Posted on 9 Comments

Island Batik Ambassador- May 2023 Project- Island Pop Quilt- Part of the Tool Craze Blog Hop

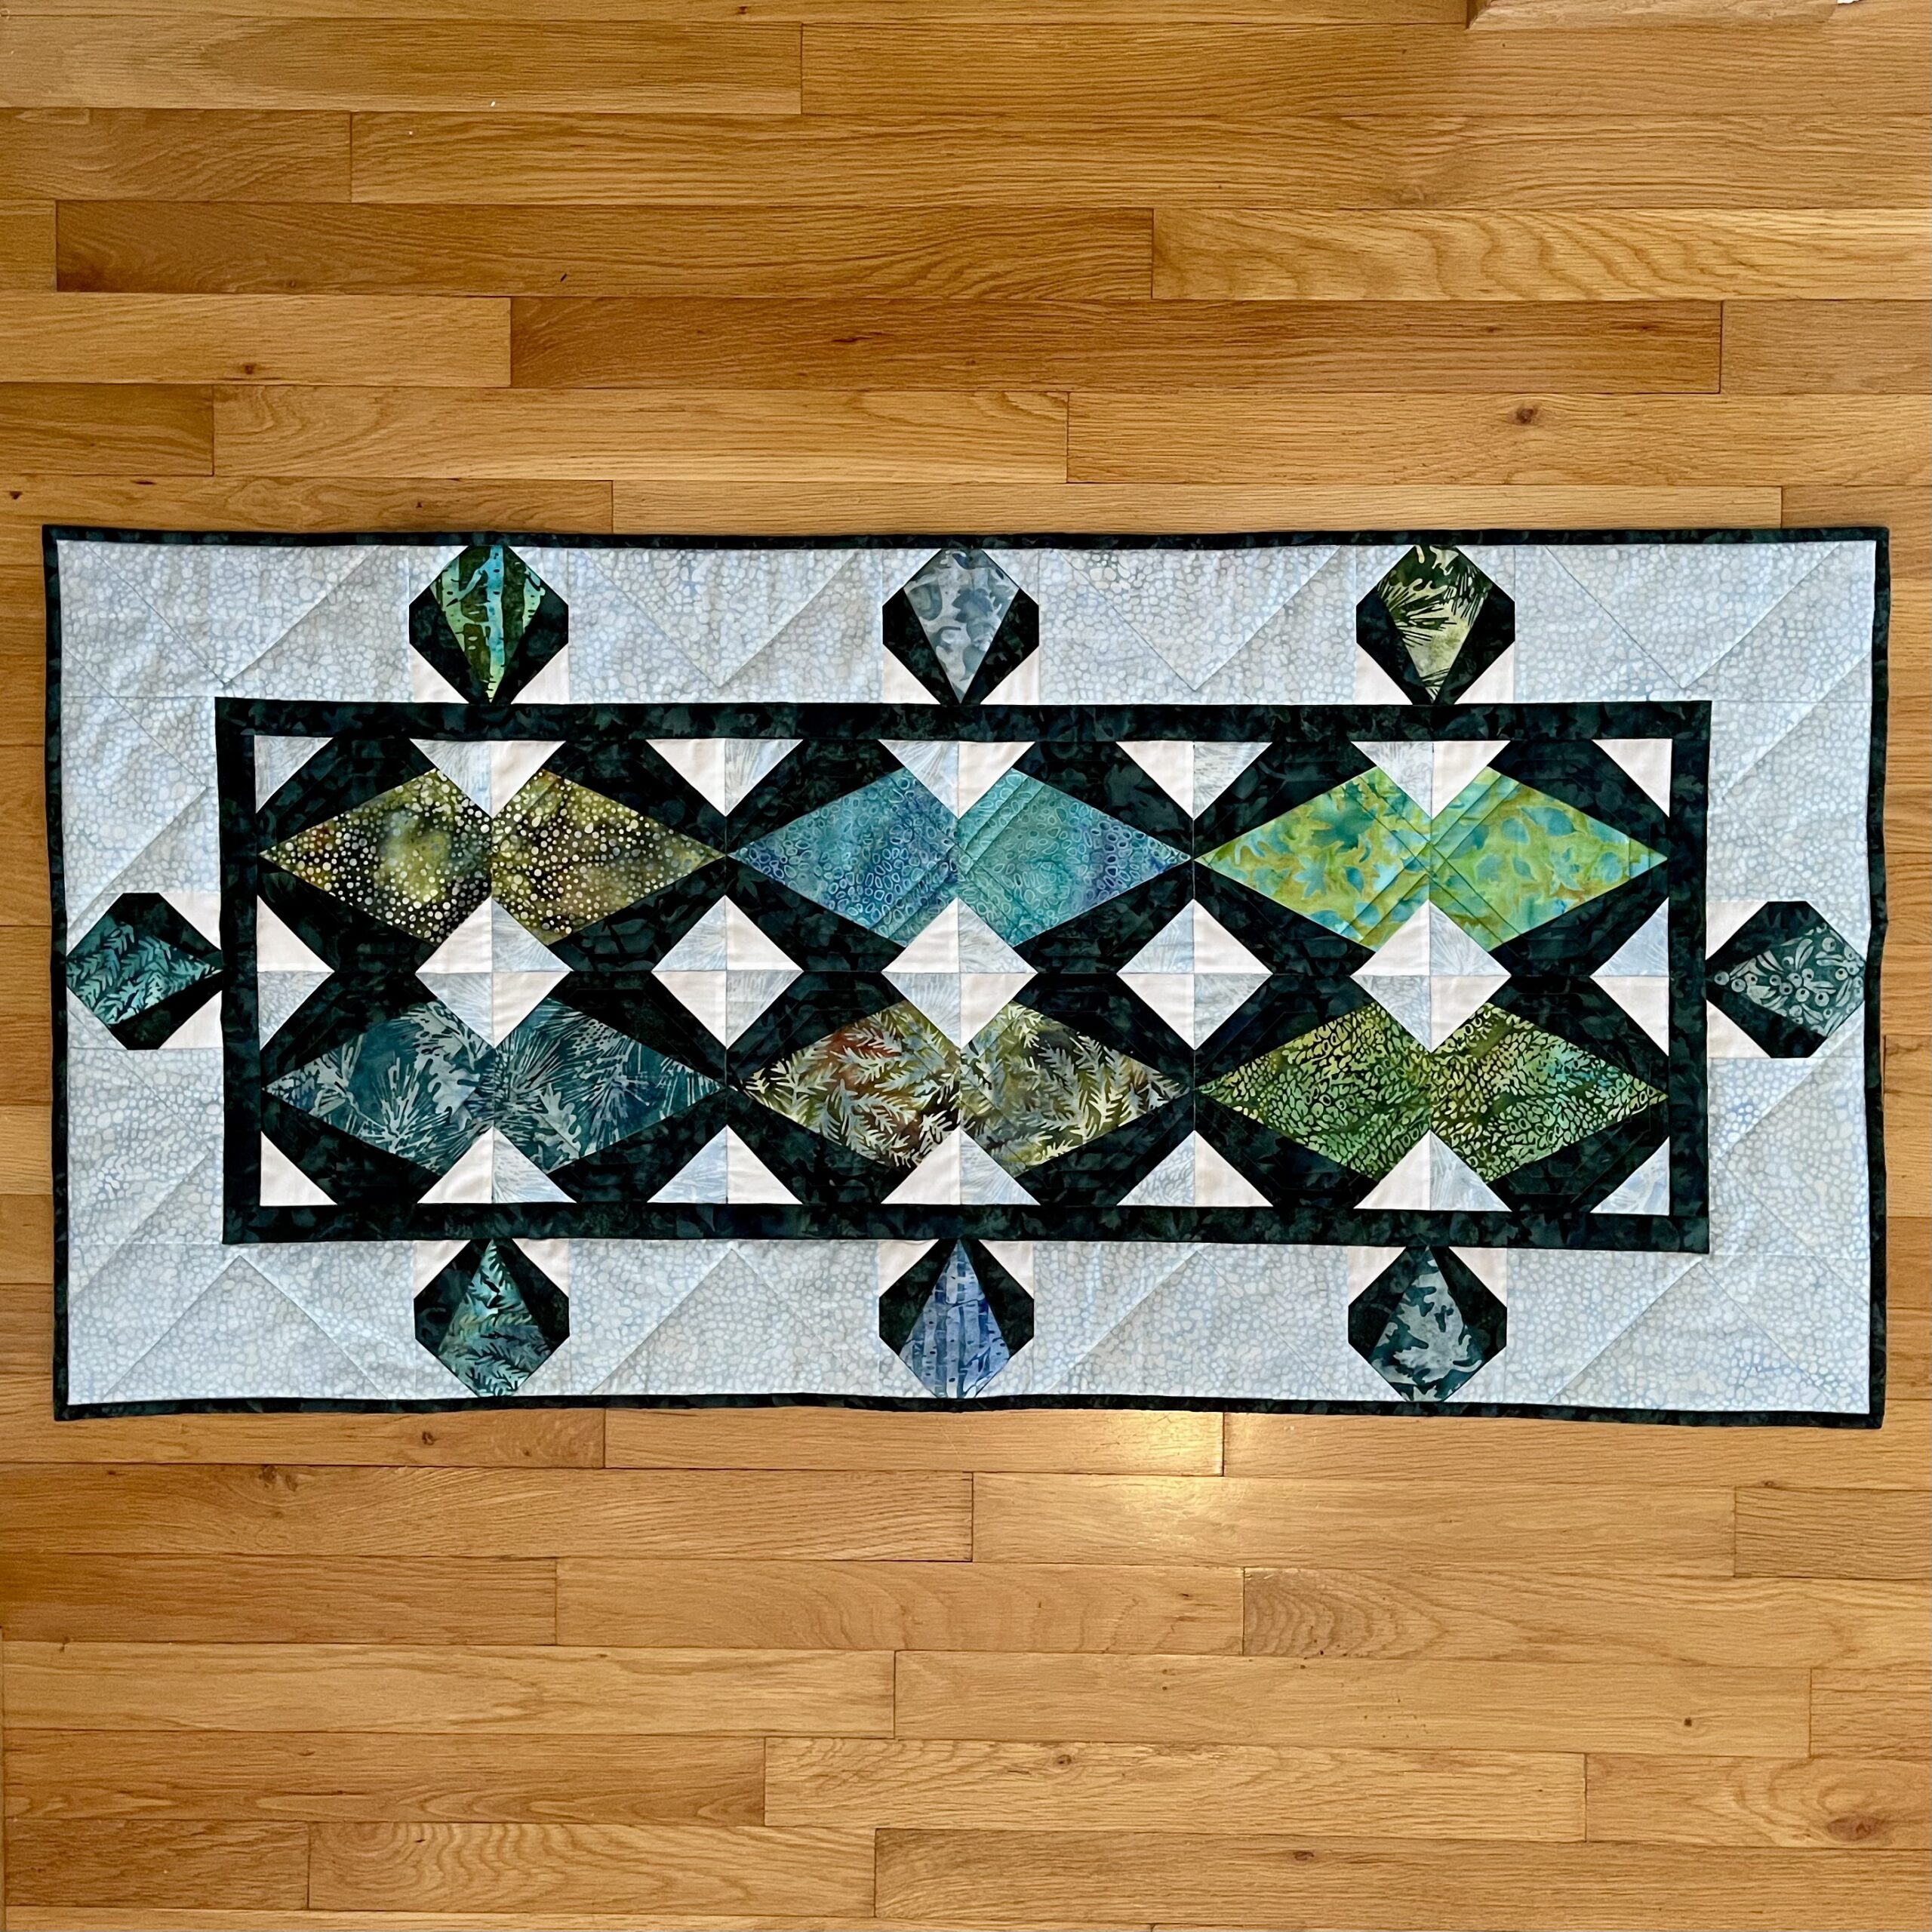
Island Pop Table Runner

This month’s blog hop is called Tool Craze as the Island Batik Ambassadors will all be making any size project using different upcoming fabric collections from Island Batik and a provided Studio 180 Design tool. I am looking forward to seeing all the wonderful projects that will be created during this month’s Island Batik blog hop. Since this month is a blog hop, you can check out the Island Batik blog and enter each week to win a fat quarter bundle of some of the fabrics the Ambassadors are using in their projects. I will show the other fabric collections later in this blog along with a link to the giveaway from Island Batik and links to other ambassador’s blogs.

Tool Craze
Tool Craze


I love the fabric I was given to use: Maple Island by Kathy Engle. Just look at this gorgeous collection of blue and green batik fabrics with a woodland theme.  The Maple Island collection may be found at your local quilt shop that carries Island Batik, such as Boutique4quilters in Melbourne, FL and Fabric Smart in St. Petersburg FL. This collection should be in your local quilt shop this summer. You may find them online at https://www.boutique4quilters.com/ or call them at (321) 768-2060 or www.fabric-smart.com or call them at (727) 914-8850. Another online option for you to shop for this fabric would be Hancocks of Paducah: Hancocks of Paducah

Maple Island
Maple Island


The table runner I made is 22″ x 46.” It has various shades of blue and green, along with  white. The Maple Island collection has many natural elements like leaves, ferns, berries, pinecones and tree bark. I originally was going call this project “Into the Woods”, but ultimately decided to call it “Island Pop” to incorporate the Corner Pop tool into the name. Making this table runner was easy and fun thanks to the Studio 180 Design tools.

Island Pop Table Runner

Here are several closeups of the Maple Island batik bundle I was provided. The first photo shows the bundle with the Corner Pop tool and the second photo is from one of my Tik Tok videos I made about this quilt. My username on TikTok is BlueBearQuilts.

Maple Island fabric and Corner Pop tool
Maple Island selection

I used my Electric Quilt 8 software to design this table runner. The first photo is a quilt I thought of doing which uses the Studio 180 Design Split Rects and Corner Pop tools. I decided to go with the table runner in the second photo, which was made with the V Block tool and the Corner Pop tool, as it had less pieces and I think it showcases the Maple Island Collection nicely. I also like the 3d effect that the Corner Pop tool created in the dark green background. Also, another aspect of this project was to make the blocks in various sizes using the Studio 180 Design tools. I really liked how the smaller version of the blocks looked in the border.

Alternative Quilt
Alternative Quilt


Island Pop Table Runner

The first step in making this table runner is to make the V Blocks aka triangle in a square blocks. Below are the completed V blocks. Don’t they look lovely in the Maple Island Collection? If you want to see in detail a demonstration of me using the Studio 180 Design tools, I will provide a link below to a You Tube video where I show how I made this runner.

V Blocks
V Blocks

The Studio 180 Design V block tool makes it so easy to make these blocks in multiple sizes. The instructions tell you what size strip to cut for the various finished sized blocks. The triangles are cut out extremely accurately using the V block tool. Look how nice this cut out triangle looks.

Cutting triangles with V Block tool


cut triangle piece
cut triangle piece

Next, you cut out the side triangle pieces. they are cut from strips that are the same size as the triangle. When you have the folded strip right sides together you will get the required mirrored image pieces that you need to make the V block.  

Cutting triangle sides with V Block tool

It is important to lay out the block before sewing so that you have the left and right side triangle pieces in the correct location. This is not as necessary with batiks, but it is something to be mindful of. A little known fact is that there really is a right side to batik fabrics. You can keep track out the right side of a batik fabric by being mindful of the fold as it comes off of the bolt. The fabric is always folded with the right side on the outside of the folded fabric. 

V Block laid out
V Block laid out

The pieces are easily sewn together by matching the tips on both ends and then sewing 1/4″ along the edge. I pressed mine toward the dark green fabric. 

The V blocks are oversized and are easily trimmed up with the tool. Below are pictures of the large and small V blocks all trimmed up. You wouldn’t believe how easy it was to make these blocks in several sizes using the Studio 180 Design V Block tool. 

large V Block
large V Block
small V Block
small V Block

Now it is time to use the Corner Pop tool, from Studio 180 Design, to give the V Blocks some pop in the corners.


The Corner Pop tool has two sections to it. The first section is where you trim off a corner of a previously made block. In my case, the V blocks. This is similar to a stitch and flip method, but with less waste of the fabric. If you know what size square you need to do a stitch and flip, the instructions tell you which line to use to cut off the corners of the block. The instructions also tell you what size squares to cut out and then cut in half diagonally to make the oversized half square triangle corners. You cut the corners off with the ruler and then sew the oversized triangles onto the corners. It is easy to sew these corner triangles on as they are centered over the edge that you trimmed off the block. 

After you have sewn the corners on, it is necessary to trim up the block as the corner triangles are oversized. This trimming up allows you to have a perfect sized block when putting the quilt together.

trimming the block
trimming the block

Here is what the block looks like after is is all trimmed up.

finished Island Pop block

Once the blocks are trimmed up, they are ready to be sewn together to make the quilt top.

Corner Pop and blocks

Next I layered the quilt top, with some Hobbs Premium wool batting. I love this batting as it gives the quilt some puffy definition and is so easy to quilt with. It also gives the quilt a nice drape and doesn’t retain any fold creases.

Hobbs Heirloom Premium Wool


Here are a few more images of the completed Island Pop Table Runner.

Island Pop Table Runner


Completed Runner
Completed Runner
left closeup
left closeup
middle closeup
middle closeup
right closeup
right closeup

Below is the image of my You Tube video for making this quilt. Here is a link to the video if you would like to watch it and see more detail of how I made the quilt:              https://youtu.be/x2aNL1xX5Uo           

You Tube Video
You Tube Video

If you like the video, please be sure to like it, share it with your friends and subscribe so you don’t miss any upcoming videos.


The supplies I used to make this project were provided by:

Island Batik Maple Island collection

Studio 180 Design Corner Pop tool

Aurifil 50 wt Thread

Schmetz 70/10 Quilting needle

Hobbs Batting Heirloom Wool Batting


IB-Aurifil-Schmetz

Studio 180 Design
Studio 180 Design
Hobbs Batting
Hobbs Batting

If you are on TikTok, be sure to check out the video I have posted of the table runner. (Look for Blue Bear Quilts)

Blue Bear hopes you like this table runner. Please let him know how much you love the this table runner by writing to him in the comments!

The other amazing Island Batik Ambassadors are also posting their May Blog Hop Tool Craze projects.  Check out their projects by clicking on the links next to their names to be directed to their blog posts.

WEEK 1

May 1

Celebrate
Celebrate


Susan Deshensky, Lady Blue Quilts

Randi Jones, Randi’s Roost

May 2

holiday-at-home
holiday-at-home


Elita Sharpe, Busy Needle Quilting

Mania Hatziioannidi, Mania for Quilts

May 3

Let it Snow
Let it Snow


Brittany Fisher, Bobbin with Brittany

Pamela Boatright, Pamela Quilts

May 4

Make a Wish
Make a Wish


Denise Looney, For the Love of Geese

Connie Kauffman, Kauffman Designs

May 5

Blog Hop Round-Up Week 1 and Giveaway

WEEK 2

May 8

maple island
maple island


Reed Johnson, Blue Bear Quilts   Thanks for stopping by!

Sandra Starley, Textile Time Travels

May 9

Sandalwood
Sandalwood


Gail Sheppard, Quilting Gail

Lana Russel, Lana Quilts

May 10

Sea Cookies
Sea Cookies


Emily Leachman, The Darling Dogwood

Claudia Porter, Create with Claudia

Anorina Morris, Samelia’s Mum

May 11

Sorbet
Sorbet


Brenda Alburl, Songbird Designs

Jennifer Thomas, Curlicue Creations

May 12

Blog Hop Round-Up Week 2 and Giveaway

WEEK 3

May 15

Summer Twilight
Summer Twilight


Victoria Johnson, Forever Quilting for You

Maryellen McAuliffe, Mary Mack Made Mine

Leah Malasky, Quilted DelightsLisa Pickering, Lisa’s Quilting Passion

May 16

Sunny Meadow
Sunny Meadow


Sarah Pitcher, Pitcher’s Boutique

Renee Atkinson, Pink Tulip Quilting

May 17

Wild Blooms
Wild Blooms


Preeti Harris, Sew Preeti Quilts

Suzy Webster, Websterquilt

Lisa Pickering, Lisa’s Quilting Passion

May 18

End of Blog Hop + Final Round Up

week-2-prize
week-2-prize
The first of the Tool Craze Up Blog Hop giveaways, from Island Batik, started on Sunday, April 30th!
Two lucky winners will each receive a bundle of new collections that will be featured this week – Sorbet by Claudia Pfeil of Claudia Pfeil Design or Sea Cookies, designed Kate Colleran by Kate Colleran Designs, LLC. Don’t miss out on your chance to add these beautiful batiks to your stash. Enter now and every week during the  Tool Craze Blog Hop:

To enter for your chance to win one of the two prizes above, follow the simple Rafflecopter prompts below.

a Rafflecopter giveaway

This giveaway ends on May, 12th at 11:59 pm PDT. Two random winners will be notified by email on May, 13rd and announced on the Island Batik Facebook page on May, 16th. If the winners do not respond within the first three days after being notified, two new random winners will be chosen. Please check your spam folders! If the winners do not respond within the first two days after being notified, two new random winners will be chosen and notified.

Make sure to follow Island Batik on social media to hop along with the Tool Craze Blog Hop. Be sure to check out the Island Batik Blog.

#islandbatikambassador #islandbatik #studio180design #iloveislandbatik #hobbsbatting #aurifil #aurifilthread #schmetzneedles #doyoueq #Janome #tool crazebloghop #electricquilt #eq8 #HancocksofPaducah #fabricsmart


Posted on 8 Comments

Island Batik Ambassador- September Project- SW 60 Quilt- Part of the Tool Talk Blog Hop

I have been waiting all year for this blog hop to get here. This month’s blog hop is called tool talk as the Island Batik Ambassadors will all be using different Studio 180 Design Rulers and different fabric collections from Island Batik.  I love the Studio 180 Design rulers as they create a slightly oversized unit which allows you to obtain great results in making your quilt. Also, most of the Studio 180 Design rulers allow you to make approximately 8 different sized units with one ruler. How awesome is that? I know you are going to see some fantastic quilts with this month’s Island Batik blog hop. Since this month is a blog hop, you can check out the Island Batik blog and enter each week to win a fat quarter bundle of some of the fabrics that the Ambassadors are using in their projects. I will show the other fabric collections later in this blog along with a link to the giveaway from Island Batik and links to other ambassador’s blogs.

tool-talk-blog-hop

The September project was to make a quilt  using an upcoming fabric line from Island Batik and a Studio 180 Design Ruler. I was so excited when the fabric I was given to use was Simply Southwest by Kathy Engle. Just look at this gorgeous collection of batik fabrics. The Simply Southwest collection may be found at your local quilt shop that carries Island Batik, such as Fabric Smart in St. Petersburg FL. You may find them online at www.fabric-smart.com or call them at 727-914-8850.

Simply Southwest

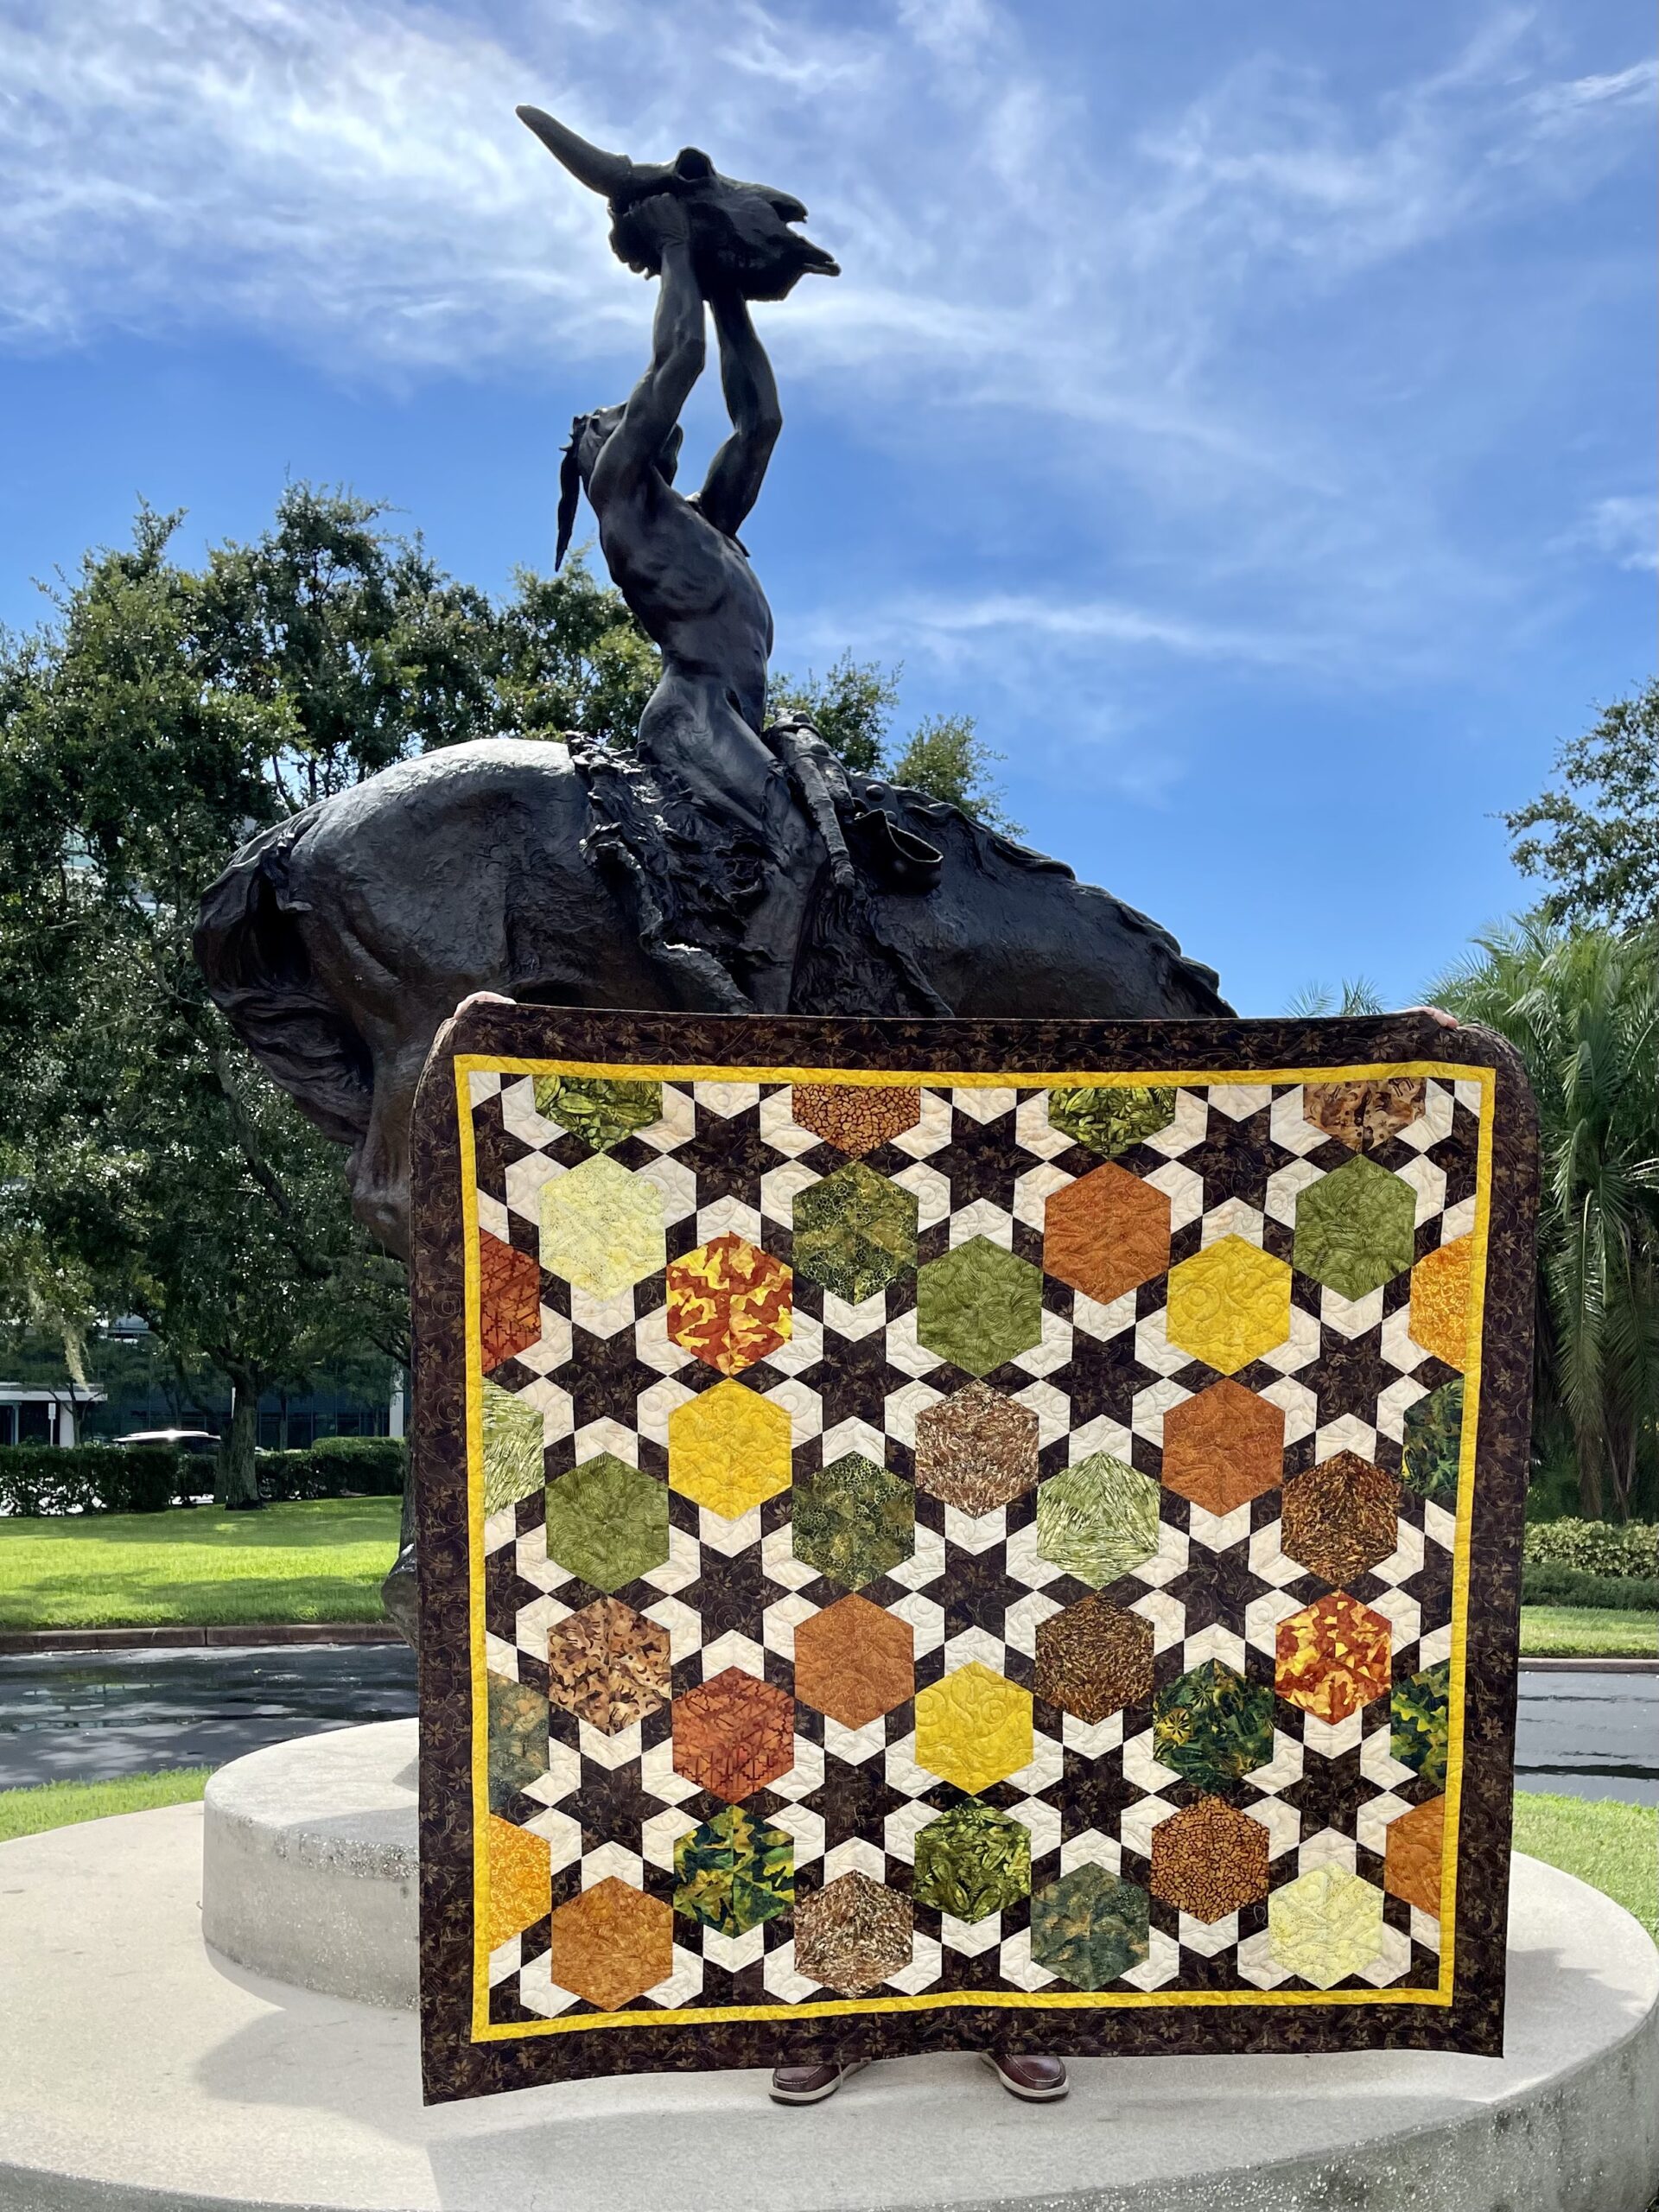
The quilt I made is called SW 60. It is a large lap quilt size 70″ x 66.” This stunning quilt has dark brown stars, highlighted in off-white, and surrounded by large hexagons in gorgeous Southwestern colors. Mr. James of the Raymond James Financial company loves to collect Southwestern art in the form of bronze statues. The art displays outside their headquarters were the perfect backdrop for a photo shoot. It’s always fun to find cool locations for the photo shoot.

SW 60 quilt
SW 60 quilt

This is one of those quilts that looks fantastic with the sun shining through it, and in these glorious fall colors, it is a very masculine quilt.

Sun shining through the quilt

The batik bundle I was provided was the Simply Southwest collection by Kathy Engle. Beauregard loves this glorious selection of rust, brown, green and yellow batiks. These fabrics are so yummy.

Simply Southwest

I downloaded the images of the fabric collection into my Electric Quilt 8 software, which is the software I use to design quilts. Here is what the quilt looked like in the software. It’s amazing how much it looks like the real quilt don’t you think? I love how the colors in this collection invite your eyes to dance across the quilt.

Star 60 quilt

When you work with a fabric collection, such as Simply Southwest from Island Batik, it makes it so easy to create a coordinated quilt. Everything just works well together.

SW 60 2

The tool I was given to work with was the Studio 180 Design Star 60 ruler and with this tool, you can create units from 1″ all the way up to 9″. The size unit I was working with was 8″. It is so awesome that you can create so many different sized block units with one ruler. With the results I was able to obtain with this ruler, I would love to try making a 1″ mini version of this quilt. The ruler also comes with an awesome set of instructions, which are very easy to follow. There are directions, and diagrams, for both left and right handed people. This came in handy with me being a lefty. Deb Tucker, the designer of these rulers, has also created fantastic videos on YouTube that give that visual presentation for  following the written instructions. Deb has also created many technique sheets, which allow you to get even more creative with this tool, as they allow you to create pieced sections within the block unit. I choose to make my diamonds, in the block units, a four patch and I used the Checkerboard 60 technique sheet instructions. There was a video you could watch for the Checkerboard 60 technique sheet as well. It is so easy to get really great results using this tool and following the instructions. I was a little intimidated in making this quilt at first, but with the Studio 180 Design Star 60 tool and following the instructions, it really was easy. The most complicated part for me was keeping all of the pieces organized as I was using so many different colors that had to be placed next to each other.

Star 60 tool

It is easy to cut out the number of side triangle shapes you need as you first cut strips and then use the ruler to cut out the triangles. There is very little waste. If you would like to see some videos of me with the quilt and how I use the Star 60 tool to cut out the various needed shapes, please go to my Tok Tok channel and YouTube channel, they are both called-Blue Bear Quilts. Here is a link to the YouTube Video:   https://youtu.be/Cl9nijmFcvI           

cut side triangles

After I had cut all of the side triangle pieces, it was time to start working on the checkerboard diamonds. They were created by sewing off-white and brown strips together and then sub cutting them into slanted rectangles. Then I sewed those slated rectangles into the pieced diamonds.

checkerboard diamond

The seams are pressed open. which will make for a flatter laying block, for which your long arm quilter will be thankful. Looks like I forgot to press one of the seams open in the picture below. Then, one end of the checkerboard diamond is trimmed so that the side triangles can be added to it.

diamond pressed open on the back


There were so many color combinations and each block unit had a different set of side triangles. In order to be organized, I needed to lay the pieces out before sewing.

laying out side triangles

The right side triangle was added first and was pressed toward the checkerboard diamond.

one side pressed toward the diamond

The left side triangle was pressed toward the left side triangle. The pressing was done this way so that the seams would nest with each other when the units were sewn together. This method of pressing worked for the majority of the block units in this quilt.

other side pressed toward the side triangle

In order to keep this quilt organized as I was making it, it was necessary to number the block units with a label.

each unit is labeled

I made a numbered chart so that I would know where all of the block units were positioned in the quilt. This was absolutely necessary since I was working with so many different colored fabrics. As I completed the units, I colored them in with colored pencils.

organization of the units

Finally, it was time to trim up the block units using the Star 60 tool. First the two sides were trimmed, as shown in the picture below, and then the ruler was repositioned to trim the bottom.

Star 60 tool trims up the units

As you can see, there is very little waste when trimming up the units with this tool. If you are a quilter who does not like to waste fabric, then the Studio 180 Design rulers are for you.

units all trimmed up

Once the units were trimmed up, I sewed three of them together to form a larger triangle.

units formed into larger triangles

Next, I sewed the larger triangles together to form a larger diamond. Doesn’t the back look so nice and pressed flat? I was able to achieve this by following the pressing directions with the tool instructions.

triangles sewn together to great larger diamonds

Finally, the larger diamonds were sewn into rows and then the rows were sewn together. I pressed all of these seams open.

larger diamonds sewn together in rows

Since the quilt had a Southwestern theme, I wanted a Southwestern quilting design. The brown fabric has longhorn skulls on it as you can see in the picture below. So at Urban Elements,  I found this quilting design called Roundup with a longhorn skull and stars on it. Isn’t it just perfect for this quilt? 

longhorn stitching

 I purchased the design and loaded it onto a thumbnail drive to bring to my long armer. My long armer for this quilt was Kim from Sunshine quilts. Didn’t she do a fantastic job with this design? Here is a link to her Facebook page if you would like to bring, or send, your quilts to her: Sunshine Quilts.

longhorn stitching from the back


White 50 wt. Aurifil thread was my selection to piece the blocks. I used a 80/12 universal needle from Schmetz Needles. For the batting, I used Hobbs Heirloom Premium 80/20 batting. 

Hobbs Heirloom Premium 80/20

The supplies I used to make this project were provided by:

Island Batik Simply Southwest for the top.

Aurifil 50 wt Thread

Hobbs Heirloom Premium 80/20

Schmetz 70/10 Quilting needle

Studio 180 Designs Star 60 Ruler

Prairie Spirit Alpacas alpaca wool pressing mat
 
Product sponsors
Hobbs Batting
Hobbs Batting

If you are on TikTok, be sure to check out the video I have posted of me with the quilt. (Look for Blue Bear Quilts)

Blue Bear hopes you like this quilt. Please let him know how much you love the this quilt by writing to him in the comments!

The other amazing Island Batik Ambassadors are also posting their September Blog Hop Tool Talk quilts.  Check out their projects by clicking on the links next to their names to be directed to their blog posts.

WEEK 1

September 6

Gail Renna, Quilt Haven Threads

Michelle Roberts, Creative Blonde Gifts

September 7

Sandra Starley, Textile Time Travels

Jennifer Thomas, Curlicue Creations

September 8

Brenda Alburl, Songbird Designs

Jennifer Fulton, Inquiring Quilter

September 9

Blog Hop Round-Up Week 1 and Giveaway

WEEK 2

September 12

Lisa Pickering, Lisa’s Quilting Passion

Suzy Webster, Websterquilt

September 13

Denise Looney, For the Love of Geese

Gail Sheppard, Quilting Gail

September 14

Preeti Harris, Sew Preeti Quilts

Connie Kauffman, Kauffman Designs

September 15

Megan Best, Bestquilter

Maryellen McAuliffe, Mary Mack Made Mine

September 16

Blog Hop Round-Up Week 2 and Giveaway

WEEK 3

September 19

Elizabeth DeCroos, Epida Studio

Jane Hauprich, Stitch by Stitch Custom Quilting

September 20

Emily Leachman, The Darling Dogwood

Andi Stanfield, True Blue Quilts

September 21

Leah Malasky, Quilted Delights

Claudia Porter, Create with Claudia

September 22

Mania Hatziioannidi, Mania for Quilts

Reed Johnson, Blue Bear Quilts

September 23

Blog Hop Week 3 Round Up + giveaway

WEEK 4

September 26

Pamela Boatright, Pamela Quilts

September 27

Anorina Morris, Samelia’s Mum

Brianna Roberts, Sew Cute and Quirky

September 28

End of Blog Hop + Final Round Up

Week-3-Paisley-Got-Mod-Silverado-Canyon

The giveaway of the Blog Hop started on Friday, June 3rd. Each week two lucky winners will each get one Fat Quarter bundle of a complete Island Batik collection. This week, it is Paisley Got Mod by Kate Colleran Designs or Silverado Canyon by Kathy Engle! To enter for your chance to win one of the two prizes above, follow the simple Rafflecopter prompts below.

a Rafflecopter giveaway

This giveaway ends on September, 23rd at 11:59 pm PDT. Two random winners will be notified by email on September, 24th and announced on our Facebook page on September, 27th. If the winners do not respond within the first two days after being notified, two new random winners will be chosen. Please, check your spam folders!

Make sure to follow Island Batik on social media to hop along with the Tool Talk Blog Hop. Be sure to check out the Island Batik Blog.

#islandbatikambassador #islandbatik #iloveislandbatik #hobbsbatting #aurifil #aurifilthread #schmetzneedles #doyoueq #Janome #studio180design #tooltalkbloghop #Star60