Posted on 32 Comments

Island Batik Ambassador- December Project- Reach For the Stars Quilt- Part of the Lone Star Blog Hop

Reach For the Stars quilt

Happy Holidays! This month’s blog hop is called Lone Star as the Island Batik Ambassadors will all be making a lone star quilt using different fabric collections from Island Batik. I love the look of Lone Star quilts and I know you are going to see some awesome quilts with this month’s Island Batik blog hop. Since this month is a blog hop, you can check out the Island Batik blog and enter each week to win a fat quarter bundle of some of the fabrics that the Ambassadors are using in their projects. I will show the other fabric collections later in this blog along with a link to the giveaway from Island Batik and links to other ambassador’s blogs.

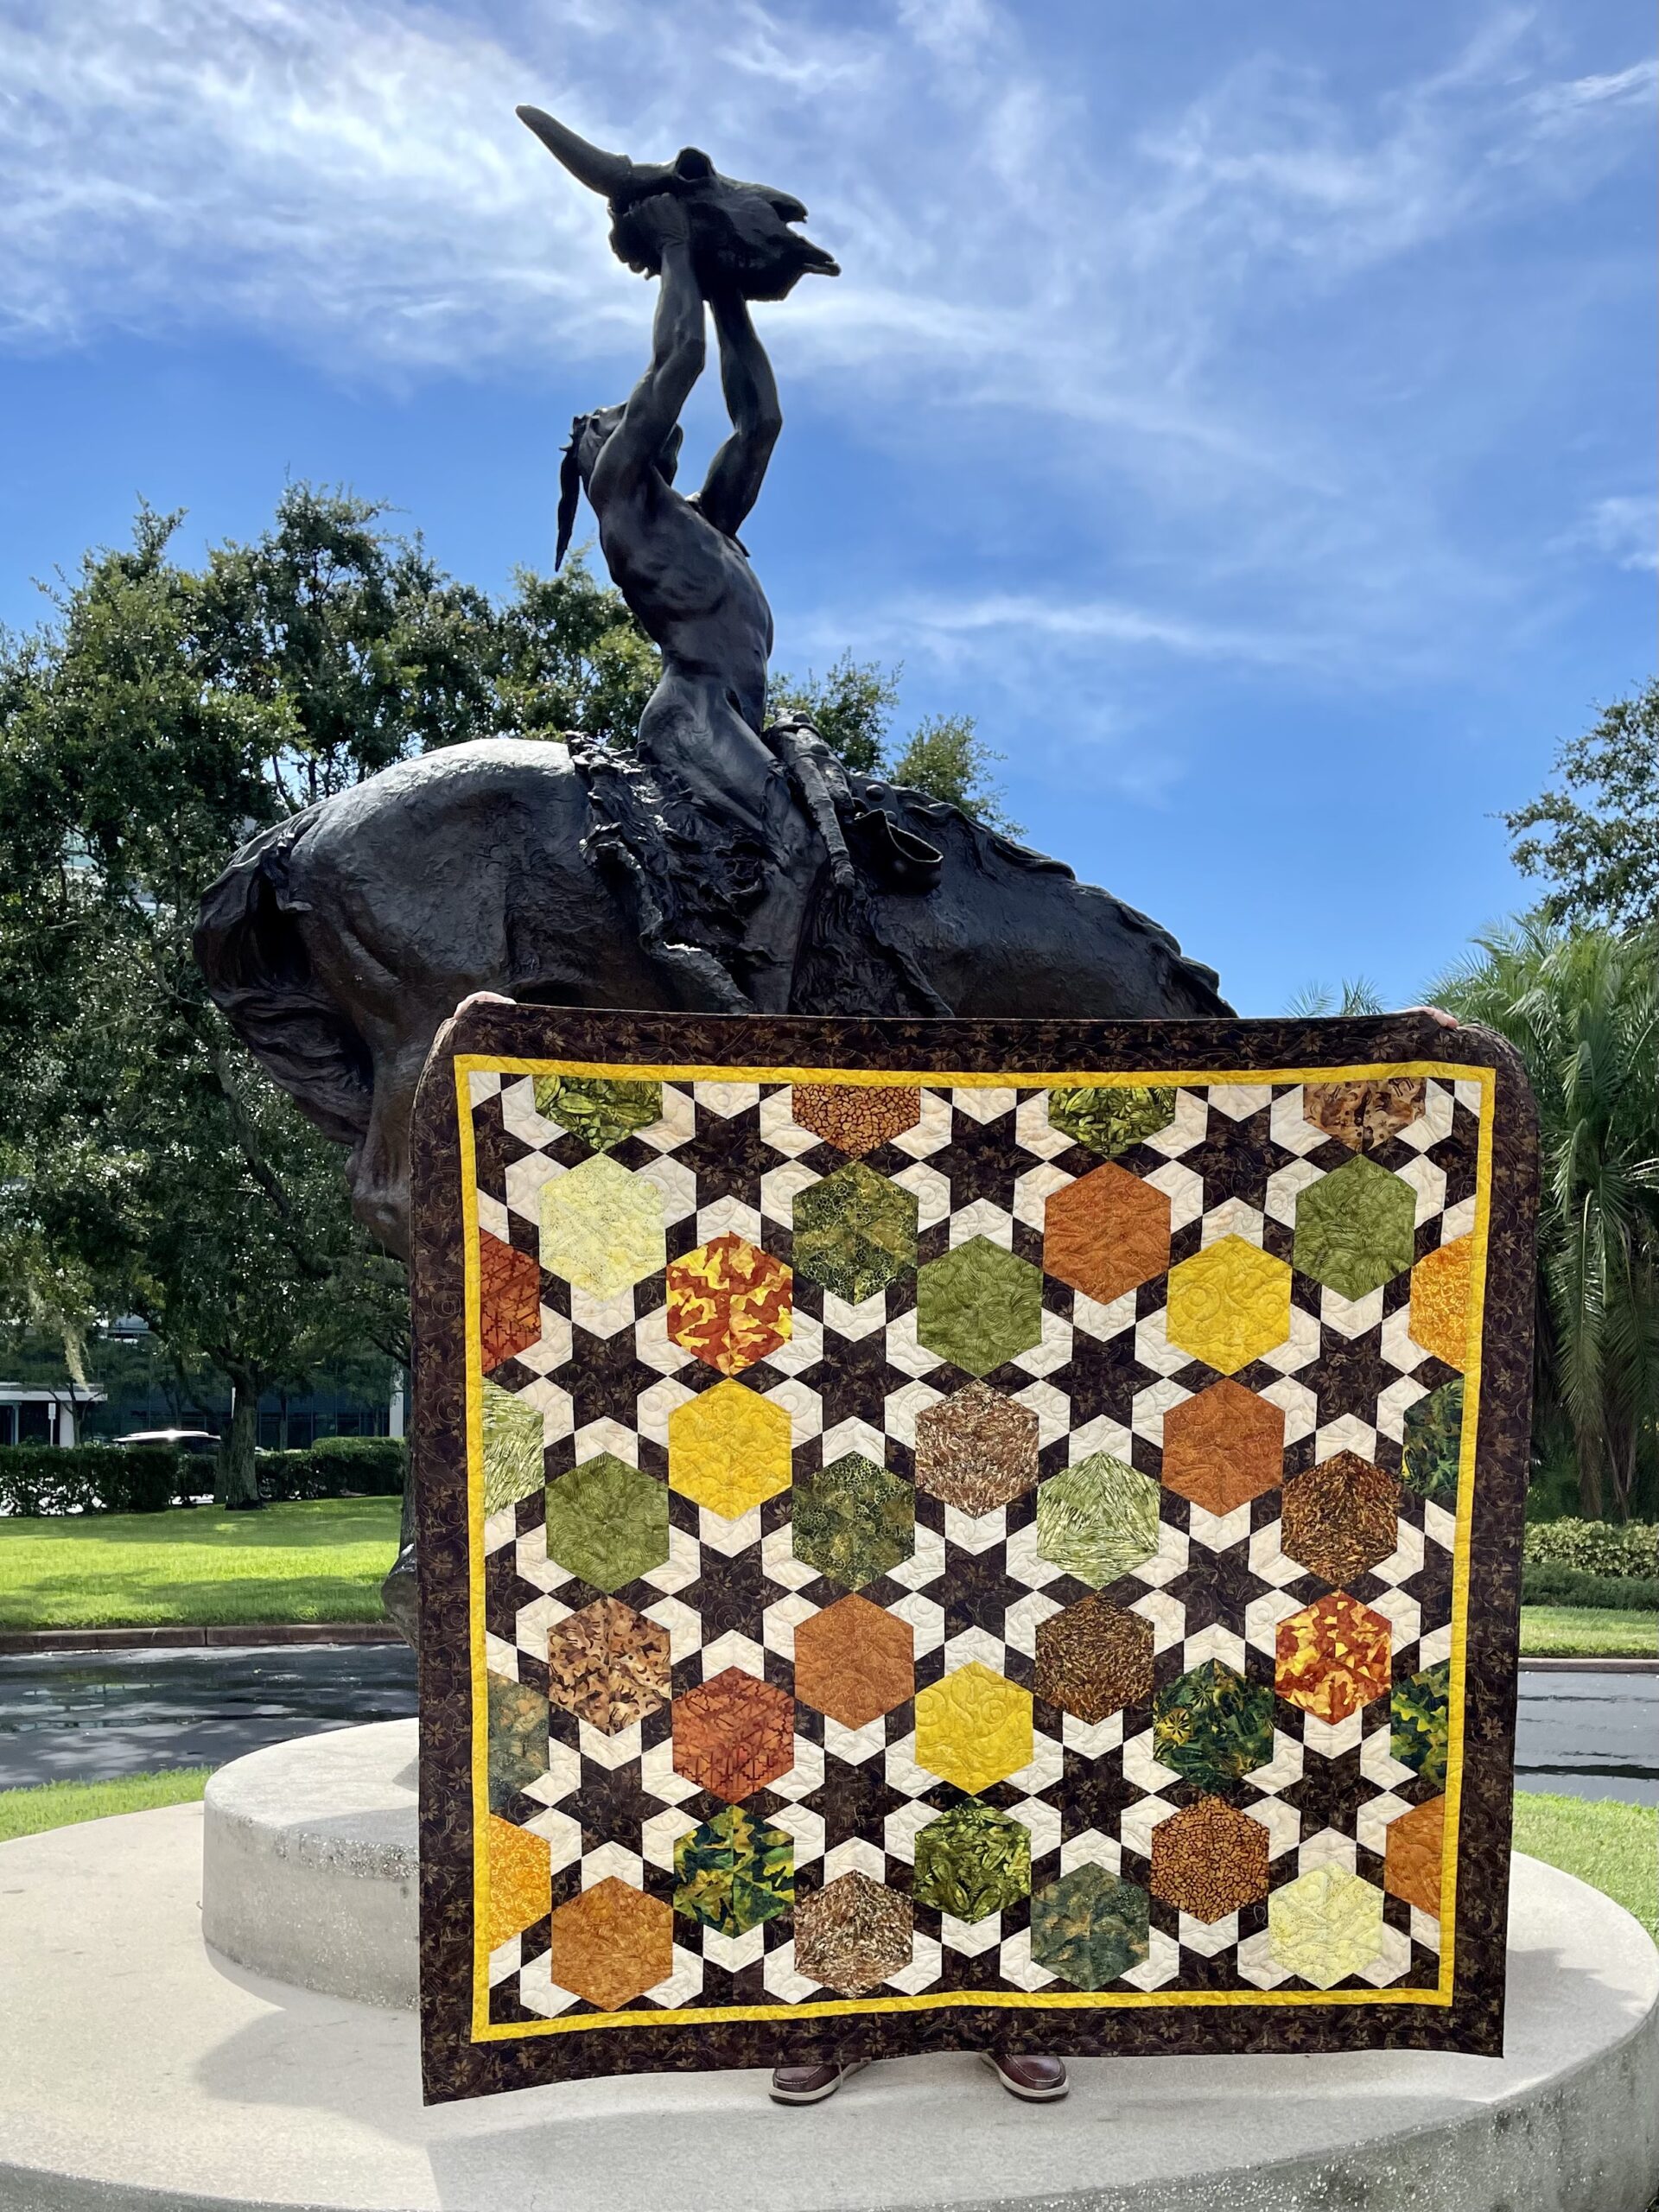
I have always liked lone star quilts and yet I have never made one. A very special lone star quilt that I saw in South Dakota is part of the Dignity Statue. This statue is massive. The Dignity Statue is a tribute to the Lakota people of South Dakota. The image of the star quilt is a reminder of the importance of generosity in Lakota culture and is one of the most valued gifts one can receive. Also, if you are looking for some additional inspiration for Lone Star quilts, there are a lot of them featured in the 24th issue of Quiltfolk, which is about South Dakota quilters.

Dignity Statue
Dignity Statue


Dignity Lone Star
Dignity Lone Star


Quiltfolk SD
Quiltfolk SD

The December project was to make a lone star quilt using an upcoming fabric line from Island Batik. I love the fabric I was given to use: Copperfield by Claudia Pfeil. Just look at this gorgeous collection of batik fabrics. The Copperfield collection may be found at your local quilt shop that carries Island Batik, such as Fabric Smart in St. Petersburg FL. You may find them online at www.fabric-smart.com or call them at 727-914-8850.

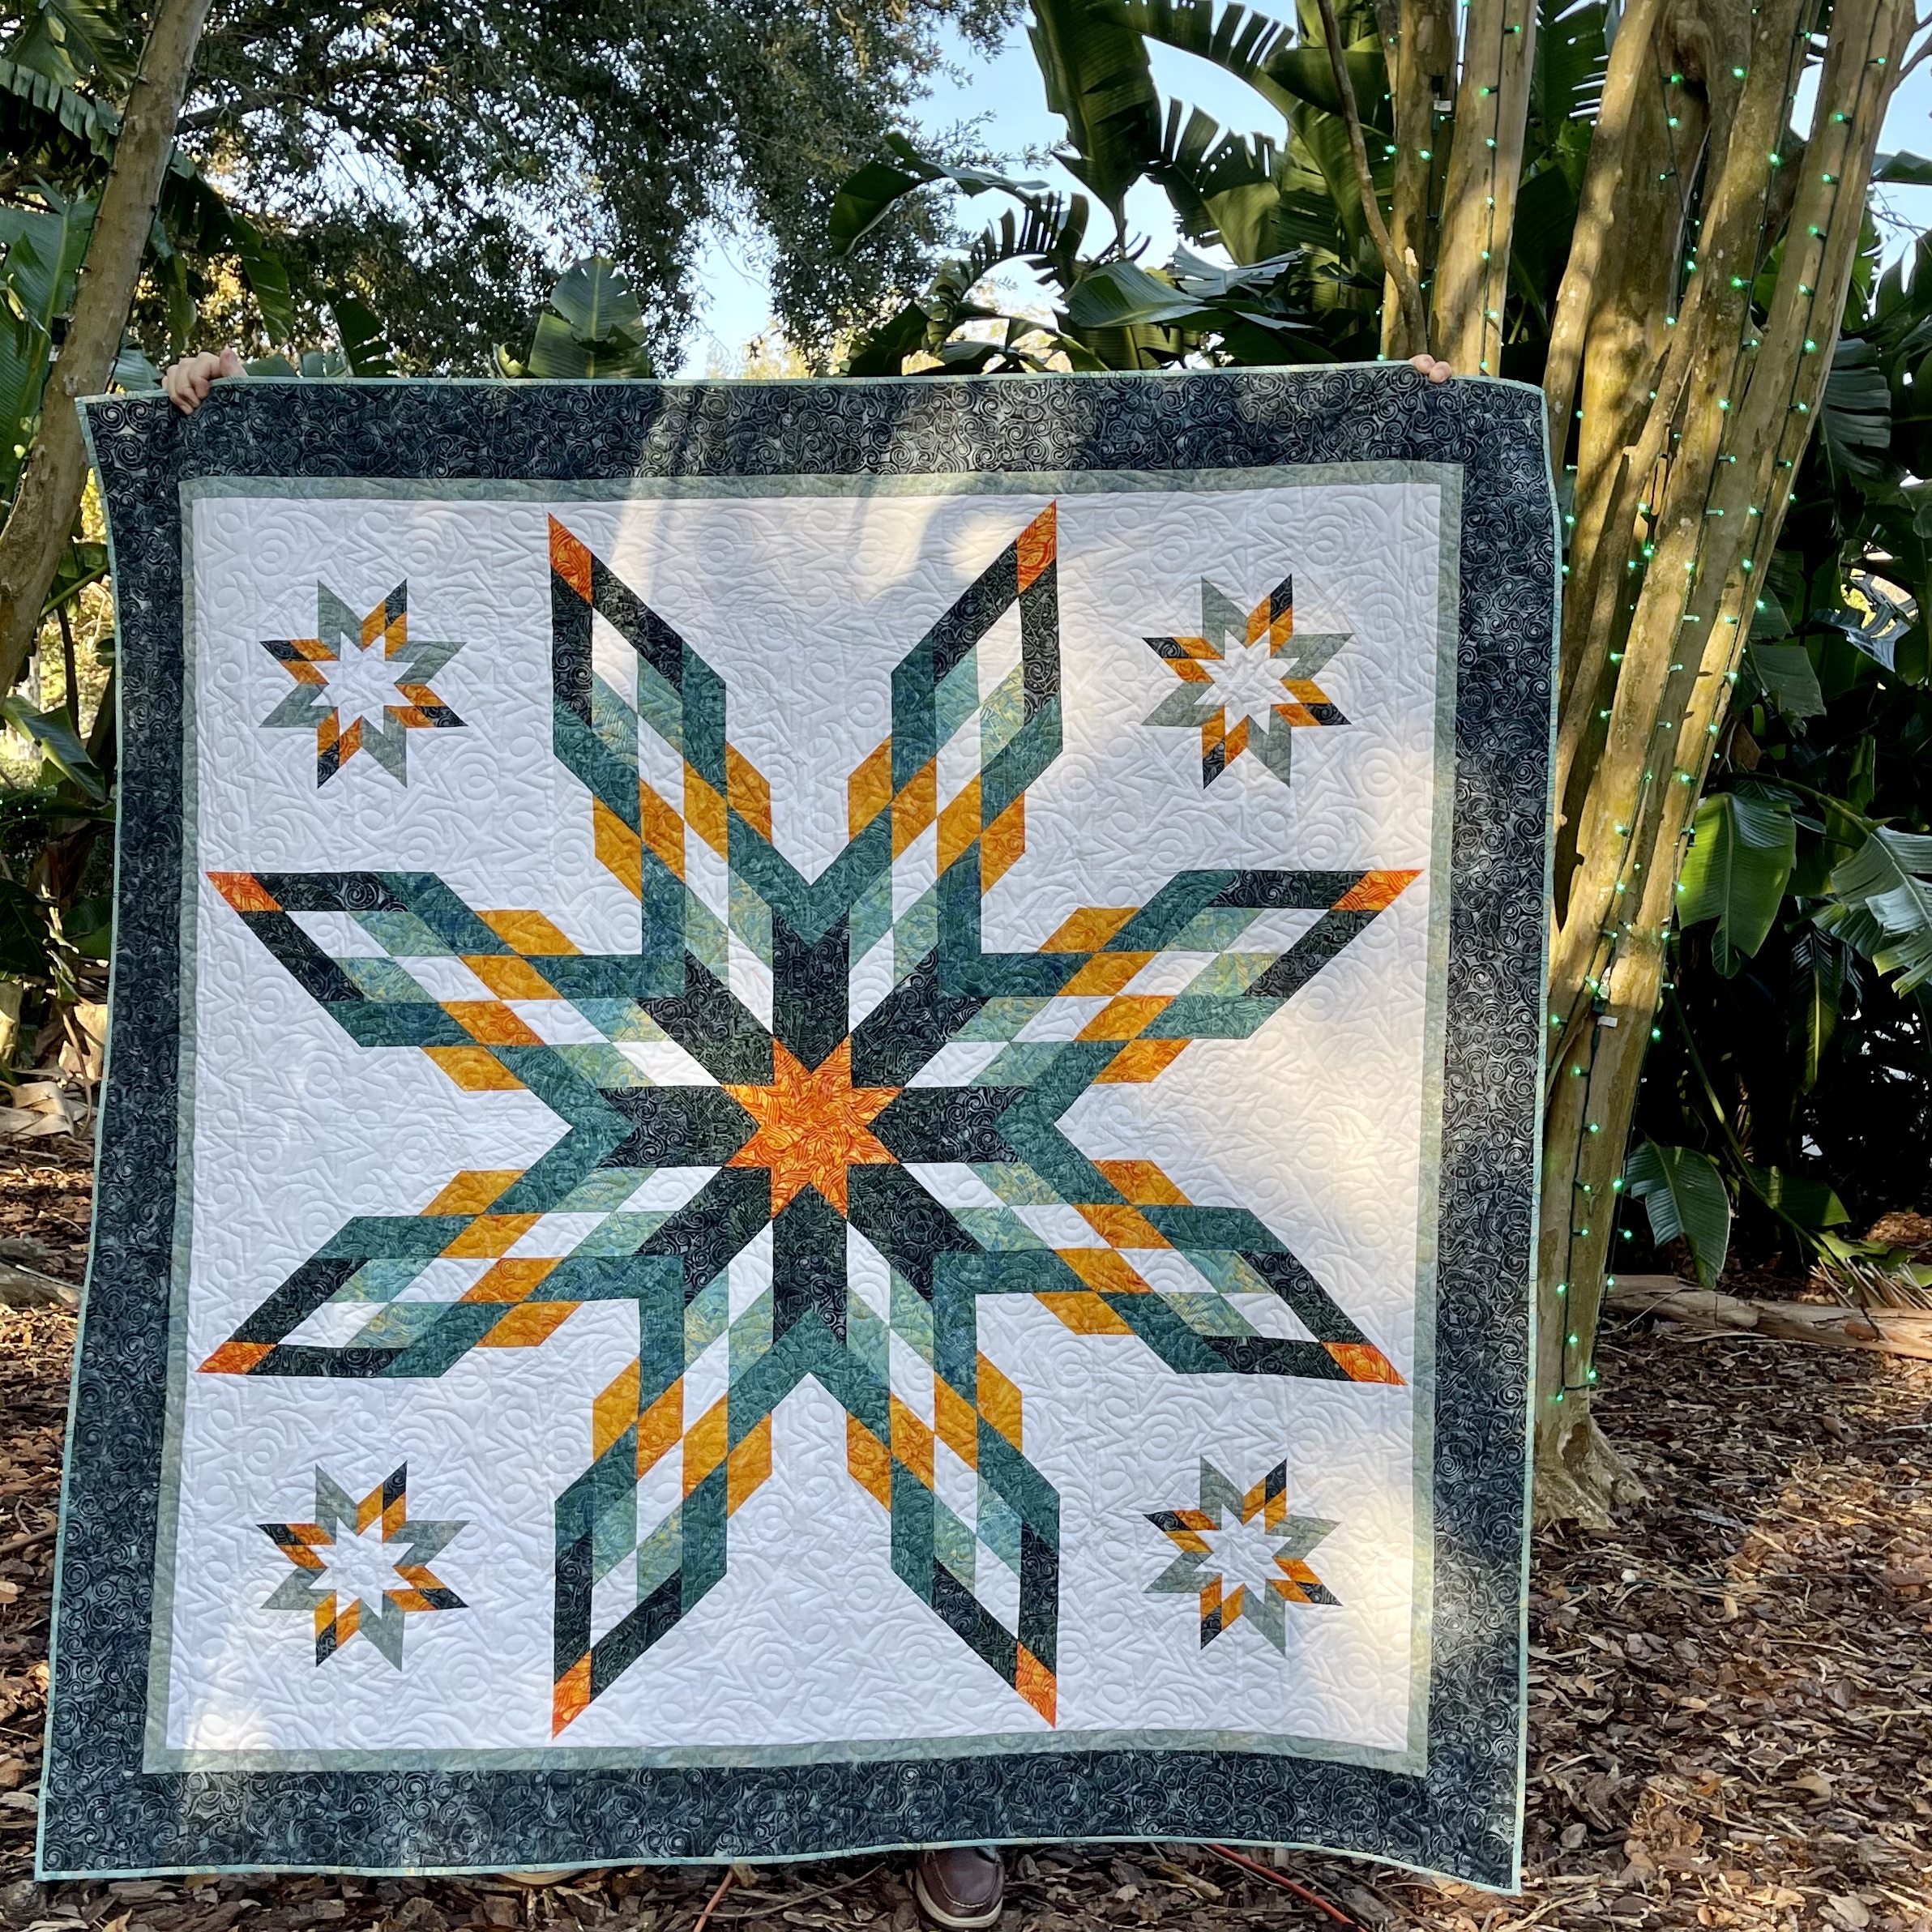
The quilt I made is called Reach For the Stars. It is a large lap sized quilt- 58″ x 58.” This striking quilt has shades of orange and shades of green on a white background. It’s a more modern lone star in that it has numerous white diamonds that create an open, lacy look to the main star. I live near Central Park- no, not that Central Park, and every year the whole park is lit up with holiday lights and they have a carnival with amusement rides. It was the perfect location to take pictures of this quilt.

Reach For the Stars quilt


quilt ornament
quilt ornament
quilt at the carnival


Quilt on the Merry-Go-Round

Here is a closeup of the Copperfield batik bundle I was provided. What a beautiful selection of orange and green batiks. 

Copperfield
Copperfield

These are the fabrics I chose from the collection to incorporate into my quilt along with white background fabric.

fabrics for quilt
fabrics for quilt

I used my Electric Quilt 8 software to design this quilt. This is what the quilt looked like in the software. This combination of fabrics, with this layout, causes the main star in the quilt to radiate outwards. I think it has this effect even more so in the actual quilt.

Computer lone star
Computer lone star

Now that I had the fabrics and the design, I had to figure out how I was going to make this quilt as I had never made a lone star quilt before. Thanks to my good friend, Eleanor Burns of Quilt in a Day, and her book, Radiant Star Quilts, I knew that I would be able to successfully make this quilt.

Radiant Star Quilts
Radiant Star Quilts

You probably know that Eleanor is a stripper and one method for making a lone star quilt involves sewing strips together. The other method is to sew lots of diamonds together. I wanted to use the strip method in the Quilt in a Day book. You need a lot of strips, so I got out my Creative Grids Stripology Ruler and quickly cut out all the strips I needed to make this quilt. 

CG Stripology Ruler
CG Stripology Ruler

In the next step, the strips have to be sewn together in a certain order to create the diamond points of the main star. Each subsequent strip is offset downward, which creates a 45 degree angle at the end of the strip set. When sewing multiple long strips together, it is a good idea to reverse directions when sewing the subsequent strips on; i.e., start at the bottom instead of the top on every other strip. This helps to prevent bowing in your strip sets.

sewing strips together

To create the diamonds, the strip sets are then cut at an angle. This creates biased edges on the newly cut strips and you have to be careful to not stretch them when pressing and/or sewing. You trim the end at a 45 degree angle and then make subsequent cuts that are the same size as your original strips, which in my case was 2.5.”

strips cut at an angle


There were three or four different combinations of strip sets that had to be sewn together and then cut at an angle. You then have to match up the correct angled strips next to each other and sew them together. This requires a lot of organization so that you have sewn the correct strip sets together and then are sewing the correct angled strips together. The Quilt in a Day book was well written and following the detailed instructions helped with the organization. 

angled strips sewn together

One sign of a well made lone star quilt is that all those diamond points are nicely lined up. There are a lot of intersections to be matched up. In order to accomplish that, it is necessary to mark the quarter inch seam on the strips at the intersections and then hold them together with pins. It’s definitely more work, but you can see from the previous photo, that that extra effort results in nicely matched points.

marking the quarter inch seam

For the smaller inset stars, I was able to cut the strips sets at an angle with the Stripology Ruler, which has 45 degree lines on it. 

angled cuts with stripology ruler

The corner stars were created with a unique placement of the diamonds, which created an outline of a star. In order to get the corner stars the correct size, it was necessary to add setting triangles and then cut the squares down to size to match the length of the diamonds in the main star.

corner stars
corner stars

One of the more challenging aspects of making the quilt was adding the setting corners and setting triangles. They are made the correct size by measuring the length of the diamonds in the main star. Then they are sewn with inset seams. This is accomplished by marking where the quarter inch intersection is located and sewing slow to not stretch the biased edges of the pieces. You are also working with a large quilt top at this point, so there is a lot of fabric to maneuver under the needle.

adding the setting triangles

I like to piece the backing of my quilts with left over fabric from the quilt I am working on. Using many of the large leftover pieces quickly made a backing for the quilt.

Quilt back
Quilt back


The theme of the quilt is stars and thus I picked a quilting design with swirls and stars. When a quilt has a lot of sharp angles in it, it is good to pick a quilting design with curves in it as this will not compete with the quilt. 

My long armer for this quilt was Kim from Sunshine quilts. She used a really fine white thread which allows the quilting to pop in the white background areas but does not overtake the colored fabrics in the main star design. Didn’t she do a fantastic job? Here is a link to her Facebook page if you would like to bring, or send, your quilts to her: Sunshine Quilts.

quilting closeup
quilting closeup


Finally, it was time to bind the quilt and I used a green from the Copperfield collection. My Betty Bobbin sure comes in handy for keeping the binding neat while I am working with it.

Betty Bobbin
Betty Bobbin


Hobbs Heirloom Premium 80/20

The supplies I used to make this project were provided by:

Island Batik Copperfield collection.

Aurifil 50 wt Thread

Hobbs Heirloom Premium 80/20

Schmetz 70/10 Quilting needle

Prairie Spirit Alpacas alpaca wool pressing mat
 
Hobbs-Aurifil-Schmetz-IB-Alpaca.jpg

If you are on TikTok, be sure to check out the video I have posted of me with the quilt. (Look for Blue Bear Quilts)

Blue Bear hopes you like this quilt. Please let him know how much you love the this quilt by writing to him in the comments!

The other amazing Island Batik Ambassadors are also posting their December Blog Hop Lone Star quilts.  Check out their projects by clicking on the links next to their names to be directed to their blog posts.


December 5

Maryellen McAuliffe, Mary Mack Made Mine

Gail Sheppard, Quilting Gail

December 6

Megan Best, Bestquilter

Brenda Alburl, Songbird Designs

December 7

Preeti Harris, Sew Preeti Quilts

Emily Leachman, The Darling Dogwood

December 8

Jennifer Thomas, Curlicue Creations

December 9

Blog Hop Round-Up Week 1 and Giveaway

WEEK 2
December 12

Reed Johnson, Blue Bear Quilts. Thanks for stopping by!

Suzy Webster, Websterquilt

December 13

Gail Renna, Quilt Haven Threads

Jennifer Fulton, Inquiring Quilter

December 14

Denise Looney, For the Love of Geese

Claudia Porter, Create with Claudia

December 15

Leah Malasky, Quilted Delights

Andi Stanfield, True Blue Quilts

December 16

Blog Hop Round-Up Week 2 and Giveaway

WEEK 3
December 19

Mania Hatziioannidi, Mania for Quilts

Michelle Roberts, Creative Blonde Gifts

December 20

Pamela Boatright, Pamela Quilts

Connie Kauffman, Kauffman Designs

Sandra Starley, Textile Time Travels

December 21

Jane Hauprich, Stitch by Stitch Custom Quilting

Lisa Pickering, Lisa’s Quilting Passion

December 22

Brianna Roberts, Sew Cute and Quirky

Anorina Morris, Samelia’s Mum

Elizabeth DeCroos, Epida Studio

giveaway bundles
giveaway bundles

The giveaway of the Blog Hop started on Friday, December 2nd. Each week two lucky winners will each get one Fat Quarter bundle of a complete Island Batik collection. This week, it is Heartland or Emperor’s Treasures  by Kathy Engle! To enter for your chance to win one of the two prizes above, follow the simple Rafflecopter prompts below.

a Rafflecopter giveaway

This giveaway ends on December, 16th at 11:59 pm PDT. Two random winners will be notified by email on December, 17th and announced on our Facebook page on December, 20th. If the winners do not respond within the first three days after being notified, two new random winners will be chosen. Please check your spam folders!

Make sure to follow Island Batik on social media to hop along with the Lone Star Blog Hop. Be sure to check out the Island Batik Blog.

#islandbatikambassador #islandbatik #iloveislandbatik #hobbsbatting #aurifil #aurifilthread #schmetzneedles #doyoueq #Janome #lonestarbloghop #creativegrids #quiltfolkmagazine #electricquilt #eq8


Posted on 8 Comments

Island Batik Ambassador- September Project- SW 60 Quilt- Part of the Tool Talk Blog Hop

I have been waiting all year for this blog hop to get here. This month’s blog hop is called tool talk as the Island Batik Ambassadors will all be using different Studio 180 Design Rulers and different fabric collections from Island Batik.  I love the Studio 180 Design rulers as they create a slightly oversized unit which allows you to obtain great results in making your quilt. Also, most of the Studio 180 Design rulers allow you to make approximately 8 different sized units with one ruler. How awesome is that? I know you are going to see some fantastic quilts with this month’s Island Batik blog hop. Since this month is a blog hop, you can check out the Island Batik blog and enter each week to win a fat quarter bundle of some of the fabrics that the Ambassadors are using in their projects. I will show the other fabric collections later in this blog along with a link to the giveaway from Island Batik and links to other ambassador’s blogs.

tool-talk-blog-hop

The September project was to make a quilt  using an upcoming fabric line from Island Batik and a Studio 180 Design Ruler. I was so excited when the fabric I was given to use was Simply Southwest by Kathy Engle. Just look at this gorgeous collection of batik fabrics. The Simply Southwest collection may be found at your local quilt shop that carries Island Batik, such as Fabric Smart in St. Petersburg FL. You may find them online at www.fabric-smart.com or call them at 727-914-8850.

Simply Southwest

The quilt I made is called SW 60. It is a large lap quilt size 70″ x 66.” This stunning quilt has dark brown stars, highlighted in off-white, and surrounded by large hexagons in gorgeous Southwestern colors. Mr. James of the Raymond James Financial company loves to collect Southwestern art in the form of bronze statues. The art displays outside their headquarters were the perfect backdrop for a photo shoot. It’s always fun to find cool locations for the photo shoot.

SW 60 quilt
SW 60 quilt

This is one of those quilts that looks fantastic with the sun shining through it, and in these glorious fall colors, it is a very masculine quilt.

Sun shining through the quilt

The batik bundle I was provided was the Simply Southwest collection by Kathy Engle. Beauregard loves this glorious selection of rust, brown, green and yellow batiks. These fabrics are so yummy.

Simply Southwest

I downloaded the images of the fabric collection into my Electric Quilt 8 software, which is the software I use to design quilts. Here is what the quilt looked like in the software. It’s amazing how much it looks like the real quilt don’t you think? I love how the colors in this collection invite your eyes to dance across the quilt.

Star 60 quilt

When you work with a fabric collection, such as Simply Southwest from Island Batik, it makes it so easy to create a coordinated quilt. Everything just works well together.

SW 60 2

The tool I was given to work with was the Studio 180 Design Star 60 ruler and with this tool, you can create units from 1″ all the way up to 9″. The size unit I was working with was 8″. It is so awesome that you can create so many different sized block units with one ruler. With the results I was able to obtain with this ruler, I would love to try making a 1″ mini version of this quilt. The ruler also comes with an awesome set of instructions, which are very easy to follow. There are directions, and diagrams, for both left and right handed people. This came in handy with me being a lefty. Deb Tucker, the designer of these rulers, has also created fantastic videos on YouTube that give that visual presentation for  following the written instructions. Deb has also created many technique sheets, which allow you to get even more creative with this tool, as they allow you to create pieced sections within the block unit. I choose to make my diamonds, in the block units, a four patch and I used the Checkerboard 60 technique sheet instructions. There was a video you could watch for the Checkerboard 60 technique sheet as well. It is so easy to get really great results using this tool and following the instructions. I was a little intimidated in making this quilt at first, but with the Studio 180 Design Star 60 tool and following the instructions, it really was easy. The most complicated part for me was keeping all of the pieces organized as I was using so many different colors that had to be placed next to each other.

Star 60 tool

It is easy to cut out the number of side triangle shapes you need as you first cut strips and then use the ruler to cut out the triangles. There is very little waste. If you would like to see some videos of me with the quilt and how I use the Star 60 tool to cut out the various needed shapes, please go to my Tok Tok channel and YouTube channel, they are both called-Blue Bear Quilts. Here is a link to the YouTube Video:   https://youtu.be/Cl9nijmFcvI           

cut side triangles

After I had cut all of the side triangle pieces, it was time to start working on the checkerboard diamonds. They were created by sewing off-white and brown strips together and then sub cutting them into slanted rectangles. Then I sewed those slated rectangles into the pieced diamonds.

checkerboard diamond

The seams are pressed open. which will make for a flatter laying block, for which your long arm quilter will be thankful. Looks like I forgot to press one of the seams open in the picture below. Then, one end of the checkerboard diamond is trimmed so that the side triangles can be added to it.

diamond pressed open on the back


There were so many color combinations and each block unit had a different set of side triangles. In order to be organized, I needed to lay the pieces out before sewing.

laying out side triangles

The right side triangle was added first and was pressed toward the checkerboard diamond.

one side pressed toward the diamond

The left side triangle was pressed toward the left side triangle. The pressing was done this way so that the seams would nest with each other when the units were sewn together. This method of pressing worked for the majority of the block units in this quilt.

other side pressed toward the side triangle

In order to keep this quilt organized as I was making it, it was necessary to number the block units with a label.

each unit is labeled

I made a numbered chart so that I would know where all of the block units were positioned in the quilt. This was absolutely necessary since I was working with so many different colored fabrics. As I completed the units, I colored them in with colored pencils.

organization of the units

Finally, it was time to trim up the block units using the Star 60 tool. First the two sides were trimmed, as shown in the picture below, and then the ruler was repositioned to trim the bottom.

Star 60 tool trims up the units

As you can see, there is very little waste when trimming up the units with this tool. If you are a quilter who does not like to waste fabric, then the Studio 180 Design rulers are for you.

units all trimmed up

Once the units were trimmed up, I sewed three of them together to form a larger triangle.

units formed into larger triangles

Next, I sewed the larger triangles together to form a larger diamond. Doesn’t the back look so nice and pressed flat? I was able to achieve this by following the pressing directions with the tool instructions.

triangles sewn together to great larger diamonds

Finally, the larger diamonds were sewn into rows and then the rows were sewn together. I pressed all of these seams open.

larger diamonds sewn together in rows

Since the quilt had a Southwestern theme, I wanted a Southwestern quilting design. The brown fabric has longhorn skulls on it as you can see in the picture below. So at Urban Elements,  I found this quilting design called Roundup with a longhorn skull and stars on it. Isn’t it just perfect for this quilt? 

longhorn stitching

 I purchased the design and loaded it onto a thumbnail drive to bring to my long armer. My long armer for this quilt was Kim from Sunshine quilts. Didn’t she do a fantastic job with this design? Here is a link to her Facebook page if you would like to bring, or send, your quilts to her: Sunshine Quilts.

longhorn stitching from the back


White 50 wt. Aurifil thread was my selection to piece the blocks. I used a 80/12 universal needle from Schmetz Needles. For the batting, I used Hobbs Heirloom Premium 80/20 batting. 

Hobbs Heirloom Premium 80/20

The supplies I used to make this project were provided by:

Island Batik Simply Southwest for the top.

Aurifil 50 wt Thread

Hobbs Heirloom Premium 80/20

Schmetz 70/10 Quilting needle

Studio 180 Designs Star 60 Ruler

Prairie Spirit Alpacas alpaca wool pressing mat
 
Product sponsors
Hobbs Batting
Hobbs Batting

If you are on TikTok, be sure to check out the video I have posted of me with the quilt. (Look for Blue Bear Quilts)

Blue Bear hopes you like this quilt. Please let him know how much you love the this quilt by writing to him in the comments!

The other amazing Island Batik Ambassadors are also posting their September Blog Hop Tool Talk quilts.  Check out their projects by clicking on the links next to their names to be directed to their blog posts.

WEEK 1

September 6

Gail Renna, Quilt Haven Threads

Michelle Roberts, Creative Blonde Gifts

September 7

Sandra Starley, Textile Time Travels

Jennifer Thomas, Curlicue Creations

September 8

Brenda Alburl, Songbird Designs

Jennifer Fulton, Inquiring Quilter

September 9

Blog Hop Round-Up Week 1 and Giveaway

WEEK 2

September 12

Lisa Pickering, Lisa’s Quilting Passion

Suzy Webster, Websterquilt

September 13

Denise Looney, For the Love of Geese

Gail Sheppard, Quilting Gail

September 14

Preeti Harris, Sew Preeti Quilts

Connie Kauffman, Kauffman Designs

September 15

Megan Best, Bestquilter

Maryellen McAuliffe, Mary Mack Made Mine

September 16

Blog Hop Round-Up Week 2 and Giveaway

WEEK 3

September 19

Elizabeth DeCroos, Epida Studio

Jane Hauprich, Stitch by Stitch Custom Quilting

September 20

Emily Leachman, The Darling Dogwood

Andi Stanfield, True Blue Quilts

September 21

Leah Malasky, Quilted Delights

Claudia Porter, Create with Claudia

September 22

Mania Hatziioannidi, Mania for Quilts

Reed Johnson, Blue Bear Quilts

September 23

Blog Hop Week 3 Round Up + giveaway

WEEK 4

September 26

Pamela Boatright, Pamela Quilts

September 27

Anorina Morris, Samelia’s Mum

Brianna Roberts, Sew Cute and Quirky

September 28

End of Blog Hop + Final Round Up

Week-3-Paisley-Got-Mod-Silverado-Canyon

The giveaway of the Blog Hop started on Friday, June 3rd. Each week two lucky winners will each get one Fat Quarter bundle of a complete Island Batik collection. This week, it is Paisley Got Mod by Kate Colleran Designs or Silverado Canyon by Kathy Engle! To enter for your chance to win one of the two prizes above, follow the simple Rafflecopter prompts below.

a Rafflecopter giveaway

This giveaway ends on September, 23rd at 11:59 pm PDT. Two random winners will be notified by email on September, 24th and announced on our Facebook page on September, 27th. If the winners do not respond within the first two days after being notified, two new random winners will be chosen. Please, check your spam folders!

Make sure to follow Island Batik on social media to hop along with the Tool Talk Blog Hop. Be sure to check out the Island Batik Blog.

#islandbatikambassador #islandbatik #iloveislandbatik #hobbsbatting #aurifil #aurifilthread #schmetzneedles #doyoueq #Janome #studio180design #tooltalkbloghop #Star60


Posted on 16 Comments

Island Batik Ambassador- June Project- New York Beauty Quilt

Beauty Pageant

The world could use a little bit of beauty right now. I hope you will find some beauty, joy and inspiration from this month’s Island Batik blog hop. I have completed my June project as an Island Batik Ambassador and I am so excited to share it with you. This month is a blog hop and if you check out the Island Batik blog, you can enter each week to win a fat quarter bundle of some of the fabrics that the Ambassadors are using in their projects. I will show the other fabric collections later in this blog along with a link to the giveaway from Island Batik and links to other ambassador’s blogs.

New York Beauty Blog Hop

The June project was to make a quilt with New York Beauty blocks using an upcoming fabric line from Island Batik. I was so excited when the fabric I was given to use was Jewel Carvings by Kathy Engle. Just look at this gorgeous collection of batik fabrics. The Jewel Carvings may be found at your local quilt shop that carries Island Batik, such as Fabric Smart in St. Petersburg FL. You may find them online at www.fabric-smart.com or call them at 727-914-8850.

Jewel Carvings

The quilt I made is called Beauty Pageant. It is a large lap quilt size 49″ x 59.” This is a dazzling quilt has a diagonal row of New York Beauty blocks surrounded by intricate nine patch blocks. 

Beauty Pageant
Beauty Pageant

I will have a pattern coming out later this summer or fall for this quilt after the testers are done testing the pattern. It’s always fun to find cool locations for the photo shoot.

NY Beauty Mystery solved

The batik bundle I was provided was the Jewel Carvings collection by Kathy Engle. Look at this glorious selection of blue, teal, green and purple batiks. These fabrics were so beautiful that it was really hard to cut them up.

Jewel Carvings

I downloaded the images of the fabric collection into my Electric Quilt software, which is the software I use to design quilts. This is what the quilt looked like in the software. It’s pretty close to the real quilt don’t you think? I love how the white and black fabrics highlight the fabrics in the Jewel Carvings collection.

NY Beauty

New York Beauty quilts are called that as they have New York Beauty blocks in them. The New York Beauty block got its name as it has spikes just like the famous Statue of Liberty in NYC.


statue of liberty

I decided to showcase the NY Beauty blocks as though they are walking on a central catwalk among a sea of admiring fans. The fans are all of the squares in the nine patch blocks. The spikes in the New York Beauty blocks are made with paper piecing so you can achieve those nice sharp points. You lay two fabrics right side together and then sew on the lines. 

paper piecing

When you sew the other pieces to the arch with the spikes, there is curved piecing involved. I wanted to make sure that the pieces lined up correctly as I slowly sewed a quarter inch along those gentle curves. Thus, a lot of pinning was involved. This will insure success with those curves. When you press, the block will naturally tell you which direction it wants to be pressed. What’s great about working with Island Batik fabric is that there is no right or wrong side, making the paper piecing much easier and, that the fabrics cut, and press, nice and crisp.

pinning

To sew the smaller nine patches, I sewed long strips together and then sub cut units into the appropriate sizes. I then chain pieced the smaller nine patches to the larger nine patch pieces. Mama always said that the back of the block should look as neat as the front.

chain piecing
back of block

New York Beauty blocks can be a little challenging to sew and thus even though my blocks look pretty accurate, I knew there could be trouble if I had to place the blocks right next to each other. Thus, I decided to separate them with sashing. This is a good little trick if you are worried that the seams of your blocks may not  line up properly. It also creates some definition to the blocks.

sashing


I used Amanda Murphy’s Good Measure Circle rulers to quilt some circular designs around the squares in the nine patch blocks. These rulers work well with the rulerwork foot on my Janome 6600. I also used some of the Creative Grids quilting rulers by Angela Walters.  I used white and black 50 wt. Aurifil thread on the front and a teal on the back. I used a 70/10 quilting needle from Schmetz Needles. For the batting, I tried Hobbs Tuscany Collection Silk batting. I had never used this batting before and it was very easy to quilt on my Janome. Hobbs Tuscany Silk Batting breathes naturally, making it an excellent choice for airy, lightweight quilts, and while it’s a cool quilt, it can also provide excellent warmth. Hobbs Tuscany Silk Batting is a blend of 90% very fine imported silk filaments and 10% fine polyester, ingredients which are carded and bonded to help retard bearding and fiber migration.

Hobbs Tuscany Silk Batting

The supplies I used to make this project were provided by:

Island Batik Jewel Carvings for the top.

Aurifil 50 wt Thread

Hobbs Tuscany Silk Batting

Schmetz 70/10 Quilting needle

Island Batik
Island Batik


Aurifil Thread
Aurifil Thread


Schmetz Needles
Schmetz Needles


Hobbs Batting
Hobbs Batting


If you are on TikTok, be sure to check out the video I have posted of me with the quilt. (Look for Blue Bear Quilts)

Blue Bear hopes you are ready for summer. Please let him know how much you love the this quilt by writing to him in the comments!

Blue Bear


New York Beauty Angels

The other amazing Island Batik Ambassadors are also posting their June Blog Hop New York Beauty quilts.  Check out their projects by clicking on the links next to their names to be directed to their blog posts.

Week 1

June 6:

Gail Sheppard, Quilting Gail
Elizabeth DeCroos, Epida Studio

June 7:

Reed Johnson, Blue Bear Quilts
Andi Stanfield, True Blue Quilts

June 8:

Sandra Starley, Textile Time Travels

June 9:

Jennifer Fulton, Inquiring Quilter
Mania Hatziioannidi, Mania for Quilts

June 10:

Blog Hop Round-Up Week 1 and Giveaway

Week 2

June 13:

Jennifer Thomas, Curlicue Creations
Maryellen McAuliffe, Mary Mack Made Mine

June 14:

Pamela Boatright, Pamela Quilts
Anorina Morris, Samelia’s Mum

June 15:

Michelle Roberts, Creative Blonde Gifts
Lisa Pickering, Lisa’s Quilting Passion

June 16:

Denise Looney, For the Love of Geese
Connie Kauffman, Kauffman Designs

June 17:

Blog Hop Round-Up Week 2 and Giveaway

Week 3

June 20:

Claudia Porter, Create with Claudia
Brianna Roberts, Sew Cute and Quirky

June 21:

Gail Renna, Quilt Haven Threads
Preeti Harris, Sew Preeti Quilts

June 22:

Megan Best, Bestquilter
Leah Malasky, Quilted Delights

June 23:

Suzy Webster, Websterquilt
Emily Leachman, The Darling Dogwood

June 24:

Blog Hop Round-Up Week 3 and Giveaway

Week 4

June 27:

Jane Hauprich, Stitch by Stitch Custom Quilting
Brenda Alburl, Songbird Designs

June 28:

End of Blog Hop and Final Round-Up

The week one giveaway of the Blog Hop started on Friday, June 3rd. Two lucky winners will each get a Fat Quarter bundle of a complete Island Batik collection by Kathy Engle – the luminous Jewel Carvings or the bold Nightshade!

To enter for your chance to win one of the two prizes above, follow the simple Rafflecopter prompts below.


This giveaway ends June, 10 at 11:59 pm PST. Two random winners will be notified by email on June, 11 and announced on the Island Batik Facebook page on June, 14. If the winners do not respond within the first two days after being notified, two new random winners will be chosen and notified.

Make sure to follow Island Batik on social media to hop along with the New York Beauty Blog Hop. Be sure to check out the Island Batik Blog at https://islandbatik.com/new-york-beauty-blog-hop/#more-61710

#islandbatikambassador #islandbatik #iloveislandbatik #hobbsbatting #aurifil #aurifilthread #schmetzneedles #doyoueq #Janome