
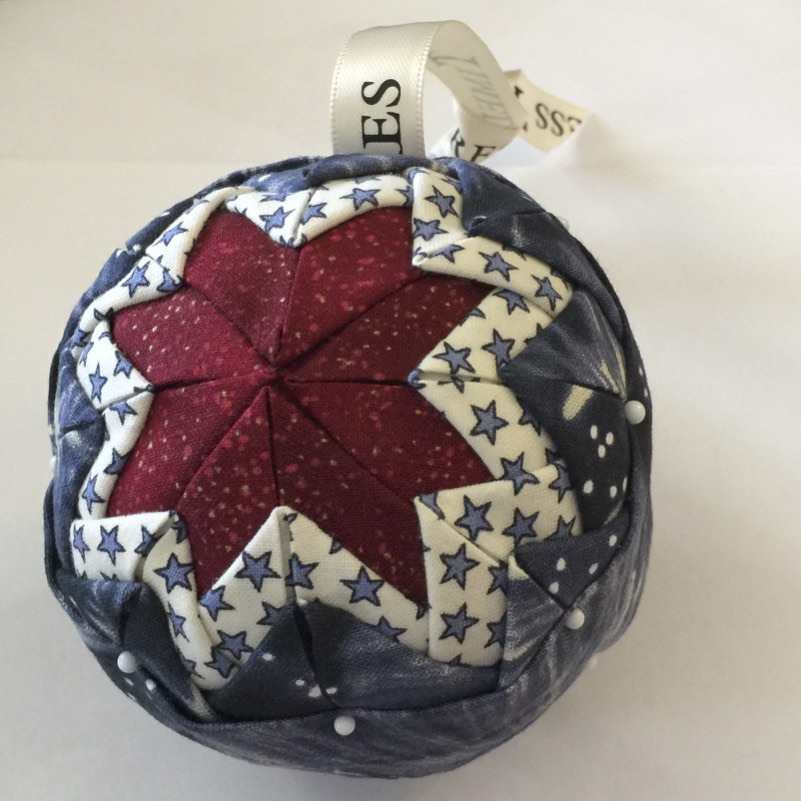
Quilted Holiday Star Ornaments (No Sew)
You could make one of these every year year. Keep them for yourself, or give them as a gift. Once you learn the technique, you can put photos on fabric in the middle or use something small that you have cross-stitched or embroidered. Have fun making these as they do not need to be perfect to look fantastic!
Quilted Star Ornament – Supply List
(1) 3” Styrofoam ball
(1) 1/8th yard dark fabric
(1) 1/8th yard light fabric
(1) 1/4th yard 2d dark fabric
(1) box dressmakers pins 1 1/16th inch, at least 300 count
(1) box extra-fine glasshead pins in color of your choice
(1) 1/4th yard decorative silky ribbon to create hanger
Quilted Star Ornament – Preparing Fabric
- You need 2.5″ squares of coordinating and contrasting fabric. You will need 3 coordinating fabrics and one of them should be a light color and the other two can be a darker color. Press your fabrics, and then using a cutting mat and rotary cutter, cut 2.5″ strips and then sub-cut the strips into 2.5″ squares. For a 3” Styrofoam ball, you will need 10 squares of the first dark color and 16 squares, each, of the light colored fabric and the 2nd dark colored fabric.

2.5″ squares - Now, it’s time for the pressing of the prairie points. But first, set aside 2 squares from the first dark color, of which you started with 10, that you will not be pressing.
a. Fold the all the rest of the 2.5″ squares in half to make rectangles that are 1.25” x 2.5.” Press with your iron on steam setting. Do not iron, just press.

b. Then fold the just made rectangles again to make squares that are 1.25” x 1.25”.

c. Once you have the small, twice folded, squares, you open them back up to the rectangle and then fold the upper, left and right, corners in to meet the center crease line in the middle of the rectangle. Be precise when lining up the edges to the center; the closer (without overlapping the edges) the better. This makes a neat equilateral triangle (a prairie point) with the folded edges meeting in the center of the front of the triangle. When you have formed the prairie point, you carefully press. Be careful not to burn your fingers. You will end up with 40 small prairie points and 2 squares that have not been pressed.


Quilted Star Ornament – Pinning the Pieces
To create the quilted look, you pin the prairie points to the foam ball in concentric layers.
Start by placing the two unfolded squares, evenly spaced apart, one at the top and one at the bottom, on the foam. Pin each corner of the squares to the foam and have the corners from each square almost meet each other, evenly spaced apart.

Round 1 of Prairie Points (1st Dark color that has 8 remaining squares)
- Place your first prairie point directly on the 2.5″ square just placed at the top of the foam. Match the wide edge of the prairie point triangle with the corners of the square. Pin the bottom wide corners of the prairie point to the foam, first, and then the upper point. Then pin, to the foam, the upper point of the prairie point in between the two folds, a little below the top edge of the prairie point. You want to place the pin right in the creased edge of the fold so that the fold will cover it. Pull the folded flaps over this pin to hide it. When finished with a prairie point, the two pins at the bottom of the triangle will be showing and the pin at the upper point will be covered by the folded edges.

First Prairie Point - Using the same method, complete the second prairie point directly across from the first one. The upper points of these two prairie points will meet in the middle of the unfolded square on the foam ball.

Second Prairie Point - Using the same method, place the 3rd prairie point in the empty space beside the two just placed prairie points.
- Pin the 4th prairie point in the remaining open space on the unfolded square to finish this round. You will have 4 prairie points in the center of the foam ball and all points should match up and not be overlapping each other at the center. They may overlap each other a little at the bottom of the prairie points. You will repeat this process on the opposite side of the ball and can do so now or after you have finished all 3 rounds on the top first.

Completed Round 1 on one side
Round 2 of Prairie Points (Light color that has 16 squares)
- In this next round, you can decide how large you want your center star to be by deciding how much of the first round you want to leave showing. A good approximation is to start the 2nd round about ½” below the top of the first round. You should be able to fit 3 rounds without using more than half of the foam ball’s space.
- To start round two, this time, place the prairie point’s upper point pin in first, right in the middle of the fold line of the first prairie point, from the previous round, about ½” from the top of the round 1 prairie point and then pin down the outer corners of the prairie point. It helps to put a pin anywhere on the prairie point, while pinning this center point first, and then remove this temporary pin. Use the same technique from round 1 of placing the upper point pin between the two folds a little below the top edge of the prairie point and pull the folded flaps over the upper point pin to hide it. Then pin the outside corners of the prairie point. These outside corners will overlap each other.

Round 2, 1st Prairie Point - Place the second prairie point, of round 2, completely opposite of the one placed in # 2 above. Just like last time, pin the center, hide the pin, and then pin the corners of the prairie point.
- Using the same method, place the third prairie point, of round 2, 90 degrees from prairie points 1 and 2 just created.
- Using the same method, place the 4th prairie point, of round 2, directly opposite of the piece created in # 4 above.
- Now there are 4 long sections of the first round (dark color) that are exposed and are creating an “x.”

Round 2 “X” You will now be placing a prairie point in each of the legs of that “x.” Place a 5th light color prairie point in one of the areas not covered by the previous 4 pieces from round 2. Place this prairie point in the line formed where the edges of the round 1 prairie points meet and just slightly below the level where the previous 4 round 2 prairie points were placed.

Round 2, 5th Prairie Point You are adding another layer to round 2, of the same color, and are now going to start forming your star. Just like before, pin the center point, hide the pin, and then pin the corners of the prairie point.
- Place the 6th prairie point completely opposite of the one placed in # 6 above.
- Place the 7th prairie point 90 degrees from pieces 6 and 7 above.
- Place the 8th prairie point directly opposite piece # 8. You will now see your first star formed from the dark color of round 1.

Completed Round 2 on one side
Round 3 of Prairie Points (2d Dark color that has 16 squares)
- Now you will place a third round of prairie points on top of round 2. Start with the first prairie point that you placed in round two and going about ½” from the upper point of the round 2 prairie point, place the point pin of the round 3 prairie point first, in the folds of the round 2 prairie point, just like you did for the last round, and then pin down the outer corners of the round 3 prairie point.

Round 3, 1st Prairie Point - Place the second prairie point completely opposite the one in # 1 above.
- Place the third prairie point 90 degrees from the prairie points created in # 1 and 2 above.
- Place the fourth prairie point directly opposite of prairie point # 3 above.
- Now there are 4 prairie points of the second round (light color) that are not covered by round 3. You will next place a prairie point in each of those 4 prairie points. Place a 5th dark color prairie point in one of the areas not covered by the previous 4 pieces from round 3. Place this prairie point in the center line of the round 2 prairie point and just slightly below the level where the previous 4 round 3 prairie points were placed. You are adding another layer to round 3, of the same color, and are now going to start forming your second star. Just like before, pin the upper center point, hide the pin, and then pin the corners of the prairie point.

Round 3, 5th Prairie Point - Place the 6th prairie point completely opposite of the one created in # 5 above.
- Place the 7th prairie point 90 degrees from prairie points # 5 and 6 from above.
- Place the 8th prairie point directly opposite of the one created in # 7. You will now see your second star.

Completed Round 3 on one side
Optionally, If you have room for another layer without going over the half way point of the foam ball, switch colors and repeat steps from round 3. You would need to cut 16 additional 2.5” squares of the new color.
When finished with one side of the foam ball, flip over the ornament and repeat all steps. If you repeated each round on the opposite side as you went, this step is already completed.
Quilted Star Ornament – Finishing Steps
Where the top and bottom edges meet is where you will place a fabric strip or ribbon. Usually the edges don’t match up perfectly. You can make the fabric strip the width needed to make sure you cover it all. Notice my edges and how at one spot the prairie points overlap each other and in another spot there is a gap.

Finishing the Ornament
If you used a different sized ball, wrap a measuring tape around the ornament to determine the size of ribbon or fabric needed to cover the edge. For the 3” foam ball, I used a 12″ x 2.5” strip of fabric. You can use whatever color of fabric you want, but if you used the same fabric as in the round three prairie points, it will create a more harmonious look.

Fold the strip in half, wrong sides together and press. Open the strip and fold both long edges of the strip toward the center line so that they meet in the center and then press. Fold each end of the strip in about a ½ “ and press. You end up with a 1.25″ finished strip to wrap around the ornament.
Determine the top of your ornament, if you have a preference. Wrap the fabric strip around the edge of your ornament and secure with the glass head pins at the intersections of the prairie points. When you come to the top, lay your hanger ribbon under the fabric strip and secure the ribbon and fabric strip to the ornament with four glass head pins. Tie your hanger ribbon in a knot at the top.

Optionally, you can attach the fabric strip and the hanger ribbon with a glue gun, if you prefer.
Keep in mind this is a handmade item and is not going to be perfect. The imperfections are what make it unique and special. There are no rules for the colors that are used or the spacing used between the rounds. Make it yours! You can make these into hanging ornaments, or decorative balls to place in a bowl or basket. The first round does not need to be prairie points. You can substitute a photo on fabric for the center square, or use a small piece of cross-stitch or embroidery as the center. To do this, you would skip the placement of the round one prairie points and start with round two after you have placed your photo or needlework.
Your ornament is ready to hang on your tree or give as a gift.

Please let me know if you have any questions and please share any ornaments that you make with the hashtag #bluebearquilts.


