Posted on 4 Comments

Island Batik Ambassador- March Project- Italian Color Builder Challenge with Aurifil

Milan WH

I have completed my March project as an Island Batik Ambassador and I am so excited to share it with you. This month’s challenge was to to make a wall hanging using one of the Aurifil Color Builders.  

The Aurifil Color Builders are twelve curated mini-collections inspired by (and named after) Italy’s most vibrant and colorful destinations. Each collection contains three large spools of 50wt thread — a warm, a medium, and a dark — within the location’s primary color palette. From the lemon groves of Sicily to the pink sand beaches of Sardinia to the clear teal waters of Capri to the stark city grey of Milan… each collection is crafted to evoke images of Italian landscapes. The colors were selected not only for their aesthetic appeal, but for their practicality in every day use. Click on the links at the bottom to see the other collections used by the Island Batik Ambassadors in their projects. 

03 - Italian Color Builders
03 – Italian Color Builders


I received Milan as my collection from Aurifil. Just look at this awesome collection of light, medium and dark grays. The colors included are 2600, 2610 and 5004. The blue batiks I used from Island Batik are part of their Brilliant Blues collection and I also used white, black and gray.

MILAN-box
MILAN-box
MILAN-spools
MILAN-spools
Milan
Milan

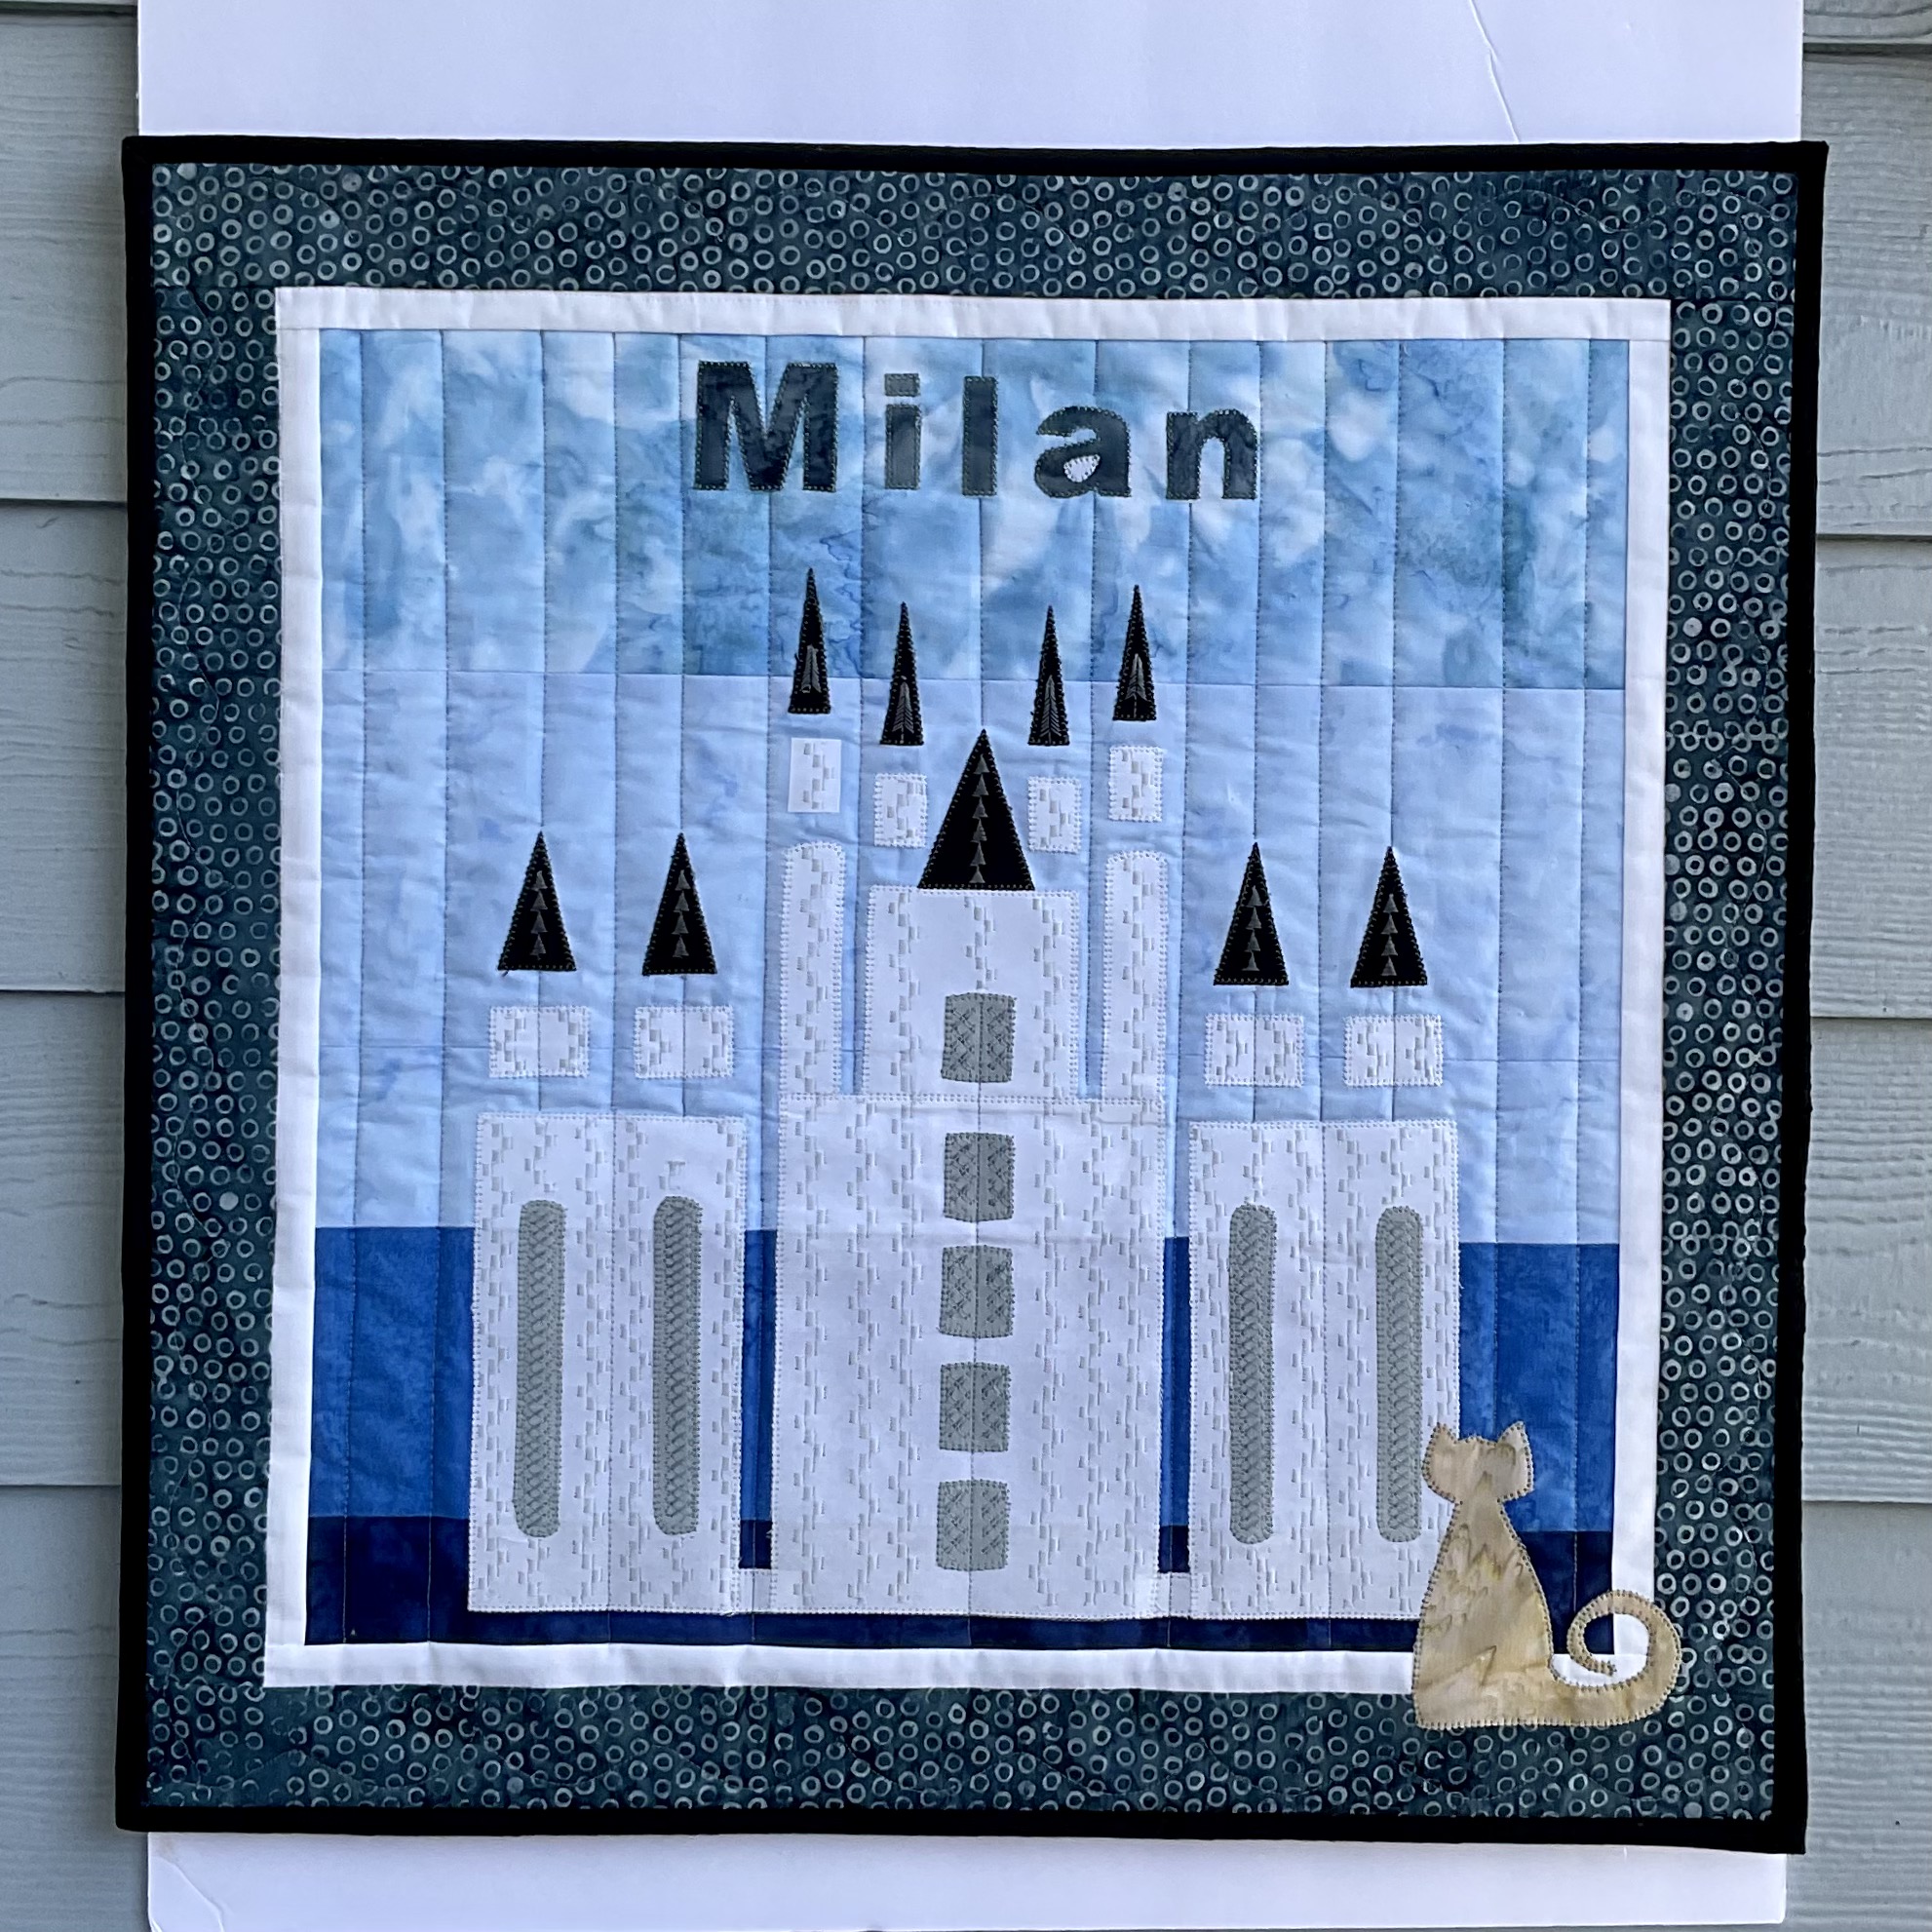
The wall hanging I made is a reflection on the beautiful Italian city of Milan and its size is 20″ x 20.” My inspiration for the wall hangin was the beautiful Milan Cathedral (In Italian: Duomo di Milano, which literally means Cathedral of Milan. The church is the largest church in Italy (excluding the Vatican), and 3rd largest in the world. It is the most visited tourist attraction in Milan.

milan-cathedral
milan-cathedral

Here are some interesting facts about the Milan Cathedral:

1. It took nearly six centuries to complete. The construction of the church began in 1386, and was officially completed in 1965 when the last bronze door was installed, although most parts of the building had been completed in 1813.

2. The church is based on a Latin cross form that covers 11700 square meters and can accommodate about 35000 people.

3. The building features a variety of architectural styles, such as Gothic, Neo Classic, Baroque, and Decorative Gothic, which is the main style.

4. Milan Cathedral has 135 spires on its roof, more than any other church in the world, and each spire is topped off by a sculpture of a biblical figure. The exterior of the church is decorated with 2245 statues sculpted on the facades of the church.

Milan cathedral sculptures

5. One of the nails reputedly from the Crucifixion of Christ has been placed in the cathedral. The Holy Nail is retrieved and exposed to the public every year, during a celebration known as the Rite of the Nivola.


I wanted to create the wall hanging in the graphic style of a vintage travel poster, such as this example of Florence.

florence
florence


I loaded the fabrics into my Electric Quilt Software and created this design.

Milan EQ
Milan EQ

I created the background sky and ground by stitching four of the Island Batik Brilliant Blues together and then appliquéd the white cathedral, with gray windows and black spires. Here is what it looked like with the appliqué pieces fused on and some of the decorative stitching in the windows and spires.

applique fused
applique fused

Then I decided to apply decorative stitches with my Bernina 770 to give the appliqué pieces some definition and texture. The light, medium and dark gray threads, from the Milan collection, worked perfectly with the white, gray and black from Island Batik. Here are some close ups of the decorative stitching.

closeup
closeup


Since the quilt is so graphic and boxy, I wanted to do some straight line quilting. I used a ruler foot for my Janome 6600 and a quilting ruler that I love from Four Paws Quilting called the Line Tamer. It has a slot down the middle that allows the ruler foot to ride in that groove and create a straight line with your quilting.

four paws ruler
four paws ruler

Here is the finished project.

Milan wall hanging
Milan wall hanging

I used the medium gray 50 wt. Aurifil thread on the front and on the back. Schmetz Needles sent the Ambassadors some of their needles and I used a 70/10 quilting needle. I used Hobbs Premium 80/20 Cotton/Poly Blend Batting. This batting is wonderful to quilt by hand or machine. It is made with a blend of  80% natural cotton and 20% fine polyester, is needle punched, and has a light resin bonding to provide exceptional strength and durability. Close quilting yields a flat, low-loft appearance, while more space between stitching lines yields a slightly higher loft.

Heirloom Premium cotton/poly blend


The supplies I used to make this project were provided by:

Island Batik Brilliant Blues, white, gray and black.

Aurifil 50 wt Thread (Milan Color Builders box)

Hobbs Heirloom® Premium 80/20 Cotton/Poly Blend Batting

Schmetz 70/10 Quilting needle


Thank you Island Batik, Aurifil Thread, Hobbs Batting,and Schmetz Needles.

Island Batik
Island Batik
Aurifil Thread
Aurifil Thread
Schmetz Needles
Schmetz Needles
Hobbs Batting
Hobbs Batting


We have two Spring quilt patterns for sale starting today and through the month of April. They are Golden Gate Park Table Runner and Spring Friends Table Runner.

Cover
Cover
cover
cover

Blue Bear says hi from Milan!

Blue Bear
Blue Bear

Please let him know how much you love this wall hanging by writing to him in the comments. The comment box is at the top left of the blog post, below Reed’s picture.

The other amazing Island Batik Ambassadors are also posting their March Color Builder Challenge projects. Check out their projects by clicking on the links next to their names to be directed to their blog posts.


Jennifer Thomas, Curlicue Creations
Denise Looney, For the Love of Geese

Pamela Boatright, Pamela Quilts
Andi Stanfield, True Blue Quilts

Megan Best, Bestquilter

Maryellen McAuliffe, Mary Mack Made Mine
Brenda Alburl, Songbird Designs

Emily Leachman, The Darling Dogwood
Leah Malasky, Quilted Delights

Suzy Webster, Websterquilt
Connie Kauffman, Kauffman Designs

Brianna Roberts, Sew Cute and Quirky
Sandra Starley, Textile Time Travels

Michelle Roberts, Creative Blonde
Jane Hauprich, Stitch by Stitch Custom Quilting

Claudia Porter, Create with Claudia

Anorina Morris, Samelia’s Mum
Preeti Harris, Sew Preeti Quilts

Elizabeth DeCroos, Epida Studio
Gail Renna, Quilt Haven Threads

Gail Sheppard, Quilting Gail
Jennifer Fulton, Inquiring Quilter

Mania Hatzioannidi, Mania for Quilts
Lisa Pickering, Lisa’s Quilting Passion

#islandbatikambassador #islandbatik #iloveislandbatik   #hobbsbatting #aurifil #aurifilthread #schmetzneedles #doyoueq #bernina #janome 


Posted on 6 Comments

Island Batik Ambassador- February Project- Row by Row Quilt

Timberland Tumble Quilt

I have completed my February project as an Island Batik Ambassador and I am so excited to share it with you. This month is a blog hop and if you check out the Island Batik blog, you can enter each week to win a fat quarter bundle of some of the fabrics that the Ambassadors are using in their projects. I will show the other fabric collections later in this blog post and there will be a link to the giveaway from Island Batik.

Row by Wow Blog Hop
Row by Wow Blog Hop


The February project was to make a row by row quilt using an upcoming fabric line from Island Batik. I was so excited when the fabric I was given to use was Evergreen and Pine by Kathy Engle. Just look at this gorgeous collection of green and tan batik fabrics. The Evergreen & Pine Batiks may be found at your local quilt shop that carries Island Batik, such as Fabric Smart in St. Petersburg FL. You may find them online at www.fabric-smart.com or call them at 727-914-8850.

Evergreen & Pine
Evergreen & Pine

The quilt I made is called Timberland Tumble. It is a large lap quilt size 56″ x 77.” This is a striking quilt with a different block in each row. I think it is sometimes difficult to come up with fabrics and quilt patterns that would be appropriate to make for a man, but I feel this quilt accomplishes that and would be an awesome quilt to make for the men in your life. This quilt is easy to make as it is composed mainly of half square triangles, a few squares and maybe a quarter square triangle or two.

Timberland Tumble Quilt
TT location
TT location

I will have a pattern coming out in March 2022 for this quilt after the testers are done testing the pattern.  The batik bundle I was provided was the Evergreen and Pine collection by Kathy Engle. Look at this glorious selection of green and tan batiks. These fabrics were so beautiful that it was really hard to cut them up.

Evergreen and Pine
Evergreen and Pine
E&P
E&P

Row by Row quilts are made with rows of quilt blocks, with each row distinct from the others. I decided to showcase the wide world of blocks that can easily be made from half square triangles. Although all of these blocks can be made from half square triangles, and a few squares and quarter square triangles, I did construct a few of the blocks using larger quarter square triangles and trapezoids as I wanted to showcase the fabric and have less seams to sew after cutting the pieces with my Accuquilt Go! Big Cutter. Here is a picture of using the Accuquilt cutter to cut out some of the shapes.

Accuquilt cutter
Accuquilt cutter

You can see that it makes beautiful cuts which are so easy to piece together. Also, I love the fact that there are no dog ears to trim and if you do a really accurate job of sewing your 1/4″ seam, there is nothing that needs to be trimmed. This really saves a lot of time and effort.

I downloaded the images of the fabric collection into my Electric Quilt software, which is the software I use to design quilts. This is what the quilt looked like in the software. I have included a couple of close ups of the blocks with the gorgeous Evergreen and Pine fabric in them.

TT EQ8
TT EQ8
row 10
row 10
row 5
row 5
row 6
row 6

I also like to often piece the backs of my quilts, which I did for this one. I used some of the fat quarters that I did not use in the quilt to add some interest to the back of the quilt. Here is picture of the back. If you are on TikTok, be sure to check out the video I have posted with me and the quilt. (Look for Blue Bear Quilts)

back of the quilt
back of the quilt

To quilt the quilt on my Bernina 770 QE, I did stitch in the ditch with the edgestitch #10D foot, which was easy to do as there was a square grid of the half square triangle shapes. I used black 50 wt. Aurifil thread on the front and a tan on the back. Schmetz Needles sent the Ambassadors some of their needles and I used a 70/10 quilting needle. I used Hobbs Premium Polyester Poly-down batting. I had never used this batting before and it was very easy to quilt on my Bernina. Hobbs Poly-Down Batting is made with very fine, white, denier polyester which enables the batting to provide a soft feel and lovely drape. It is prized by machine quilters for its wonderful loft which accentuates quilting details. It is also very light weight.

Polydown_batting
Polydown_batting


The supplies I used to make this project were provided by:

Island Batik Evergreen and Pine for the top and Pearl for the backing.

Aurifil 50 wt Thread (black and Tan)

Hobbs Premium Polyester Poly-down batting

Schmetz 70/10 Quilting needle

Accuquilt Go! Big Cutter and 6″ Qube


Thank you Island Batik, Aurifil Thread, Hobbs Batting, Schmetz Needles and Accuquilt.

Island Batik
Island Batik
Aurifil Thread
Aurifil Thread
Schmetz Needles
Schmetz Needles
Hobbs Batting
Hobbs Batting
accuquilt
accuquilt

Blue Bear is sending you some love for Valentine’s Day. Please let him know how much you love the quilt by writing to him in the comments!

TT Quilt with heart
TT Quilt with heart

Be sure to check out the Island Batik Blog at https://islandbatik.com/row-by-row-blog-hop-week-one/ where you can enter to win a fat quarter bundle. Check it out! a Rafflecopter giveaway  Citified and Contempo are the two fabric lines that are being given away this week. Good luck!

week two prize
week two prize

The other amazing Island Batik Ambassadors are also posting their February Blog Hop quilts. For this week in the blog hop, on Tuesday, Suzy Webster and Connie Kauffman posted on the Contempo fabric line and on Thursday, Brianna Roberts and Sandra Starley will be posting on the Graphic line from Island Batik. Check out their projects by clicking on the links next to their names to be directed to their blog posts.

Be sure to check out the other amazing Row by Row quilts (I have seen some amazing quilts so far) and all the fabulous new Island Batik Collections!

January 31:

Jennifer Thomas, Curlicue Creations
Denise Looney, For the Love of Geese

February 1:

Pamela Boatright, Pamela Quilts
Andi Stanfield, True Blue Quilts

February 2:

Megan Best, Bestquilter

February 3:

Maryellen McAuliffe, Mary Mack Made Mine
Brenda Alburl, Songbird Designs

February 7:

Emily Leachman, The Darling Dogwood
Leah Malasky, Quilted Delights

February 8:

Suzy Webster, Websterquilt
Connie Kauffman, Kauffman Designs

February 9:

Reed Johnson, Blue Bear Quilts

February 10:

Brianna Roberts, Sew Cute and Quirky
Sandra Starley, Textile Time Travels

February 14:

Michelle Roberts, Creative Blonde
Jane Hauprich, Stitch by Stitch Custom Quilting

February 15:

Claudia Porter, Create with Claudia

February 16:

Anorina Morris, Samelia’s Mum
Preeti Harris, Sew Preeti Quilts

February 17:

Elizabeth DeCroos, Epida Studio
Gail Renna, Quilt Haven Threads

February 18:

Blog Hop Round-Up Week 3 and Giveaway

February 21:

Gail Sheppard, Quilting Gail
Jennifer Fulton, Inquiring Quilter

February 22:

Mania Hatzioannidi, Mania for Quilts
Lisa Pickering, Lisa’s Quilting Passion

#islandbatikambassador #islandbatik #iloveislandbatik   #hobbsbatting #accuquilt #accuquiltgo #aurifil #aurifilthread #schmetzneedles #doyoueq #bernina 

Posted on Leave a comment

Island Batik Ambassador- January Project- Step by Step Quilt

South Seas Shuffle Quilt

I am so excited to be an Island Batik Ambassador for 2022.


Each month, I will be sharing a different project using upcoming fabric lines from Island Batik.

Unboxing video
Unboxing video


If you would like to see my unboxing video, where I show all of the fabric and batting Island Batik and Hobbs sent to me, here is a link to my YouTube video: https://youtu.be/Q-MN2HbI6dg. Be sure to subscribe and click the bell so the you will be notified when I post more videos.

For the month of January, the challenge was to create a step by step quilt using the Island Batik basic line of Gradations.

01 - Step by Step Challenge
01 – Step by Step Challenge


The quilt I made is called South Seas Shuffle. It is a large lap quilt size 56″ x 62.”

South Seas Shuffle Quilt.
South Seas Shuffle Quilt


This is a modern quilt using the traditional flying geese block. It’s modern in that the geese are going in many directions, there are large white negative spaces and there are partial seam blocks in the construction of the quilt. I will have a pattern coming out in February 2022 for this quilt after the testers are done testing the pattern. I also will have a YouTube video for how to sew the partial seam block unit in this quilt. The batik bundle I was provided was Brilliant Blues. Look at this glorious selection of blue batiks. Island Batik developed ten different colorways of gradations with 20 steps in each. There are so many quilt projects that make use of gradations in color and value. Yardage for the Gradation Batiks may be found at your local quilt shop that carries Island Batik, such as Fabric Smart in St. Petersburg FL. You may find them online at www.fabric-smart.com or call them at 727-914-8850.

BB Bundle
BB Bundle
Brilliant Blues
Brilliant Blues


The idea behind the step by step challenge was to incorporate the gradation of light, medium and dark colors into a quilt. Sometimes it is difficult to determine if a color should be placed into the light, medium, or dark category. In order to do that, it helps to place them next to each other. If it is still too difficult to determine, a little trick is to take a picture of them and then use the filters in your phone’s camera app to turn the picture into a B&W monochromatic picture. Then it is easier to see the differences in values. Squinting at the photos and fabrics helps as well. In the photos below, it looks like the 1st and 3rd batiks might be about the same value, but in the B&W photo, you can see the the 3rd batik is clearly lighter that the 1st. So in the color photo, the 1st batik is the dark, the 2nd and 3rd are the mediums and the 4th batik is the light value. The value of a fabric can change when you place different lights and darks next to it.

Color values
Color values
black and white image


I downloaded the images of the fabric collection into my Electric Quilt software, which is the software I use to design quilts. This is what the quilt looked like in the software.

South Seas Shuffle Quilt in EQ8


I used the measurements of the Accuquilt Flying Geese die to create the size of the blocks. Then the EQ8 software told me how much yardage I needed of each fabric and gave me the rotary cutting diagrams for the non-Accuquilt pieces.

Each one of the flying geese blocks has a blue batik with a light, medium and dark value. This creates the gradation in colors. I cut the blue batik quarter square triangles, which are in the flying geese blocks, using the Accuquilt cutter and die. Since the Accuquilt cutter and die cuts off the dog ears, it is easy to line up the pieces for sewing and there is no trimming that needs to be done after the pieces are sewn together.


When the quilt top was all sewn together, I took it outside to let the sun shine through the quilt as I knew these brilliant blue batiks would sing in the sunshine and wow did they.

SSS see through
SSS see through


Looking at this photo on my iPhone, I discovered something new called Lookup -Artwork. When I clicked on that, it showed me different artist’s works that were similar in feel to my quilt. I was amazed by what they came up with, so I though I would share those other artist’s works with you.

Other's Artwork
Other’s Artwork
Other's Artwork
Other’s Artwork
Other's Artwork
Other’s Artwork
Other's Artwork
Other’s Artwork
Other's Artwork
Other’s Artwork


To quilt the quilt on my Bernina 770 QE, I did stitch in the ditch with the edgestitch #10D foot.

Stitch in the ditch quilting


I did some quilting in the negative white spaces to mimic the flying geese that were in the other blocks. I used the Creative Grids “Chevy” ruler, designed by Angela Walters, to do this quilting.

Negative space quilting


I also wanted to do some echo quilting, which means quilting next to the seam lines, within the blue flying geese. So, I switched to a blue Aurifil thread and then used the Line Tamer ruler by Fourpawsquilting.com to get straight lines with my echo quilting.

Four Paws ruler
Four Paws ruler
Echo quilting
Echo quilting


I used a new Schmetz 70/10 quilting needle. Using new needle on a new quilting project just makes your life so much easier.


I used Hobbs Heirloom 80/20 Bleached batting as the quilt top had a lot of white in it and I did not want the batting to show through the fabrics. This batting was very easy to quilt on my Bernina. It is fairly thin and gives your quilt a beautiful drape and also lays fairly flat. It is also light weight and breathable so it makes a good batting for a summer quilt or if used in a warmer climate.  It’s loft is 1/8″; it’s shrinkage is 3-5% and the maximum stitch distance when quilting is 4.”

HobbsHeirloom8020Bleached


What I liked about using Island Batik fabrics:

  1. The colors are so vibrant.
  2. There is a wonderful texture in the fabrics.
  3. They have very little fraying after they have been cut.
  4. They produce very little lint in your sewing machine.
  5. They are tightly woven, yet very light. I had been working with the batiks for awhile and then switched to regular quilting cotton. I thought the quilting cotton was so heavy that I had a double layer, but I did not. The light weight of the batiks would make for an overall lighter quilt, depending on your batting and how much quilting you put onto the top.

The supplies I used to make this project were provided by:

Island Batik Foundations Fabrics: Brilliant Blues, White, and Black for the top and Pearl for the backing.

Aurifil 50 wt Thread (white. black and blue)

Hobbs Heirloom 80/20 Bleached Batting

Schmetz 70/10 Quilting needle

Accuquilt Go! Big Cutter and die #55456 Flying Geese 


Thank you Island Batik, Aurifil Thread, Hobbs Batting, Schmetz Needles and Accuquilt.

Island Batik
Island Batik
Aurifil Thread
Aurifil Thread
Schmetz Needles
Schmetz Needles
Hobbs Batting
Hobbs Batting
accuquilt
accuquilt


Blue Bear likes this quilt because of its fabulous blue colors. He hopes you like it too!

Blue Bear with quilt

The other amazing Island Batik Ambassadors are also posting their first quilts of the year. They are all making wonderful gradation quilts in a rainbow of colors. Check out their projects by clicking on the links next to their names to be directed to their blog posts.

Brenda Alburl ~ Songbird Designs

Megan Best ~ Bestquilter

Pamela Boatright ~ Pamelaquilts

Elizabeth DeCroos ~ Epida Studio

Jennifer Fulton ~ Inquiring Quilter

Preeti Harris ~ Sew Preeti Quilts

Mania Hatziioannidi ~ Mania for quilts

Jane Hauprich ~ Stitch By Stitch Custom Quilting

Connie Kauffman ~ Kauffman Designs

Emily Leachman ~ The Darling Dogwood

Denise Looney ~ For The Love Of Geese

Leah Malasky ~ Quilted Delights

Maryellen McAuliffe ~ Mary Mack Made Mine

Anorina Morris – sameliasmum.com

Lisa Pickering ~ Lisa’s Quilting Passion

Claudia Porter ~ Create with Claudia

Gail Renna ~ Quilt Haven Threads

Brianna Roberts ~ Sew Cute And Quirky

Michelle Roberts ~ Creative Blonde

Gail Sheppard ~ Quilting Gail

Andi Stanfield ~ True Blue Quilts

Sandra Starley ~ Textile Time Travels

Jennifer Thomas ~ Curlicue Creations

Suzy Webster ~ Websterquilt

#islandbatikambassador #islandbatik #iloveislandbatik 

 #hobbsbatting #accuquilt #accuquiltgo #aurifil #aurifilthread #schmetzneedles #doyoueq #bernina 


Posted on Leave a comment

Week 8- January 15, 2018- Block of the Week- Churn Dash

Block of the week is back and this week’s block is a favorite among quilters. It is the churn dash.

Churn Dash Block
Churn Dash Block


It originated in the early 1800’s. It is called churn dash as the outside rounded corners look like the outside of a butter churn

and the center square looks like the wooden dash that went into the center of the churn to make the butter by pounding the dash

up and down in the churn. It is a favorite among quilters as it is fairly easy, using only a square, rectangles and triangles.

It makes a beautiful quilt.

Churn Dash Quilt
Churn Dash Quilt

Accuquilt makes it super easy to make this block with their 9″ Churn Dash die.

Accuquilt Churn Dash


The churn dash pattern has many, many different names and variations of construction, such as the Shoo Fly and Double Monkey Wrench.

Let’s take a look at how some quilters have put a modern spin on a churn dash quilt.

It could be a red and white quilt as was done by Amy Smart.

Red White Churn Dash Quilt

Or a blue and white as created by Material Girl Quilts

Blue White Churn Dash Quilt


This quilt is absolutely gorgeous turned on point.

On Point Churn Dash
On Point Churn Dash by Pat Speth.

How about something big and bold like this coloring of the quilt?

Bold Churn Dash
Bold Churn Dash

You can also piece some of the shapes in the block for a modern effect, like this colorful 4-patch center and pieced rectangles in Nut by The Happy Zombie.


or add flying geese to the rectangles as was done by Blue Ridge Girl in this modern interpretation of the churn dash block.

Flying Geese Churn Dash

Finally, you could alternate the churn dash with another block

such as the 9-patch for a very striking and modern quilt created by Mary Manson or


make the block wonky like this one made by Jennifer Dick of 42 Quilts.

Wonky Churn
Wonky Churn


I hope this has inspired you to try some new things for putting a modern spin on the old time favorite churn dash block.

Posted on 14 Comments

Greek Isles Modern Quilt

For the 2017 Blogger’s Quilt Festival, I thought I would share Blue Bear’s most popular pattern, Greek Isles Modern. 

This pattern is much easier than it looks. It is made with 2.5″ strips of white and 2.5″ strips of light, medium and dark batiks, that you may obtain from jelly rolls, or cut on your 2.5″ strip die with your Accuquilt Go! Cutter. The blocks are all constructed the same way, and placement is what determines the pattern. At 70 x 90,” it is the perfect quilt to curl up with on the couch for binge watching your favorite Netflix shows.

Here is a picture of Kim at Keep Me in Stitches in Largo, Florida, quilting this beauty; followed by a close up of her fantastic quilting.


Here are several more photos of the quilt out and about.


I have taught this class several times and here are some of my students interpretations of the quilt. Click on the links for short videos. They did a fantastic job!

4D1F584E-4BF0-4F0B-9EC4-06091ACAE8FC

IMG_0865

If you would like to purchase this pattern, it is available on our website here, www.bluebearquilts.com, or on Craftsy here- https://www.craftsy.com/quilting/patterns/greek-isles-modern-quilt/490532

Greek Isles Modern Quilt Cover

Sharing at the Blogger’s Quilt Festival hosted by Amy’s Creative Side.

Posted on Leave a comment

Week 7- September 26, 2016- Block of the Week- Log Cabin- Part 2

As we discussed in Part 1 last week, this is a excellent block for beginning quilters to learn how to quilt. It is the pattern that I used when I was first learning to quilt. The most recommended book to make this pattern is “Make a Quilt in a Day- Log Cabin Pattern” by Eleanor Burns. So many people, including me, have used this book to make their first quilt. Thus, Quilt in a Day and Eleanor Burns are endeared to many quilter’s. Eleanor was a school teacher and her patterns are clearly written and easy to follow. The book is pictured in the photo below.


Quilt in a Day Log Cabin Pattern
Log Cabin Pattern

One helpful tool that the book contains is a paste-up sheet, where you lay out all of your fabric samples to see if you have a good mixture of lights and darks. An additional trick that I learned was to photocopy this sheet with the fabrics on it as it will highlight the contrasting tonal values for you. Here is a photo of the paste-up sheet that I  did for my first quilt and a photo of it photocopied. To obtain the desired pattern effects, you want a strong contrast between the lights and darks. Remember this was my first quilt and I now see that I could have done a better job of making a stronger contrast between the lights and darks. Today, I  would have made the pink center square darker and the two outer light colors lighter. This palette with the floral fabrics created a very country look and today I would most likely shy away from that as well. This quilt pattern is also good for a beginner as you can quilt it yourself by quilting straight stitches in the ditch.

Color Paste-up sheet
Copier Paste-up sheet


This pattern is very versatile and can result is many different looks, depending on how you rotate the blocks. Let’s take a look at the traditional quilt from last week laid out 8 different ways. Depending on the fabrics you use and the layout, this traditional pattern can take on a modern look. I think that Whirligig and Navajo have a more modern spin to them.

Barn Raising Layout
Barn Raising Layout
Whirligig Layout
Whirligig Layout
Cross Hatch Layout
Cross Hatch Layout
Positive/Negative Layout
Stained Glass Layout
Fields and Furrows Layout
Navajo Layout
Navajo Layout
Dark with Light Layout

My favorite is “Positive/Negative” as I love how the lights and darks create a a dimensional feel to the pattern. Which one is your favorite?

Positive/Negative Layout

Next week, we will look at the Wild Geese Block which can create some fun modern patterns.

Posted on Leave a comment

Week 6- September 19, 2016- Block of the Week- Log Cabin- Part 1

Today we are going to look at the log cabin block. This is the quintessential beginner quilt block because it is so easy. All you have to do is sew strips together and cut various sized units. Those units keep getting sewn to another strip and then cut again. Here is what the block traditionally looks like.

Log Cabin Block
Log Cabin Block

You will note that there is a red center with light fabrics on the left side and dark fabrics on the right side. The red center is thought to be the fireplace of the cabin, and the light side is the sun shining on the cabin, or goodness, and the dark side is thought to be shadows on the house, or sadness. Sometimes this quilt is called Sunshine and Shadows depending on how the blocks are arranged. The next photo shows how this quilt is traditionally laid out.

Traditional Log Cabin Quilt

Here is an excellent video animation by Judit Hajdu showing how to strip piece this quilt. https://youtu.be/ZayIGmzkMmo

Next week will feature part 2 on the log cabin block and showcase how many different quilts one can create depending on how the blocks are arranged.

Posted on Leave a comment

Week 5-Block of the Week- September 12, 2016- God’s Eye Block

There are many blocks which have names related to things or events in the Bible. Today’s block, God’s Eye, would be one of the them.

God's Eye Block
God’s Eye Block

Others would be Jacob’s Ladder, Crown of Thorns, Joseph’s Coat, Ruins of Jericho, Star of Bethlehem and many others. Quilts with Biblical names can be reassuring to those that are devoted to God and quilts have often been used as burial shrouds and it is comforting to families to have their loved one wrapped in a quilt with a Biblical theme. Many other quilt blocks with a square eye in the middle have been called “God’s Eye.” The yarn “God’s Eye” is a popular kids craft where two sticks make a cross and then different colored yarns are wrapped around the sticks concentrically.


The block is made up of a 4 x 4 grid, with smaller 4 x 4 grids contained therein. The smaller grids are composed with squares and half square triangles. Although there are many pieces in this block (88), it would still be a fairly easy block for a beginning quilter. This block is usually composed with four colors, 2 lights and 2 darks. Below is an example of  a 16 block quilt made up of God’s Eye blocks.

God's Eye Quilt
God’s Eye Quilt


This quilt can be very striking when made from scrappy fabrics, such as the quilt below.

God's Eye Scrappy Quilt
God’s Eye Scrappy Quilt


Stay tuned for next week’s block, which will be the Log Cabin, a great block for a beginner to learn to quilt.

Posted on Leave a comment

Quilt Block of the Week- September 5, 2016

Week 4- September 5, 2016

Jacob’s Ladder


Happy Labor Day. I hope everyone is enjoying their time off with their families.

This week’s block is the Jacob’s Ladder. It has a Biblical reference as it refers to the story of Jacob found in Genesis 28: 10-12. The block also has many other names such as “Road To California, “Double Hour Glass” and “Covered Wagon,” suggesting that they were popular with the early pioneers headed west. Here is an example of what the block historically looked like.

Traditional Jacob's Ladder Quilt Block
Traditional Jacob’s Ladder Quilt Block

Notice that the block is a nine patch construction, which was discussed in a previous post, containing 5 four patch blocks, also discussed in a previous post, and 4 new blocks that are called half square triangles (HST.) See example below. This block is documented as having been made into a quilt at the beginning of the 20th century. It was originally made with two contrasting colors, a light and a dark. The block often has another name, ” Underground Railroad,” associated with it, but it has not been documented that this block existed around the time of pre Civil War, when the Underground Railroad was happening, and may have gotten the name later as a remembrance.

Example of half square triangle

This is an excellent block for a novice quilter as sewing the HSTs together is easy as you just have to sew two triangles together. It can be a little tricky to get those points on the end to match up, so one of my favorite tools to create the Jacob’s Ladder patches is my Accuquilt Fabric Cutter. It precision die cuts the pieces so they are perfectly cut. On the triangles, it cuts off the dog ears (the points that stick out) so that the ends are easy to align. Here is a link to the Accuquilt website, where you will find the fabric cutters and lots of fun dies. http://www.accuquilt.com.

Two “Go! Dies” that could be used to make this block are the 2.5″ square and the 2″ finished half square triangle.  You will notice that the dies are two-tone, making it easy for you to place the fabric on the die. Then you place a plastic mat over the fabric and run the die, with the fabric and mat on it, through the cutter. There are manual and electric fabric cutters. Here is a picture of a “Go! Fabric Cutter” and the square and triangle dies. (Click on the thumbnails to make the pictures larger.) They are frequently on sale.


Continue reading Quilt Block of the Week- September 5, 2016

Posted on Leave a comment

Quilt Block of the Week- August 29, 2016

Week 3- August 29, 2016

Double Nine Patch

Double Nine Patch Block

In order to create a double nine patch, we need to know what a nine patch is first. it is a block that contains a 3 x 3 grid. Normally there is a combination of light and dark fabrics. Here is an example of the basic nine patch block.

Basic Nine Patch Block

Notice how there are nine “patches” that are the same size. There is a combination of light yellow with the dark navy blue. The yellow is forming a cross and the navy is forming an “x” in the middle. All of these patches can be anywise, but typically they are divisible by 3, so the overall block size is usually 6, 9 or 12 inches. This block is popular with beginning quilters as it involves straight sewing and matching of a couple of seams. It is also an easy block to select color fabrics as you only need two, consisting of a light and dark. This block also makes a great scrap quilt as each of the navy squares in the example could be a different piece of fabric. This is also an easy jelly roll quilt as to contract the blocks, you sew 2.5″ strips of dark, light, dark together and strips of light, dark, light together and then cut them at 2.5″ intervals. Then you take two of the dark, light, dark units and piece them together with a light, dark, light unit in the middle. Here is what a quilt would look like using this block, and then using the block alternating with plain navy squares.

basic nine patch quilt
Basic Nine Patch Quilt


Variation Nine Patch Quilt

Continue reading Quilt Block of the Week- August 29, 2016