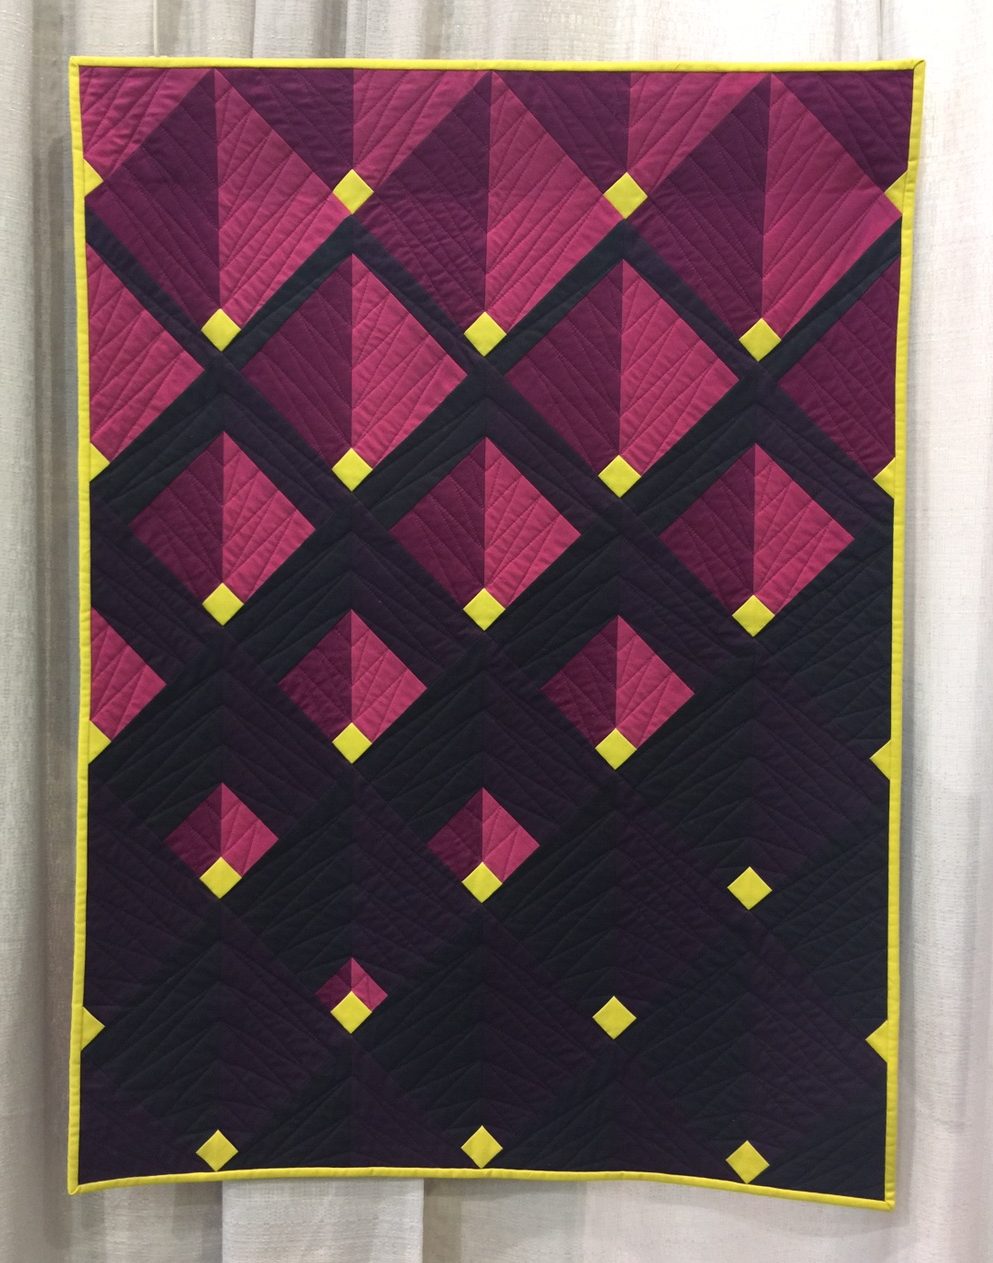
Since becoming a certified Quilt in a Day instructor things have gotten very busy with the trip to California with Quilt in a Day, teaching quilt classes, the holidays, family weddings, colds caught at family weddings and a trip to Quiltcon. Quiltcon 2017, in Savannah, was very exciting as I went exploring to learn all about the world of modern quilting. Modern quilters are just as passionate about their craft as traditional quilters, and they love to share their thoughts and ideas with other quilters. I was trying to get a definition for modern quilting and what I came up with was use of lots of solid colors, like Kona Cottons, lots of negative space for beautiful quilting, think Angela Waters, quilts are more utilitarian, taking traditional blocks and incorporating them into modern quilts or blowing the traditional blocks up to a much larger size so there is more negative space for quilting. Here are some photos of the exquisite work that I saw in Savannah. I hope you enjoy!
You could make one of these every year year. Keep them for yourself, or give them as a gift. Once you learn the technique, you can put photos on fabric in the middle or use something small that you have cross-stitched or embroidered. Have fun making these as they do not need to be perfect to look fantastic!
Quilted Star Ornament – Supply List
(1) 3” Styrofoam ball
(1) 1/8th yard dark fabric
(1) 1/8th yard light fabric
(1) 1/4th yard 2d dark fabric
(1) box dressmakers pins 1 1/16th inch, at least 300 count
(1) box extra-fine glasshead pins in color of your choice
(1) 1/4th yard decorative silky ribbon to create hanger
Quilted Star Ornament – Preparing Fabric
You need 2.5″ squares of coordinating and contrasting fabric. You will need 3 coordinating fabrics and one of them should be a light color and the other two can be a darker color. Press your fabrics, and then using a cutting mat and rotary cutter, cut 2.5″ strips and then sub-cut the strips into 2.5″ squares. For a 3” Styrofoam ball, you will need 10 squares of the first dark color and 16 squares, each, of the light colored fabric and the 2nd dark colored fabric.
2.5″ squares
Now, it’s time for the pressing of the prairie points. But first, set aside 2 squares from the first dark color, of which you started with 10, that you will not be pressing.
a. Fold the all the rest of the 2.5″ squares in half to make rectangles that are 1.25” x 2.5.” Press with your iron on steam setting. Do not iron, just press.
Half Rectangles
b. Then fold the just made rectangles again to make squares that are 1.25” x 1.25”.
1.25″ folded squares
c. Once you have the small, twice folded, squares, you open them back up to the rectangle and then fold the upper, left and right, corners in to meet the center crease line in the middle of the rectangle. Be precise when lining up the edges to the center; the closer (without overlapping the edges) the better. This makes a neat equilateral triangle (a prairie point) with the folded edges meeting in the center of the front of the triangle. When you have formed the prairie point, you carefully press. Be careful not to burn your fingers. You will end up with 40 small prairie points and 2 squares that have not been pressed.
Prairie PointsPrairie Points close upPrairie Points and squares
Quilted Star Ornament – Pinning the Pieces
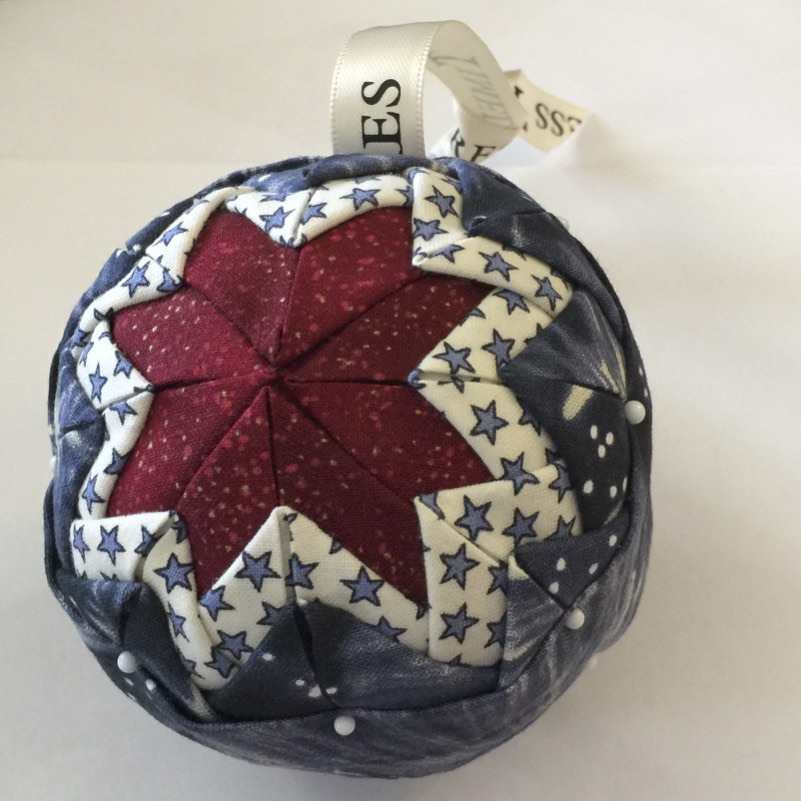
To create the quilted look, you pin the prairie points to the foam ball in concentric layers.
Start by placing the two unfolded squares, evenly spaced apart, one at the top and one at the bottom, on the foam. Pin each corner of the squares to the foam and have the corners from each square almost meet each other, evenly spaced apart.
Squares on opposite sides
Round 1 of Prairie Points (1st Dark color that has 8 remaining squares)
Place your first prairie point directly on the 2.5″ square just placed at the top of the foam. Match the wide edge of the prairie point triangle with the corners of the square. Pin the bottom wide corners of the prairie point to the foam, first, and then the upper point. Then pin, to the foam, the upper point of the prairie point in between the two folds, a little below the top edge of the prairie point. You want to place the pin right in the creased edge of the fold so that the fold will cover it. Pull the folded flaps over this pin to hide it. When finished with a prairie point, the two pins at the bottom of the triangle will be showing and the pin at the upper point will be covered by the folded edges.
First Prairie Point
Using the same method, complete the second prairie point directly across from the first one. The upper points of these two prairie points will meet in the middle of the unfolded square on the foam ball.
Second Prairie Point
Using the same method, place the 3rd prairie point in the empty space beside the two just placed prairie points.
Pin the 4th prairie point in the remaining open space on the unfolded square to finish this round. You will have 4 prairie points in the center of the foam ball and all points should match up and not be overlapping each other at the center. They may overlap each other a little at the bottom of the prairie points. You will repeat this process on the opposite side of the ball and can do so now or after you have finished all 3 rounds on the top first.
Completed Round 1 on one side
Round 2 of Prairie Points (Light color that has 16 squares)
In this next round, you can decide how large you want your center star to be by deciding how much of the first round you want to leave showing. A good approximation is to start the 2nd round about ½” below the top of the first round. You should be able to fit 3 rounds without using more than half of the foam ball’s space.
To start round two, this time, place the prairie point’s upper point pin in first, right in the middle of the fold line of the first prairie point, from the previous round, about ½” from the top of the round 1 prairie point and then pin down the outer corners of the prairie point. It helps to put a pin anywhere on the prairie point, while pinning this center point first, and then remove this temporary pin. Use the same technique from round 1 of placing the upper point pin between the two folds a little below the top edge of the prairie point and pull the folded flaps over the upper point pin to hide it. Then pin the outside corners of the prairie point. These outside corners will overlap each other.
Round 2, 1st Prairie Point
Place the second prairie point, of round 2, completely opposite of the one placed in # 2 above. Just like last time, pin the center, hide the pin, and then pin the corners of the prairie point.
Using the same method, place the third prairie point, of round 2, 90 degrees from prairie points 1 and 2 just created.
Using the same method, place the 4th prairie point, of round 2, directly opposite of the piece created in # 4 above.
Now there are 4 long sections of the first round (dark color) that are exposed and are creating an “x.”
Round 2 “X”
You will now be placing a prairie point in each of the legs of that “x.” Place a 5th light color prairie point in one of the areas not covered by the previous 4 pieces from round 2. Place this prairie point in the line formed where the edges of the round 1 prairie points meet and just slightly below the level where the previous 4 round 2 prairie points were placed.
Round 2, 5th Prairie Point
You are adding another layer to round 2, of the same color, and are now going to start forming your star. Just like before, pin the center point, hide the pin, and then pin the corners of the prairie point.
Place the 6th prairie point completely opposite of the one placed in # 6 above.
Place the 7th prairie point 90 degrees from pieces 6 and 7 above.
Place the 8th prairie point directly opposite piece # 8. You will now see your first star formed from the dark color of round 1.
Completed Round 2 on one side
Round 3 of Prairie Points (2d Dark color that has 16 squares)
Now you will place a third round of prairie points on top of round 2. Start with the first prairie point that you placed in round two and going about ½” from the upper point of the round 2 prairie point, place the point pin of the round 3 prairie point first, in the folds of the round 2 prairie point, just like you did for the last round, and then pin down the outer corners of the round 3 prairie point.
Round 3, 1st Prairie Point
Place the second prairie point completely opposite the one in # 1 above.
Place the third prairie point 90 degrees from the prairie points created in # 1 and 2 above.
Place the fourth prairie point directly opposite of prairie point # 3 above.
Now there are 4 prairie points of the second round (light color) that are not covered by round 3. You will next place a prairie point in each of those 4 prairie points. Place a 5th dark color prairie point in one of the areas not covered by the previous 4 pieces from round 3. Place this prairie point in the center line of the round 2 prairie point and just slightly below the level where the previous 4 round 3 prairie points were placed. You are adding another layer to round 3, of the same color, and are now going to start forming your second star. Just like before, pin the upper center point, hide the pin, and then pin the corners of the prairie point.
Round 3, 5th Prairie Point
Place the 6th prairie point completely opposite of the one created in # 5 above.
Place the 7th prairie point 90 degrees from prairie points # 5 and 6 from above.
Place the 8th prairie point directly opposite of the one created in # 7. You will now see your second star.
Completed Round 3 on one side
Optionally, If you have room for another layer without going over the half way point of the foam ball, switch colors and repeat steps from round 3. You would need to cut 16 additional 2.5” squares of the new color.
When finished with one side of the foam ball, flip over the ornament and repeat all steps. If you repeated each round on the opposite side as you went, this step is already completed.
Quilted Star Ornament – Finishing Steps
Where the top and bottom edges meet is where you will place a fabric strip or ribbon. Usually the edges don’t match up perfectly. You can make the fabric strip the width needed to make sure you cover it all. Notice my edges and how at one spot the prairie points overlap each other and in another spot there is a gap.
Ornament Unfinished Edge
Finishing the Ornament
If you used a different sized ball, wrap a measuring tape around the ornament to determine the size of ribbon or fabric needed to cover the edge. For the 3” foam ball, I used a 12″ x 2.5” strip of fabric. You can use whatever color of fabric you want, but if you used the same fabric as in the round three prairie points, it will create a more harmonious look.
Coordinating Fabric Strip
Fold the strip in half, wrong sides together and press. Open the strip and fold both long edges of the strip toward the center line so that they meet in the center and then press. Fold each end of the strip in about a ½ “ and press. You end up with a 1.25″ finished strip to wrap around the ornament.
Determine the top of your ornament, if you have a preference. Wrap the fabric strip around the edge of your ornament and secure with the glass head pins at the intersections of the prairie points. When you come to the top, lay your hanger ribbon under the fabric strip and secure the ribbon and fabric strip to the ornament with four glass head pins. Tie your hanger ribbon in a knot at the top.
Attaching Strip and Ribbon
Optionally, you can attach the fabric strip and the hanger ribbon with a glue gun, if you prefer.
Keep in mind this is a handmade item and is not going to be perfect. The imperfections are what make it unique and special. There are no rules for the colors that are used or the spacing used between the rounds. Make it yours! You can make these into hanging ornaments, or decorative balls to place in a bowl or basket. The first round does not need to be prairie points. You can substitute a photo on fabric for the center square, or use a small piece of cross-stitch or embroidery as the center. To do this, you would skip the placement of the round one prairie points and start with round two after you have placed your photo or needlework.
Your ornament is ready to hang on your tree or give as a gift.
Folded Fabric Star Ornament
Please let me know if you have any questions and please share any ornaments that you make with the hashtag #bluebearquilts.
Back in March, I relayed a post From Suzan Ellis of Accuquilt regarding a Rob Peter to Pay Paul Quilt love story. It was part 1. Dying to know the rest of the story, I called her and said that fans were anxiously awaiting the outcome. She has posted the conclusion to the love story and you don’t want to miss it.
As we discussed in Part 1 last week, this is a excellent block for beginning quilters to learn how to quilt. It is the pattern that I used when I was first learning to quilt. The most recommended book to make this pattern is “Make a Quilt in a Day- Log Cabin Pattern” by Eleanor Burns. So many people, including me, have used this book to make their first quilt. Thus, Quilt in a Day and Eleanor Burns are endeared to many quilter’s. Eleanor was a school teacher and her patterns are clearly written and easy to follow. The book is pictured in the photo below.
Log Cabin Pattern
One helpful tool that the book contains is a paste-up sheet, where you lay out all of your fabric samples to see if you have a good mixture of lights and darks. An additional trick that I learned was to photocopy this sheet with the fabrics on it as it will highlight the contrasting tonal values for you. Here is a photo of the paste-up sheet that I did for my first quilt and a photo of it photocopied. To obtain the desired pattern effects, you want a strong contrast between the lights and darks. Remember this was my first quilt and I now see that I could have done a better job of making a stronger contrast between the lights and darks. Today, I would have made the pink center square darker and the two outer light colors lighter. This palette with the floral fabrics created a very country look and today I would most likely shy away from that as well. This quilt pattern is also good for a beginner as you can quilt it yourself by quilting straight stitches in the ditch.
Color Paste-up sheetCopier Paste-up sheet
This pattern is very versatile and can result is many different looks, depending on how you rotate the blocks. Let’s take a look at the traditional quilt from last week laid out 8 different ways. Depending on the fabrics you use and the layout, this traditional pattern can take on a modern look. I think that Whirligig and Navajo have a more modern spin to them.
Barn Raising LayoutWhirligig LayoutCross Hatch LayoutPositive/Negative LayoutStained Glass LayoutFields and Furrows LayoutNavajo LayoutDark with Light Layout
My favorite is “Positive/Negative” as I love how the lights and darks create a a dimensional feel to the pattern. Which one is your favorite?
Positive/Negative Layout
Next week, we will look at the Wild Geese Block which can create some fun modern patterns.
Today we are going to look at the log cabin block. This is the quintessential beginner quilt block because it is so easy. All you have to do is sew strips together and cut various sized units. Those units keep getting sewn to another strip and then cut again. Here is what the block traditionally looks like.
Log Cabin Block
You will note that there is a red center with light fabrics on the left side and dark fabrics on the right side. The red center is thought to be the fireplace of the cabin, and the light side is the sun shining on the cabin, or goodness, and the dark side is thought to be shadows on the house, or sadness. Sometimes this quilt is called Sunshine and Shadows depending on how the blocks are arranged. The next photo shows how this quilt is traditionally laid out.
Traditional Log Cabin Quilt
Here is an excellent video animation by Judit Hajdu showing how to strip piece this quilt. https://youtu.be/ZayIGmzkMmo
Next week will feature part 2 on the log cabin block and showcase how many different quilts one can create depending on how the blocks are arranged.
There are many blocks which have names related to things or events in the Bible. Today’s block, God’s Eye, would be one of the them.
God’s Eye Block
Others would be Jacob’s Ladder, Crown of Thorns, Joseph’s Coat, Ruins of Jericho, Star of Bethlehem and many others. Quilts with Biblical names can be reassuring to those that are devoted to God and quilts have often been used as burial shrouds and it is comforting to families to have their loved one wrapped in a quilt with a Biblical theme. Many other quilt blocks with a square eye in the middle have been called “God’s Eye.” The yarn “God’s Eye” is a popular kids craft where two sticks make a cross and then different colored yarns are wrapped around the sticks concentrically.
The block is made up of a 4 x 4 grid, with smaller 4 x 4 grids contained therein. The smaller grids are composed with squares and half square triangles. Although there are many pieces in this block (88), it would still be a fairly easy block for a beginning quilter. This block is usually composed with four colors, 2 lights and 2 darks. Below is an example of a 16 block quilt made up of God’s Eye blocks.
God’s Eye Quilt
This quilt can be very striking when made from scrappy fabrics, such as the quilt below.
God’s Eye Scrappy Quilt
Stay tuned for next week’s block, which will be the Log Cabin, a great block for a beginner to learn to quilt.
The name comes from the fact that there are two smaller four patches contained in this block. While four patch is in the name, “four patch” also describes the type of block construction.
Notice that there are two four patches and two plain squares. When these four units are combined together, they create a larger four patch, containing two smaller four patches, and you notice a lovely chain effect happening. The smaller four patch units could be made from strips or jelly rolls. This is an excellent block to use up scraps as each one of the colored squares could be a different color fabric creating a wonderful scrappy look.
Due to its simplicity, this block is an excellent block for beginning quilters and it can create a gorgeous quilt as you can see in the diagram below. This quilt contains 64 blocks- 8 across and 8 down.
Double Four Patch Quilt
Next Week’s Block of the Week will be the Double Nine Patch.
We will feature a quilt block of the week. You will be able to find them all grouped together in the page tab on the right side of the blog. We will have an example of the block and how it looks in a quilt and tell you a little about the history of the block, if known.
Week 1- August 15, 2016
Most Basic Block- Mother of all Quilt Blocks- The Basic Four Patch
This has to be the easiest of all quilt blocks. This is an excellent block for a beginning quilter to start with due to its straight sewing and simplicity. Here is what the block looks like.
Four Patch Block
To enhance the pattern, light and dark patches are alternated. It is called the four patch as it is composed of four patches. I believe that it was first identified by Carrie Hall in 1935. This block is a good one for thrifty quilters as it allows small scraps of fabric to be sewn together. The squares in the example above are 2″ by 2.”
Four patch is also the style, or basic grid-work, of a block when four similar units are combined together to form a larger four patch block, similar to the example below.
4 patch grid block example
Here is how the 4-patch block looks in a quilt. It creates a checkerboard pattern when it is not combined with any other blocks. For this reason, this block is sometimes called checkerboard as well. This quilt is good for placing appliqué and/or quilting designs in the square blocks and borders.
4-Patch Block Quilt
Next week, we will talk about the Double Four Patch Quilt Block.
My sister was recently on vacation in Montana and sent me a photo of a barn, along the road, stating that it needed a quilt. Looking at the photo, which is below, I agreed with her.
Unedited photo that was sent to me
I decided to give it one of my own quilts to adorn it. This quilt pattern, which I am developing, is called Modern Rainbow. I think it’s an improvement on the barn! Wouldn’t it be wonderful to be traveling down the road, in the middle of nowhere, and find this barn with a gorgeous quilt hanging on it? Let me know what you think.