Quilt Block Mania is traveling for the month of July and there are so many wonderful blocks for you to be able to commemorate a special trip. Our complimentary block of the month for Quilt Block Mania, during the month of July, Treasure Chest Star, may be incorporated with some of the other blocks, or as a stand alone project.
In July, we are offering 20% off two digital download patterns that are patriotic. They are Patriotic Polka and Sparkles on Liberty Square. These quilts are great for summer nights and those patriotic summer holidays. The link to these patterns is here: downloadable-patterns/
PP CoverSparklers Quilt Pattern
Testers and Checkers wanted!
Blue Bear is looking for some additional quilt pattern testers and checkers. Testers and checkers receive a preliminary pattern before it is released. Testers actually make the quilt out of their stash and let the designer know if there were any issues with the pattern. Checkers also receive a preliminary copy of a new pattern before it is released. They review the pattern for any errors or things that may be confusing. Both are volunteer activities. An email is sent out telling you about the upcoming pattern and you can then let us know that you are interested in participating. Testers and checkers receive a digital download version of the final pattern; get photos of their work shared on Blue Bear’s social media; receive a free digital download pattern from our web store and occasionally other goodies like fabric. If you are interested in participating in our tester/ checker program, please send me an email at reed@bluebearquilts.com
Quilt Block Mania has 18 talented quilt designers creating blocks for this month’s theme- Travel. Here are the theme colors for this month.
July Colors
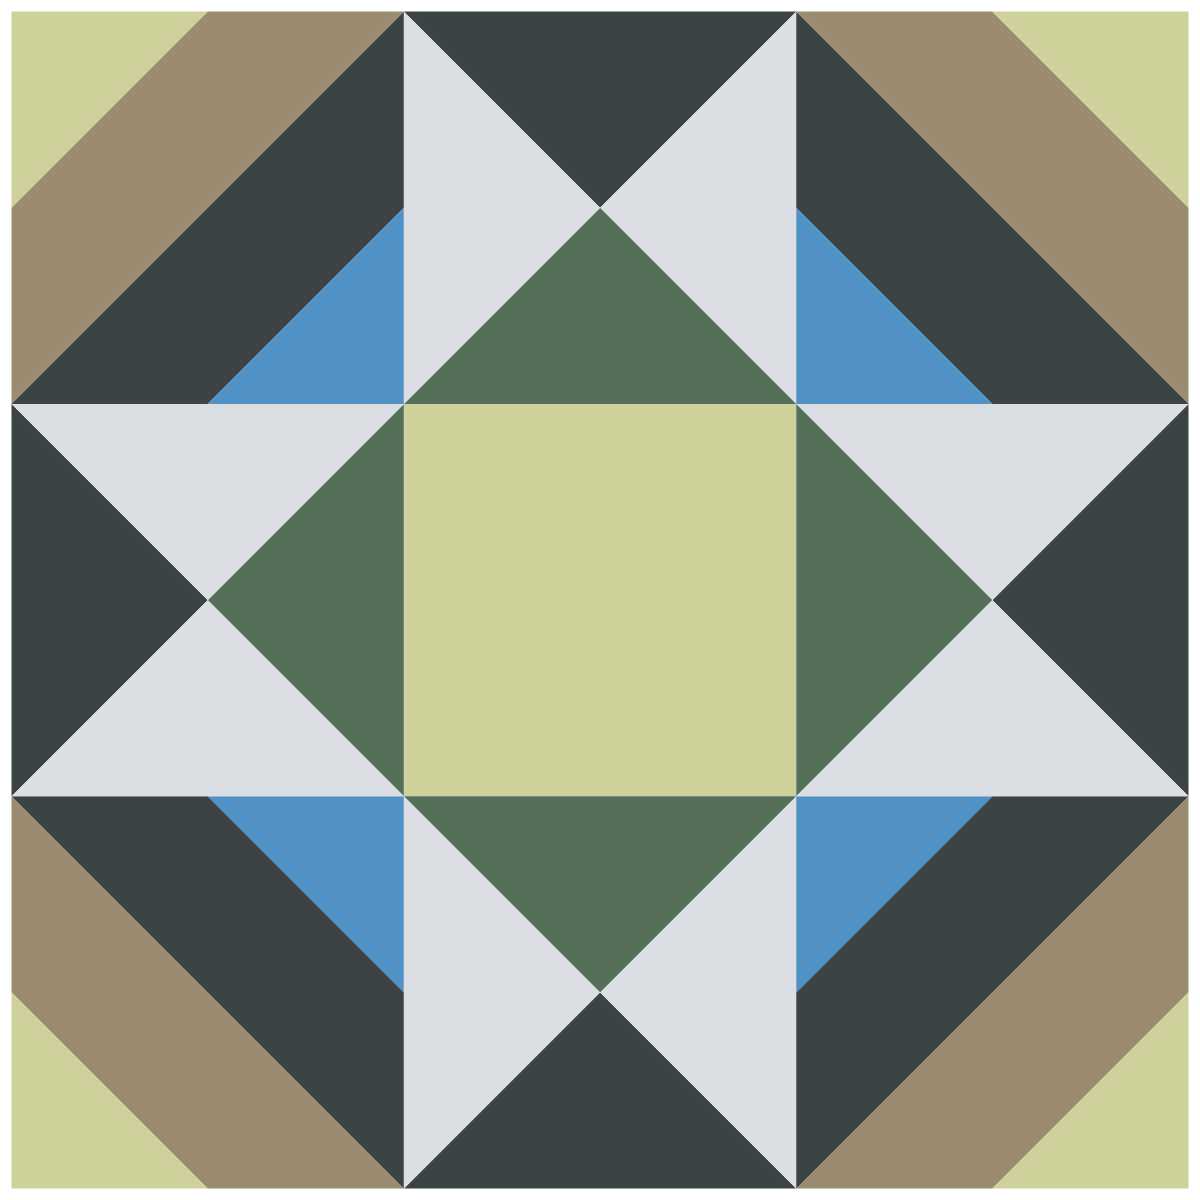
This is the Treasure Chest Star block. Many tears ago, travelers used stars to navigate their way and often they were in search of treasure. Perhaps this block will set you on some travels of your own in search of treasure.
TC Star Block
This block features a gray star emanating from a treasure chest in Celery green, hunter green, sky blue, black and tan. This is a traditional block sewn with a more modern method of strip tubes.
Here is a photo of the Treasure Chest Star block that has been sewn with fabrics from my stash.
Treasure Chest Star sewn
TC TR 51 x 15
The Treasure Chest block makes an awesome table runner. You could also make cool placemats to go with the table runner.
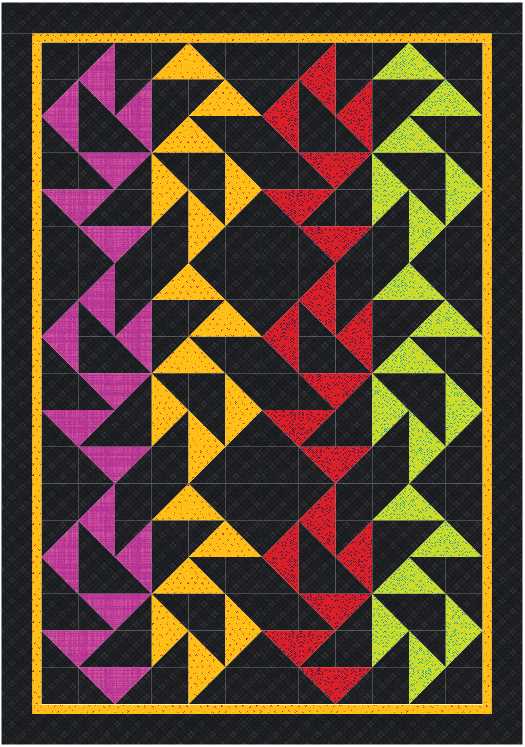
This block also makes a beautiful quilt when you combine 16 blocks and add a 2″ finished black border. The quilt appears to create an optical illusion of the blocks moving as your eyes dance all over the quilt.
TC quiilt 52
How to get the block
If you are new to our website and are interested in downloading a complimentary PDF pattern of our Treasure Chest Star block for July, all you have to do is look for the box on our blog, on the right hand side, that says “Like this content? Sign up for free updates” and sign up to receive our newsletter. When you have done that, you will receive a welcoming email from us that will contain a coupon code and a link back to the complimentary pattern. You will act as though you are purchasing the pattern and in the cart, you will apply the coupon code, which will make the pattern free. You will need to fill out contact information, but no payment method will be necessary. Don’t worry, we do not send out newsletters very often and we never sell email addresses or contact information. Here is what the pattern looks like. It is in a format very similar to most Blue Bear Quilt patterns, so if you see what you like in this free pattern, you will like our other patterns as well.
Please note: This pattern will only be complimentary during the month of July 2021.
TCS Cover
Current newsletter subscribers, don’t despair! You will be able to download the complimentary pattern as well. You have already been sent a newsletter on July 6th which gave you the coupon code.
Be sure to follow us on our Instagram page, @bluebearquilts, as that is where we occasionally have giveaways.
Also, please check out our You Tube Channel (Blue Bear Quilts). We are so happy that you stopped by to visit us in the Quilt Block Mania hop and we hope that you like our block. Please stop by to see all of the other designer’s wonderful blocks.
July Image
You can click on the links to the other blocks here.
We have been very busy creating many patterns, which we hope you will enjoy. We’ve done Facebook Lives with other talented designers over the summer. We created a YouTube channel. And, we have our first fabric collection.
We have been busy sewing lots of face masks. We even found a Quilt in a Day scallop ruler which helped cut out the mask shapes. Even the bears got into the act. Silly Reed thought you could wear them on top of your head but Beauregard Bear showed him the correct way.
Reed with masksBear with maskQIAD ruler
Our Quilt Cruise to Alaska did not happen in June due to the pandemic, but it was fun thinking about the possibility and we hope to schedule another quilt cruise in the future when we can all be together.
We have two new fun summer sailing patterns we created for Accuquillt. One is called Ahoy Mate Table Runner.
This quilt brought some joy to my 4th of July this year.
Next was 50’s Diner in the May/June 2020 McCall’s Quilting magazine.
50’s Diner Quiltmay/june mccalls 2020
Can’t you just imagine drinking an ice cream soda at the soda fountain with your date?
Have you ever tried curved piecing like you would find in the Drunkard’s Path block? The Waverly Path quilt was in the July/August 2020 issue of Quiltmaker magazine.
Waverly PathWaverly PathQM July/August 2020
Finally, named after a grand niece, Thoroughly Modern Vivs was in the premier issue of Fons and Porter Quick and Easy Quilts. It was such an honor to be in this magazine with so many esteemed designers.
Modern Vivs QuiltQuick-Easy
We created several patterns for Timeless Treasures new collections. They are There’s a Bear in My Watermelon Patch 2, using their One in a Mellon collection; Patriotic Polka, using their Treats Freedom collection; Adore Him, using the Come Let Us Adore Him collection; Peaceful Valley, using the Winter Blessing collection and Cowboy Claus, which uses the Ho Ho Hoedown collection. These fabric lines are at quilt shops now and you can purchase these quilt patterns on our website.
There’s a Bear in my Watermelon Patch 2Patriotic PolkaAdore HimPeace in the ValleyCowboy Claus
On Facebook, we did four facebook lives covering a virtual trunk show, accurate cutting, fussy cutting tips and our top 20 favorite quilting notions. We also have a video debuting our first ever fabric collection. If you missed any of these, you can catch them all on our YouTube Channel.
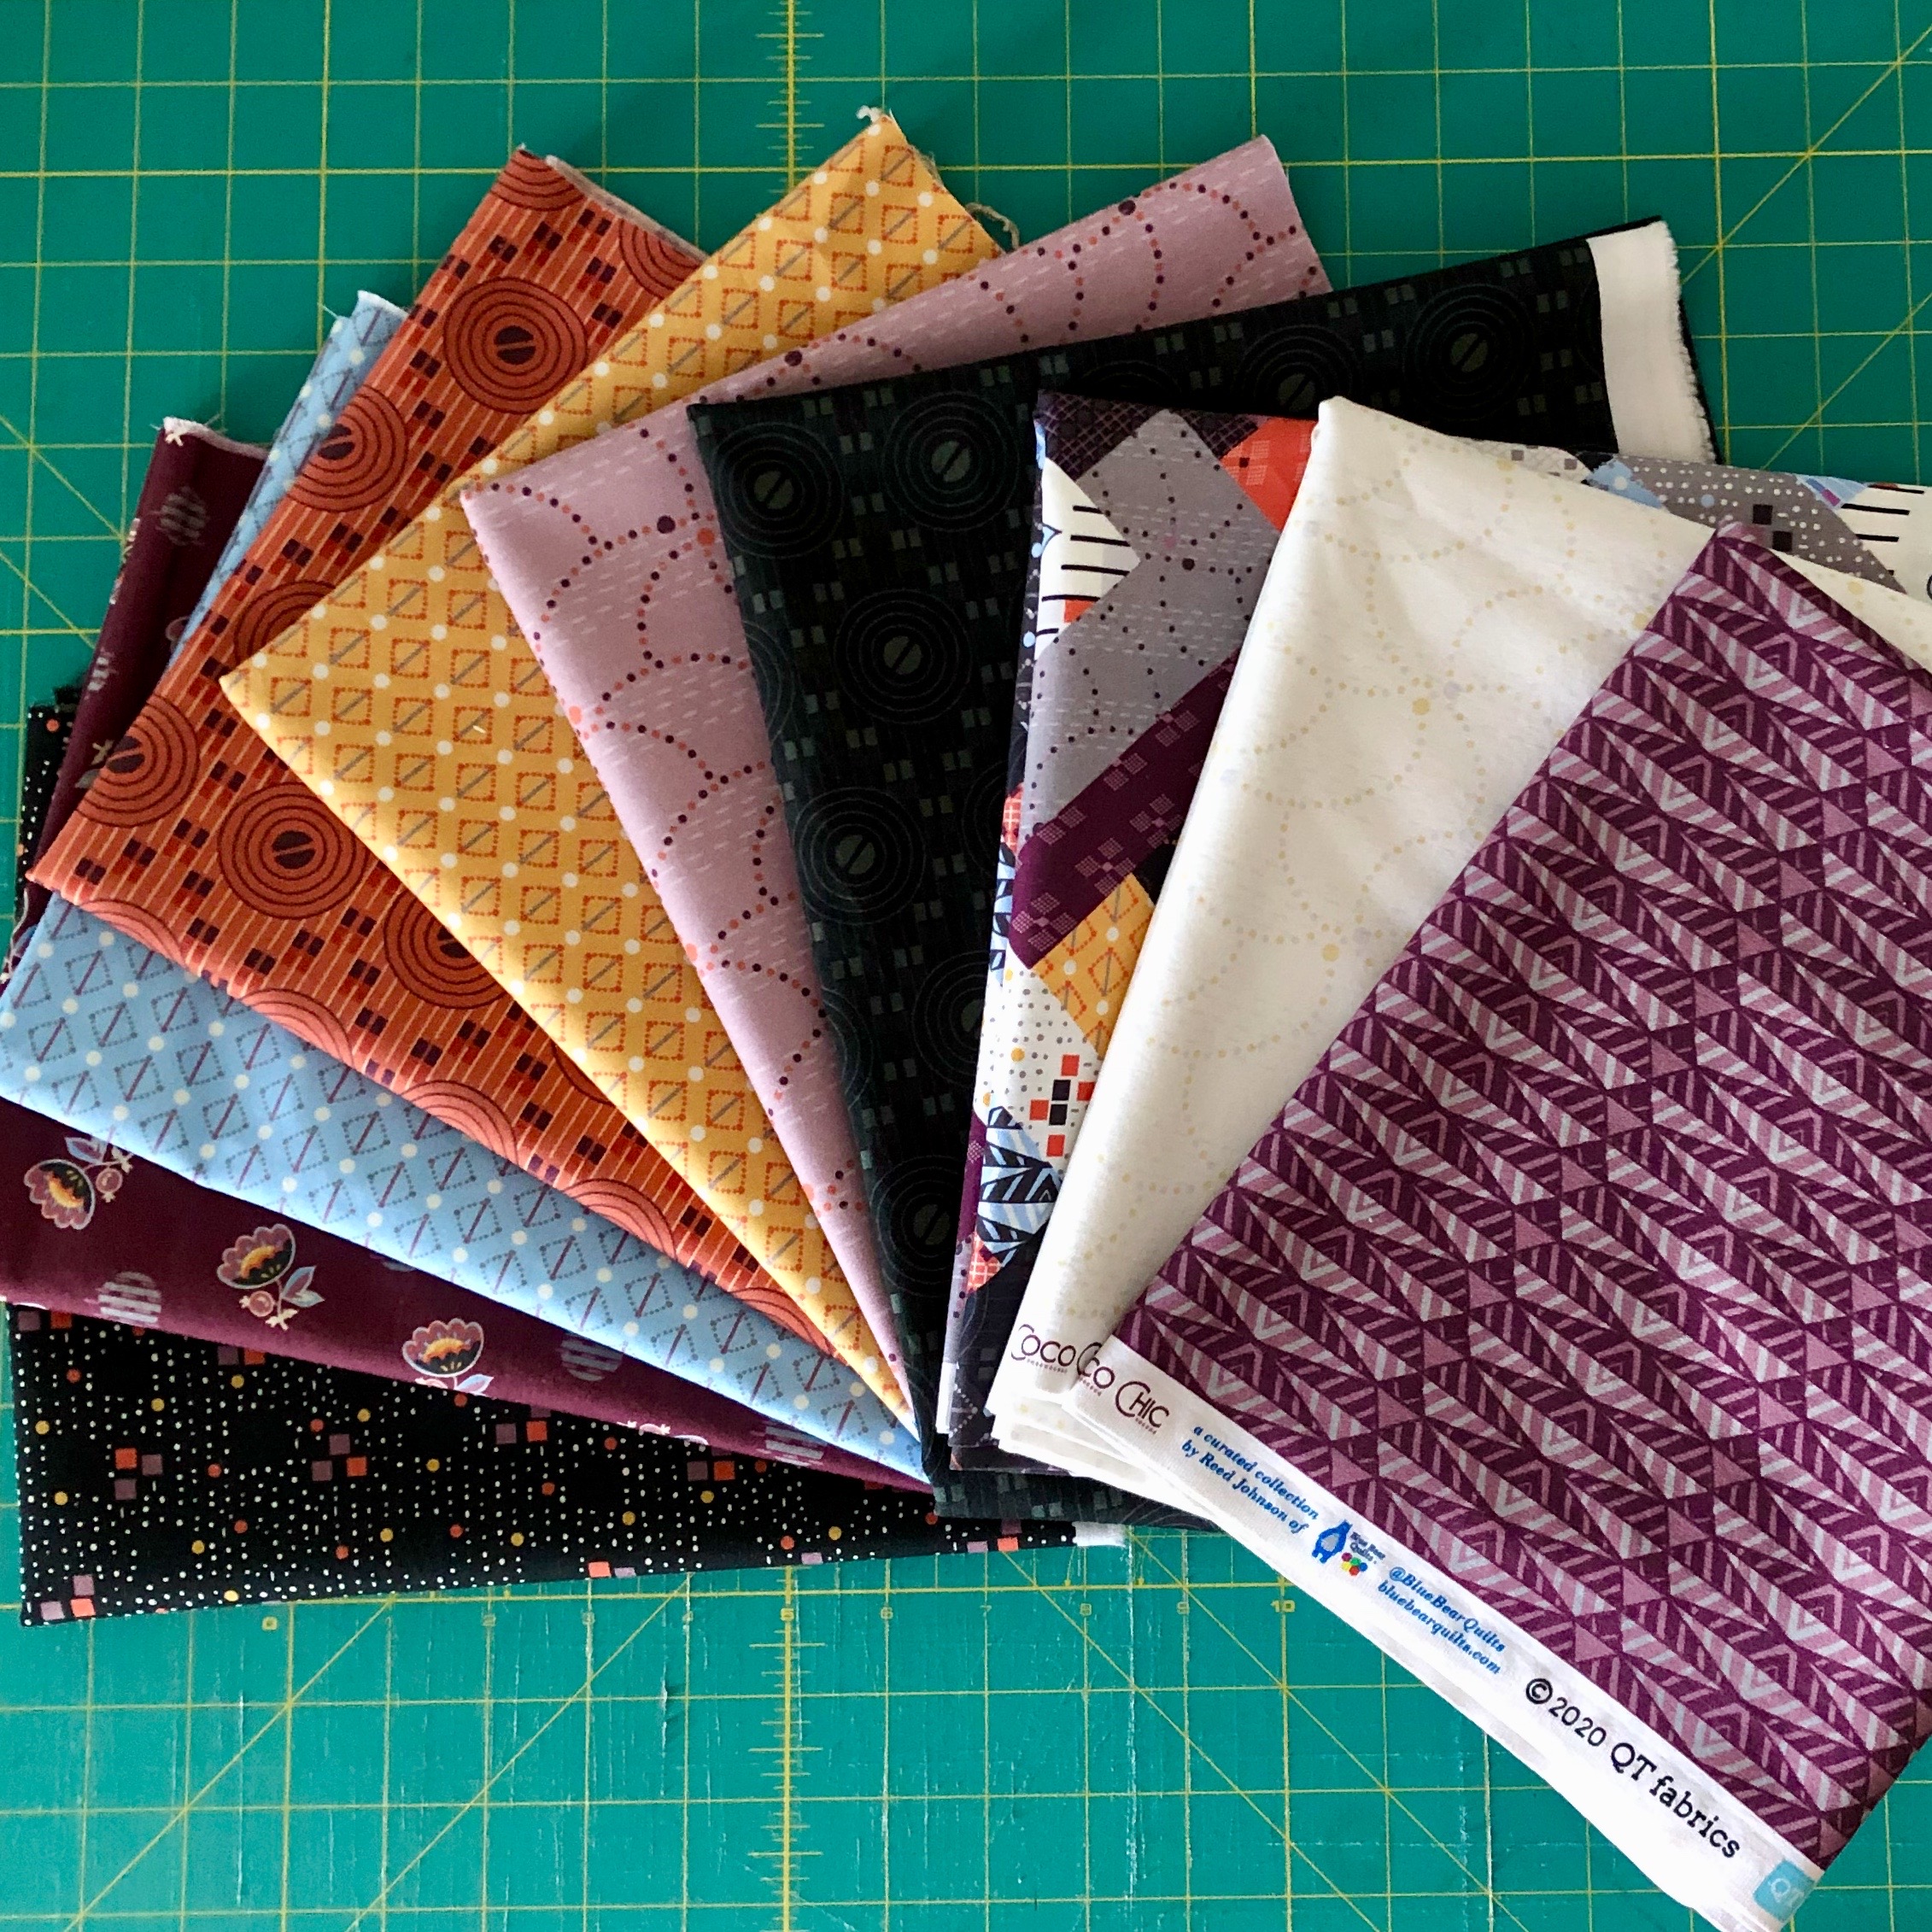
Speaking of a new fabric collection, our first fabric collection is with QT Fabrics and it is called Coco Chic.
Coco ChicCoco Chic Collection
It will be available in quilt shops in January 2021. This fabric collection was inspired by authentic 1920’s fabric from deep in the QT Fabrics archives. Wouldn’t it be fun to have a Great Gatsby or Roaring 20’s party using these fabrics from the time period. We see this fabric being used in quilts, bags, lady’s dresses and men’s shirts. We hope you are as excited about this collection as we are.
Be sure to ask you local quilt shop if they will be carrying Coco Chic. We have designed several quilts using the collection and will have demos on Youtube using the fabrics. Stay tuned for much more regarding this exciting fabric collection.
On August 4th, we will be participating in Quilt Block Mania, A blog hop with other designers, where they all will be giving away a free block pattern with the theme of Back to School. Watch for this coming soon! Keep on quilting. Oh, and Beauregard says Hi.
These are difficult times. We are all concerned about staying healthy, employed and not going crazy. Social isolation is necessary in order for governments around the world to get control of the Coronavirus. There are things you can do to make this time go by a little smoother and more quickly.
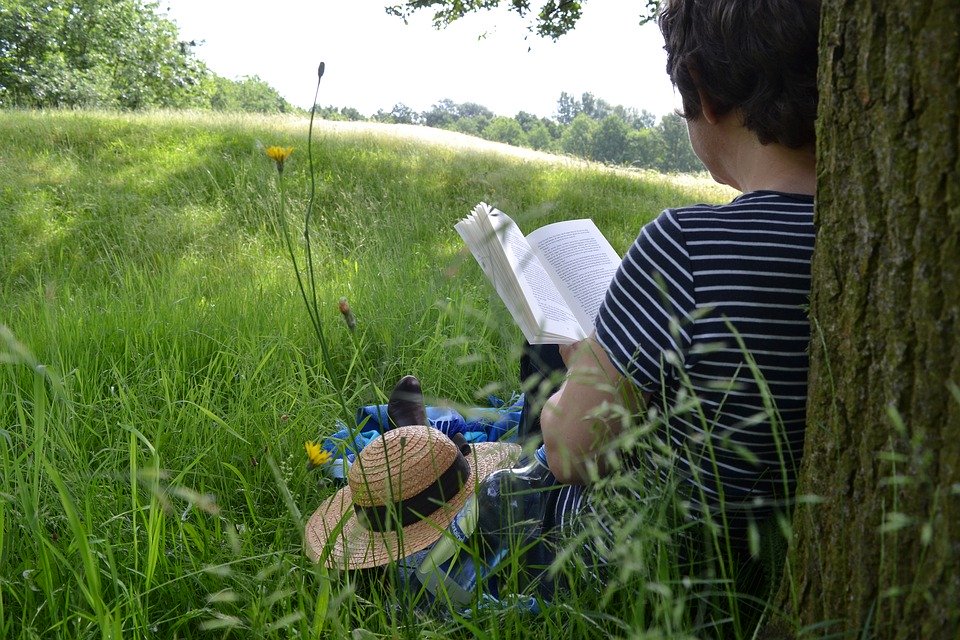
Girl reading book
I thought I would offer 7 tips of what I am doing to get through this. In offering these suggestions, I do not want to diminished the suffering of those who are sick, have lost loved ones, have lost their jobs or businesses. I am also mindful and thankful for the hardships of those on the front lines, like doctors, nurses, firefighters, police, transportation workers, utility workers, food service workers, warehouse and delivery workers and those working in government or other essential services. This post is just to offer some ideas of what to do with your free time while in isolation.
1. Communicate with your friends and loved ones. We are social beings and still need that human connection with one another. There are many apps on your phone, or computer, that will allow you to video chat with friends and loved ones, such as Skype, Zoom, Facetime and Google Hangouts. The video chat is better than a phone call as it allows you to see facial expressions, show what you are doing or give virtual hugs. Many of these services will allow you to connect with several people at the same time and they all have a free component.
2. Volunteer your services. By volunteering, it will occupy your time and mind and has the effect of making you feel better as you are doing some good in the world. There have been many examples of people that are healthy and able offering to go out and get groceries and other needed supplied for those who are less able or more vulnerable. You could call the elderly that are sheltering in the senior homes with no visitors. One volunteer project for sewists would be to make face masks for healthcare workers as those items are in short supply and are desparately needed. You would need to check with your local health facilities to see if these masks are something they would be able to use and if they have any specifications. Here is a You Tube video tutorial on how to make masks:
3. Listen to music. Music has the ability to sooth the soul. Try listening to different music to see how it affects you. Watch this video of an Italian opera singer singing to his neighbors from his back balcony. It will be a few moments of pure bliss.
4. Exercise to bring your brain positive endorphins. Talk a walk outdoors and maintain your social distance of 6 feet and avoid large crowds of people. There are also exercise videos on You Tube which you can do at home. This is a video for doing exercises in your chair:
and this video might be a little more challenging, if you are so inclined and able:
5. Read a good book. There is nothing like a good book to take your mind new places and to forget your cares. There is a company called BookBub, https://www.bookbub.com/welcome, that you can sign up to receive daily emails of digital books that are free, or anywhere from $.99 to $2.99. Also, if you have a current library card, you can download an app called Overdrive or Libby, that allows you to borrow digital books from your library for up to 2 weeks at a time for free.
6. Nourish your spiritual side to find internal peace. For me that comes from attending a church service virtually online, or watching archived sermons, or reading a devotional or the Bible. For you, your nourishment may come from a different source. “Here is an example of a devotional that I recently read from the book 365 Devotions to Embrace what Matters Most by John Michalak. Peace Through Surrender. Here’s a simple definition of war: War is a conflict where the strength and weaknesses of each side are exposed so that one side eventually conquers, and the other side surrenders, resulting in peace. The wars you face will expose your weaknesses. They will give you the opportunity to accept the things you cannot change, and if you choose to see it, they will expose God’s strength and the need to surrender to His strength. Surrendering is scary. But know that God is more than just some distant higher power. He is someone who loves you deeply. He is someone who will stand faithful when you’re ready to give up. He will hold your troubles in safekeeping and offer you a peace that passes understanding. Will you surrender your troubles to Him?” “Do not be anxious about anything, but in every situation, by prayer and petition, with thanksgiving, present your requests to God. And the peace of God, which transcends all understanding, will guard your hearts and your minds in Christ Jesus.”- Philippians 4:6-7.
7. Learn a new hobby or a new technique in your current hobby. If you are a quilter, you could learn how to make a mini quilt with Sue Bouchard from Quilt in a Day. Here is a video on how to make a mini red, white and blue star quilt:
You could take up knitting by watching this video:
Or, you might even take up the Ukulele by watching this video:
I hope I have given you some ideas that you can use while you are hunkering down. Please take this virus seriously and stay safe and healthy for yourself and your loved ones. We will get through this by being smart, caring and compassionate. Hang in there and keep on quilting.
Over the years, we have created a number of patterns for Accuquilt. I thought it would be fun to share them all in a post. They are all available on their website as a free download. The patterns on their website may be found here: https://www.accuquilt.com/patterns.html
The first pattern that we created for Accuquilt was Hexagon Illusions and it was made by cutting larger hexagons from an ombre fabric and then cutting smaller hexagons from the same section of the fabric and rotating them 180 degrees and appliquéing them onto the larger hexagons.
Hexagon Illusions
Elephant Cuddles was the next pattern and it was made from Minky.
Elephant Cuddles
Holiday Northwoods Medley Placemats are created with a reverse appliqué technique.
Holiday Northwoods Medley Placemats
Lilac Table Topper uses the die that cuts perfect 1″ finished squares.
Lilac Table Topper
Fall Frolic Table Runner was made with beautiful Jinny Beyers Denim fabric from RJR Fabrics.
Fall Frolic Table Runner
Cleapatra’s Garden Gate featured the Cleapatra’s Fan die.
Cleopatra’s Garden Gate
Have you ever heard of crumb quilting? That was the technique used in Spring Medley Mug Rugs. You sew small scraps of fabric together and then apply fusible webbing before cutting out the appliqué shapes on the die. Accuquilt also supplies the embroidery files as a free download on their website.
Spring Medley Mug Rugs
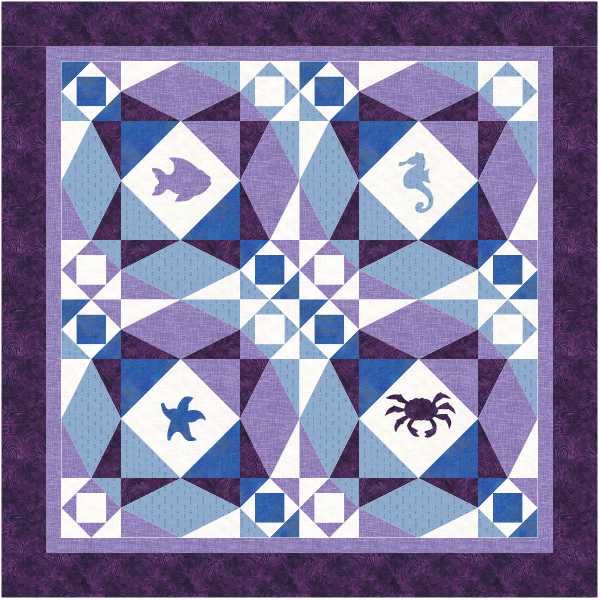
Fun at Sea Life Medley is a great quilt pattern for showcasing your appliqué shapes.
Fun at Sea Life Medley Quilt
With that same die, we also created Storm at Sea Life Medley.
Storm at Sea Life Medley Quilt
Antique Americana was made using the very versatile Hattie’s Choice die. This patriotic quilt is perfect for the 4th of July, Veteran’s Day or a Quilt of Valor.
Antique Americana
A perfect quilt for a hot summer day would be Orange Cream Soda. It features the Studio Setting Triangles dies.
Orange Cream Soda
A modern take on the Glorified Nine Patch block resulted in Sherbet Dreams.
Sherbet Dreams
Fall is Coming is a great quilt for fall which uses Kimberly Einmo’s Solidish Fabrics from Timeless Treasures Fabrics.
Fall is Coming
Love Letters also used Kimberly Einmo’s Solidish Fabrics from Timeless Treasures Fabrics. This would be a great Valentines quilt.
Love Letters
In the mood to create something scary? Then you might want to make the Boo! Halloween Medley Table Runner.
Boo! Halloween Table Runner
Ahoy Mate and Let’s Go Sailing were created using the GO! Nautical Medley die and is the perfect pattern and die for all of you water lovers.
Ahoy Mate Table Runner
Let’s Go Sailing
The Retro Twist Wall Hanging was made with the Starry Path die. This is the perfect wall hanging for your mid century modern home.
Retro Twist Wall Hanging
The Go! Yuletide Gnome Wall Hanging is a great decoration to make for the holidays. Who doesn’t love a little gnome?
GnomeYuletide Gnome Wall Hanging
Your kids will love the Deco Dino Table Runner.
Deco Dino Table Runner
Stay tuned for more fun and inspiring designs we create for Accuquilt.
At Blue Bear Quilts, we have been very busy getting ready for the summer 2018 classes. We also have been working on some secret sewing projects for Accuquilt that we can’t wait to share with you. We also have been designing patterns with QT Fabrics. Hopefully, we will be able to share these projects with you very soon.
Triaxial Weave Pillow
Here are some of the exciting classes that we have coming up this summer. We will be offering a Triaxial Weave Pillow at Keep Me in Stitches on May 22& 29 in Tampa and July 12 & 19 in Largo. This is a weaving project that has little sewing and offers many creative ideas to incorporate into your sewing projects like garments, bags, and quilts.
We have an exciting Electric Quilt 8/ Accuquilt Event coming up at Keep Me in Stitches on May 25 & 26 in Tampa, and June 22 &23 in Largo. In this two-day event, you will learn the basic functions of EQ8 and learn how to create the “In the Jungle” quilt in EQ8 incorporating Accuquilt die shapes. The second day, we will cut out the quilt pieces using an Accuquilt cutter and die and sew the quilt together.
In the Jungle Quilt
Finally, at Keep Me in Stitches, we have an Accuquilt party called “Patriotic Windings Ways,” perfect for the 4th of July, on June 8 & 9, in Largo, and June 15 & 16 in Tampa; a 3D Pinwheel Serger Blanket for the Baby Lock Serger Club, and the Bright Hope Quilt, in Tampa, on June 7 & 14th, and, in Largo, on August 20 & 27th.
Country Quilts and Bears in Clearwater will have two offerings this summer. The first is our Accuquilt block contest fan favorite, “Not Your Grandmother’s Flower Garden” on May 23 & 30 and then “Water Wheel,” on July 14th, A Quilt in a Day Pattern.
Water Wheel
At Bear Patch Quilting Company in White Bear Lake, Minnesota, on August 8th, we will be teaching a Quilt in a Day pattern called “Kylee’s Kite,” which we have put a modern spin on it with black and white fabrics and lots of geometric quilting.
Kylee’s Kite
Finally here are some photos from classes that we held this last session: Zippered serger pouch, Wonky Heart Pillow, Hawaiian Stars, and Snapshots Quilt.
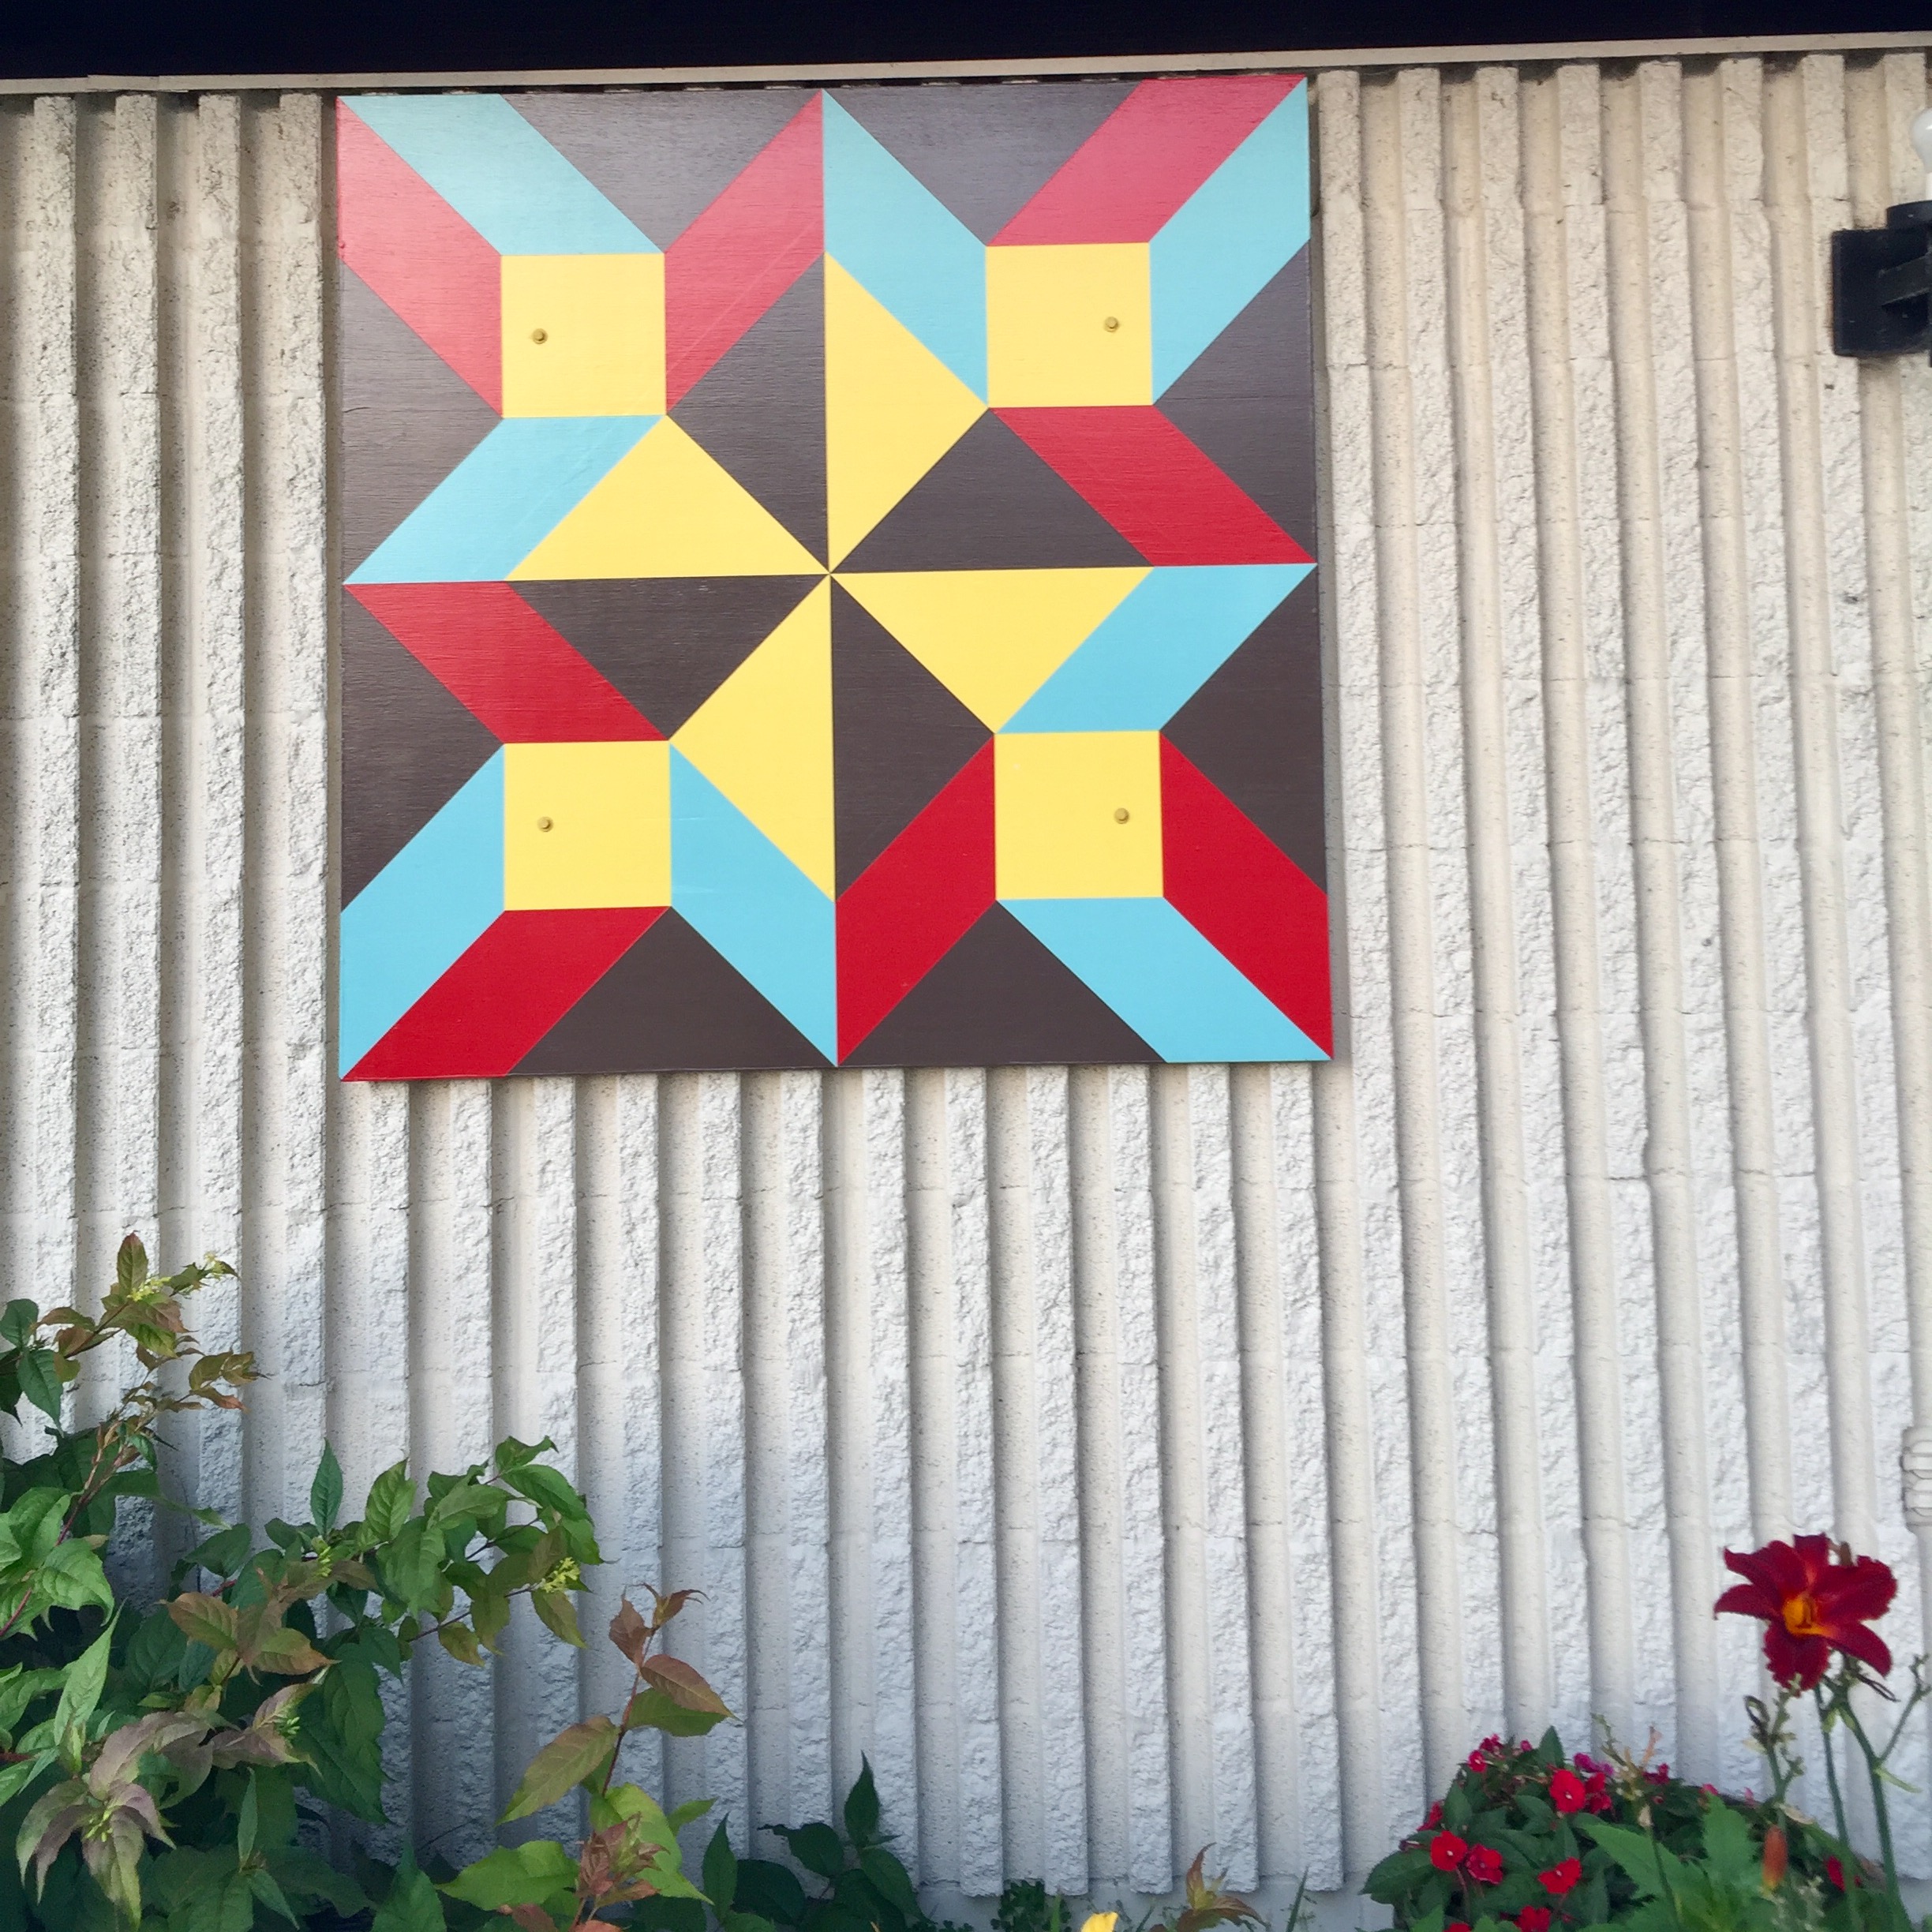
When I was teaching at Bear Patch Quilt Company in White Bear Lake, MN, this August, I came across a Swedish Barn Quilt Trail when sightseeing with my sister. This trail is located on Highway 8 and goes through the cities of Chisago City, Lindstrom, Center City and Shafer. How fun it was to see all of these beautiful quilt blocks decorating buildings. A barn quilt is a quilt block pattern that is painted on a large wood square and hung on a barn, or on the front of a business. They are designed to last 6-8 years by using several coats of paint and then applying a clear coat. The first barn quilt trails were created in 2001 in Ohio. Scroll down to see the photo of the patriotic home that has tons of antique auto memorabilia surrounding it.
Whirling StarTulips in the CornerInterdependencePatriotic house in Lindstrom with lots of antique auto memorabilia.Swedish Rubics CubeDr. Pete’s Patchwork PetsSwedish Summer Night with Dala Horse in centerStar of BethlehemTable for FourCross and DartsGoldstarTulips in TownSwing in the CenterFantasiaStar BurstThere’s no place like Dome
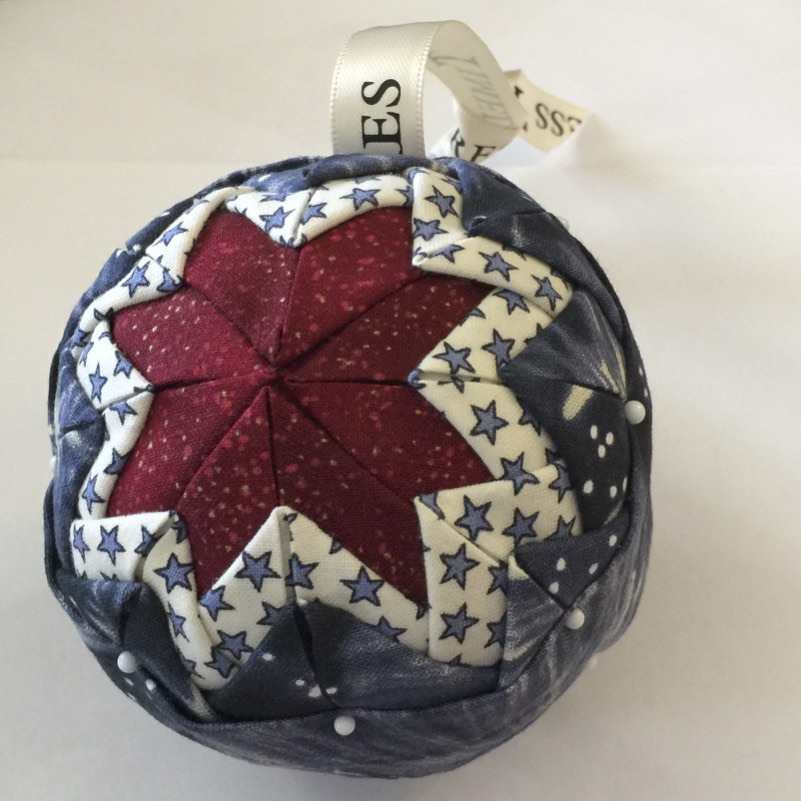
You could make one of these every year year. Keep them for yourself, or give them as a gift. Once you learn the technique, you can put photos on fabric in the middle or use something small that you have cross-stitched or embroidered. Have fun making these as they do not need to be perfect to look fantastic!
Quilted Star Ornament – Supply List
(1) 3” Styrofoam ball
(1) 1/8th yard dark fabric
(1) 1/8th yard light fabric
(1) 1/4th yard 2d dark fabric
(1) box dressmakers pins 1 1/16th inch, at least 300 count
(1) box extra-fine glasshead pins in color of your choice
(1) 1/4th yard decorative silky ribbon to create hanger
Quilted Star Ornament – Preparing Fabric
You need 2.5″ squares of coordinating and contrasting fabric. You will need 3 coordinating fabrics and one of them should be a light color and the other two can be a darker color. Press your fabrics, and then using a cutting mat and rotary cutter, cut 2.5″ strips and then sub-cut the strips into 2.5″ squares. For a 3” Styrofoam ball, you will need 10 squares of the first dark color and 16 squares, each, of the light colored fabric and the 2nd dark colored fabric.
2.5″ squares
Now, it’s time for the pressing of the prairie points. But first, set aside 2 squares from the first dark color, of which you started with 10, that you will not be pressing.
a. Fold the all the rest of the 2.5″ squares in half to make rectangles that are 1.25” x 2.5.” Press with your iron on steam setting. Do not iron, just press.
Half Rectangles
b. Then fold the just made rectangles again to make squares that are 1.25” x 1.25”.
1.25″ folded squares
c. Once you have the small, twice folded, squares, you open them back up to the rectangle and then fold the upper, left and right, corners in to meet the center crease line in the middle of the rectangle. Be precise when lining up the edges to the center; the closer (without overlapping the edges) the better. This makes a neat equilateral triangle (a prairie point) with the folded edges meeting in the center of the front of the triangle. When you have formed the prairie point, you carefully press. Be careful not to burn your fingers. You will end up with 40 small prairie points and 2 squares that have not been pressed.
Prairie PointsPrairie Points close upPrairie Points and squares
Quilted Star Ornament – Pinning the Pieces
To create the quilted look, you pin the prairie points to the foam ball in concentric layers.
Start by placing the two unfolded squares, evenly spaced apart, one at the top and one at the bottom, on the foam. Pin each corner of the squares to the foam and have the corners from each square almost meet each other, evenly spaced apart.
Squares on opposite sides
Round 1 of Prairie Points (1st Dark color that has 8 remaining squares)
Place your first prairie point directly on the 2.5″ square just placed at the top of the foam. Match the wide edge of the prairie point triangle with the corners of the square. Pin the bottom wide corners of the prairie point to the foam, first, and then the upper point. Then pin, to the foam, the upper point of the prairie point in between the two folds, a little below the top edge of the prairie point. You want to place the pin right in the creased edge of the fold so that the fold will cover it. Pull the folded flaps over this pin to hide it. When finished with a prairie point, the two pins at the bottom of the triangle will be showing and the pin at the upper point will be covered by the folded edges.
First Prairie Point
Using the same method, complete the second prairie point directly across from the first one. The upper points of these two prairie points will meet in the middle of the unfolded square on the foam ball.
Second Prairie Point
Using the same method, place the 3rd prairie point in the empty space beside the two just placed prairie points.
Pin the 4th prairie point in the remaining open space on the unfolded square to finish this round. You will have 4 prairie points in the center of the foam ball and all points should match up and not be overlapping each other at the center. They may overlap each other a little at the bottom of the prairie points. You will repeat this process on the opposite side of the ball and can do so now or after you have finished all 3 rounds on the top first.
Completed Round 1 on one side
Round 2 of Prairie Points (Light color that has 16 squares)
In this next round, you can decide how large you want your center star to be by deciding how much of the first round you want to leave showing. A good approximation is to start the 2nd round about ½” below the top of the first round. You should be able to fit 3 rounds without using more than half of the foam ball’s space.
To start round two, this time, place the prairie point’s upper point pin in first, right in the middle of the fold line of the first prairie point, from the previous round, about ½” from the top of the round 1 prairie point and then pin down the outer corners of the prairie point. It helps to put a pin anywhere on the prairie point, while pinning this center point first, and then remove this temporary pin. Use the same technique from round 1 of placing the upper point pin between the two folds a little below the top edge of the prairie point and pull the folded flaps over the upper point pin to hide it. Then pin the outside corners of the prairie point. These outside corners will overlap each other.
Round 2, 1st Prairie Point
Place the second prairie point, of round 2, completely opposite of the one placed in # 2 above. Just like last time, pin the center, hide the pin, and then pin the corners of the prairie point.
Using the same method, place the third prairie point, of round 2, 90 degrees from prairie points 1 and 2 just created.
Using the same method, place the 4th prairie point, of round 2, directly opposite of the piece created in # 4 above.
Now there are 4 long sections of the first round (dark color) that are exposed and are creating an “x.”
Round 2 “X”
You will now be placing a prairie point in each of the legs of that “x.” Place a 5th light color prairie point in one of the areas not covered by the previous 4 pieces from round 2. Place this prairie point in the line formed where the edges of the round 1 prairie points meet and just slightly below the level where the previous 4 round 2 prairie points were placed.
Round 2, 5th Prairie Point
You are adding another layer to round 2, of the same color, and are now going to start forming your star. Just like before, pin the center point, hide the pin, and then pin the corners of the prairie point.
Place the 6th prairie point completely opposite of the one placed in # 6 above.
Place the 7th prairie point 90 degrees from pieces 6 and 7 above.
Place the 8th prairie point directly opposite piece # 8. You will now see your first star formed from the dark color of round 1.
Completed Round 2 on one side
Round 3 of Prairie Points (2d Dark color that has 16 squares)
Now you will place a third round of prairie points on top of round 2. Start with the first prairie point that you placed in round two and going about ½” from the upper point of the round 2 prairie point, place the point pin of the round 3 prairie point first, in the folds of the round 2 prairie point, just like you did for the last round, and then pin down the outer corners of the round 3 prairie point.
Round 3, 1st Prairie Point
Place the second prairie point completely opposite the one in # 1 above.
Place the third prairie point 90 degrees from the prairie points created in # 1 and 2 above.
Place the fourth prairie point directly opposite of prairie point # 3 above.
Now there are 4 prairie points of the second round (light color) that are not covered by round 3. You will next place a prairie point in each of those 4 prairie points. Place a 5th dark color prairie point in one of the areas not covered by the previous 4 pieces from round 3. Place this prairie point in the center line of the round 2 prairie point and just slightly below the level where the previous 4 round 3 prairie points were placed. You are adding another layer to round 3, of the same color, and are now going to start forming your second star. Just like before, pin the upper center point, hide the pin, and then pin the corners of the prairie point.
Round 3, 5th Prairie Point
Place the 6th prairie point completely opposite of the one created in # 5 above.
Place the 7th prairie point 90 degrees from prairie points # 5 and 6 from above.
Place the 8th prairie point directly opposite of the one created in # 7. You will now see your second star.
Completed Round 3 on one side
Optionally, If you have room for another layer without going over the half way point of the foam ball, switch colors and repeat steps from round 3. You would need to cut 16 additional 2.5” squares of the new color.
When finished with one side of the foam ball, flip over the ornament and repeat all steps. If you repeated each round on the opposite side as you went, this step is already completed.
Quilted Star Ornament – Finishing Steps
Where the top and bottom edges meet is where you will place a fabric strip or ribbon. Usually the edges don’t match up perfectly. You can make the fabric strip the width needed to make sure you cover it all. Notice my edges and how at one spot the prairie points overlap each other and in another spot there is a gap.
Ornament Unfinished Edge
Finishing the Ornament
If you used a different sized ball, wrap a measuring tape around the ornament to determine the size of ribbon or fabric needed to cover the edge. For the 3” foam ball, I used a 12″ x 2.5” strip of fabric. You can use whatever color of fabric you want, but if you used the same fabric as in the round three prairie points, it will create a more harmonious look.
Coordinating Fabric Strip
Fold the strip in half, wrong sides together and press. Open the strip and fold both long edges of the strip toward the center line so that they meet in the center and then press. Fold each end of the strip in about a ½ “ and press. You end up with a 1.25″ finished strip to wrap around the ornament.
Determine the top of your ornament, if you have a preference. Wrap the fabric strip around the edge of your ornament and secure with the glass head pins at the intersections of the prairie points. When you come to the top, lay your hanger ribbon under the fabric strip and secure the ribbon and fabric strip to the ornament with four glass head pins. Tie your hanger ribbon in a knot at the top.
Attaching Strip and Ribbon
Optionally, you can attach the fabric strip and the hanger ribbon with a glue gun, if you prefer.
Keep in mind this is a handmade item and is not going to be perfect. The imperfections are what make it unique and special. There are no rules for the colors that are used or the spacing used between the rounds. Make it yours! You can make these into hanging ornaments, or decorative balls to place in a bowl or basket. The first round does not need to be prairie points. You can substitute a photo on fabric for the center square, or use a small piece of cross-stitch or embroidery as the center. To do this, you would skip the placement of the round one prairie points and start with round two after you have placed your photo or needlework.
Your ornament is ready to hang on your tree or give as a gift.
Folded Fabric Star Ornament
Please let me know if you have any questions and please share any ornaments that you make with the hashtag #bluebearquilts.
Happy 4th of July America. This is a patriotic home in Whitefish Bay Wisconsin.
Patriotic House
Blue Bear is taking some time off to celebrate with his family. He has been working on several new patterns to be released soon. A couple are patriotic and use fabrics designed for Quilts of Valor. Another is a bed runner that he is designing.