Posted on 32 Comments

Island Batik Ambassador- December Project- Reach For the Stars Quilt- Part of the Lone Star Blog Hop

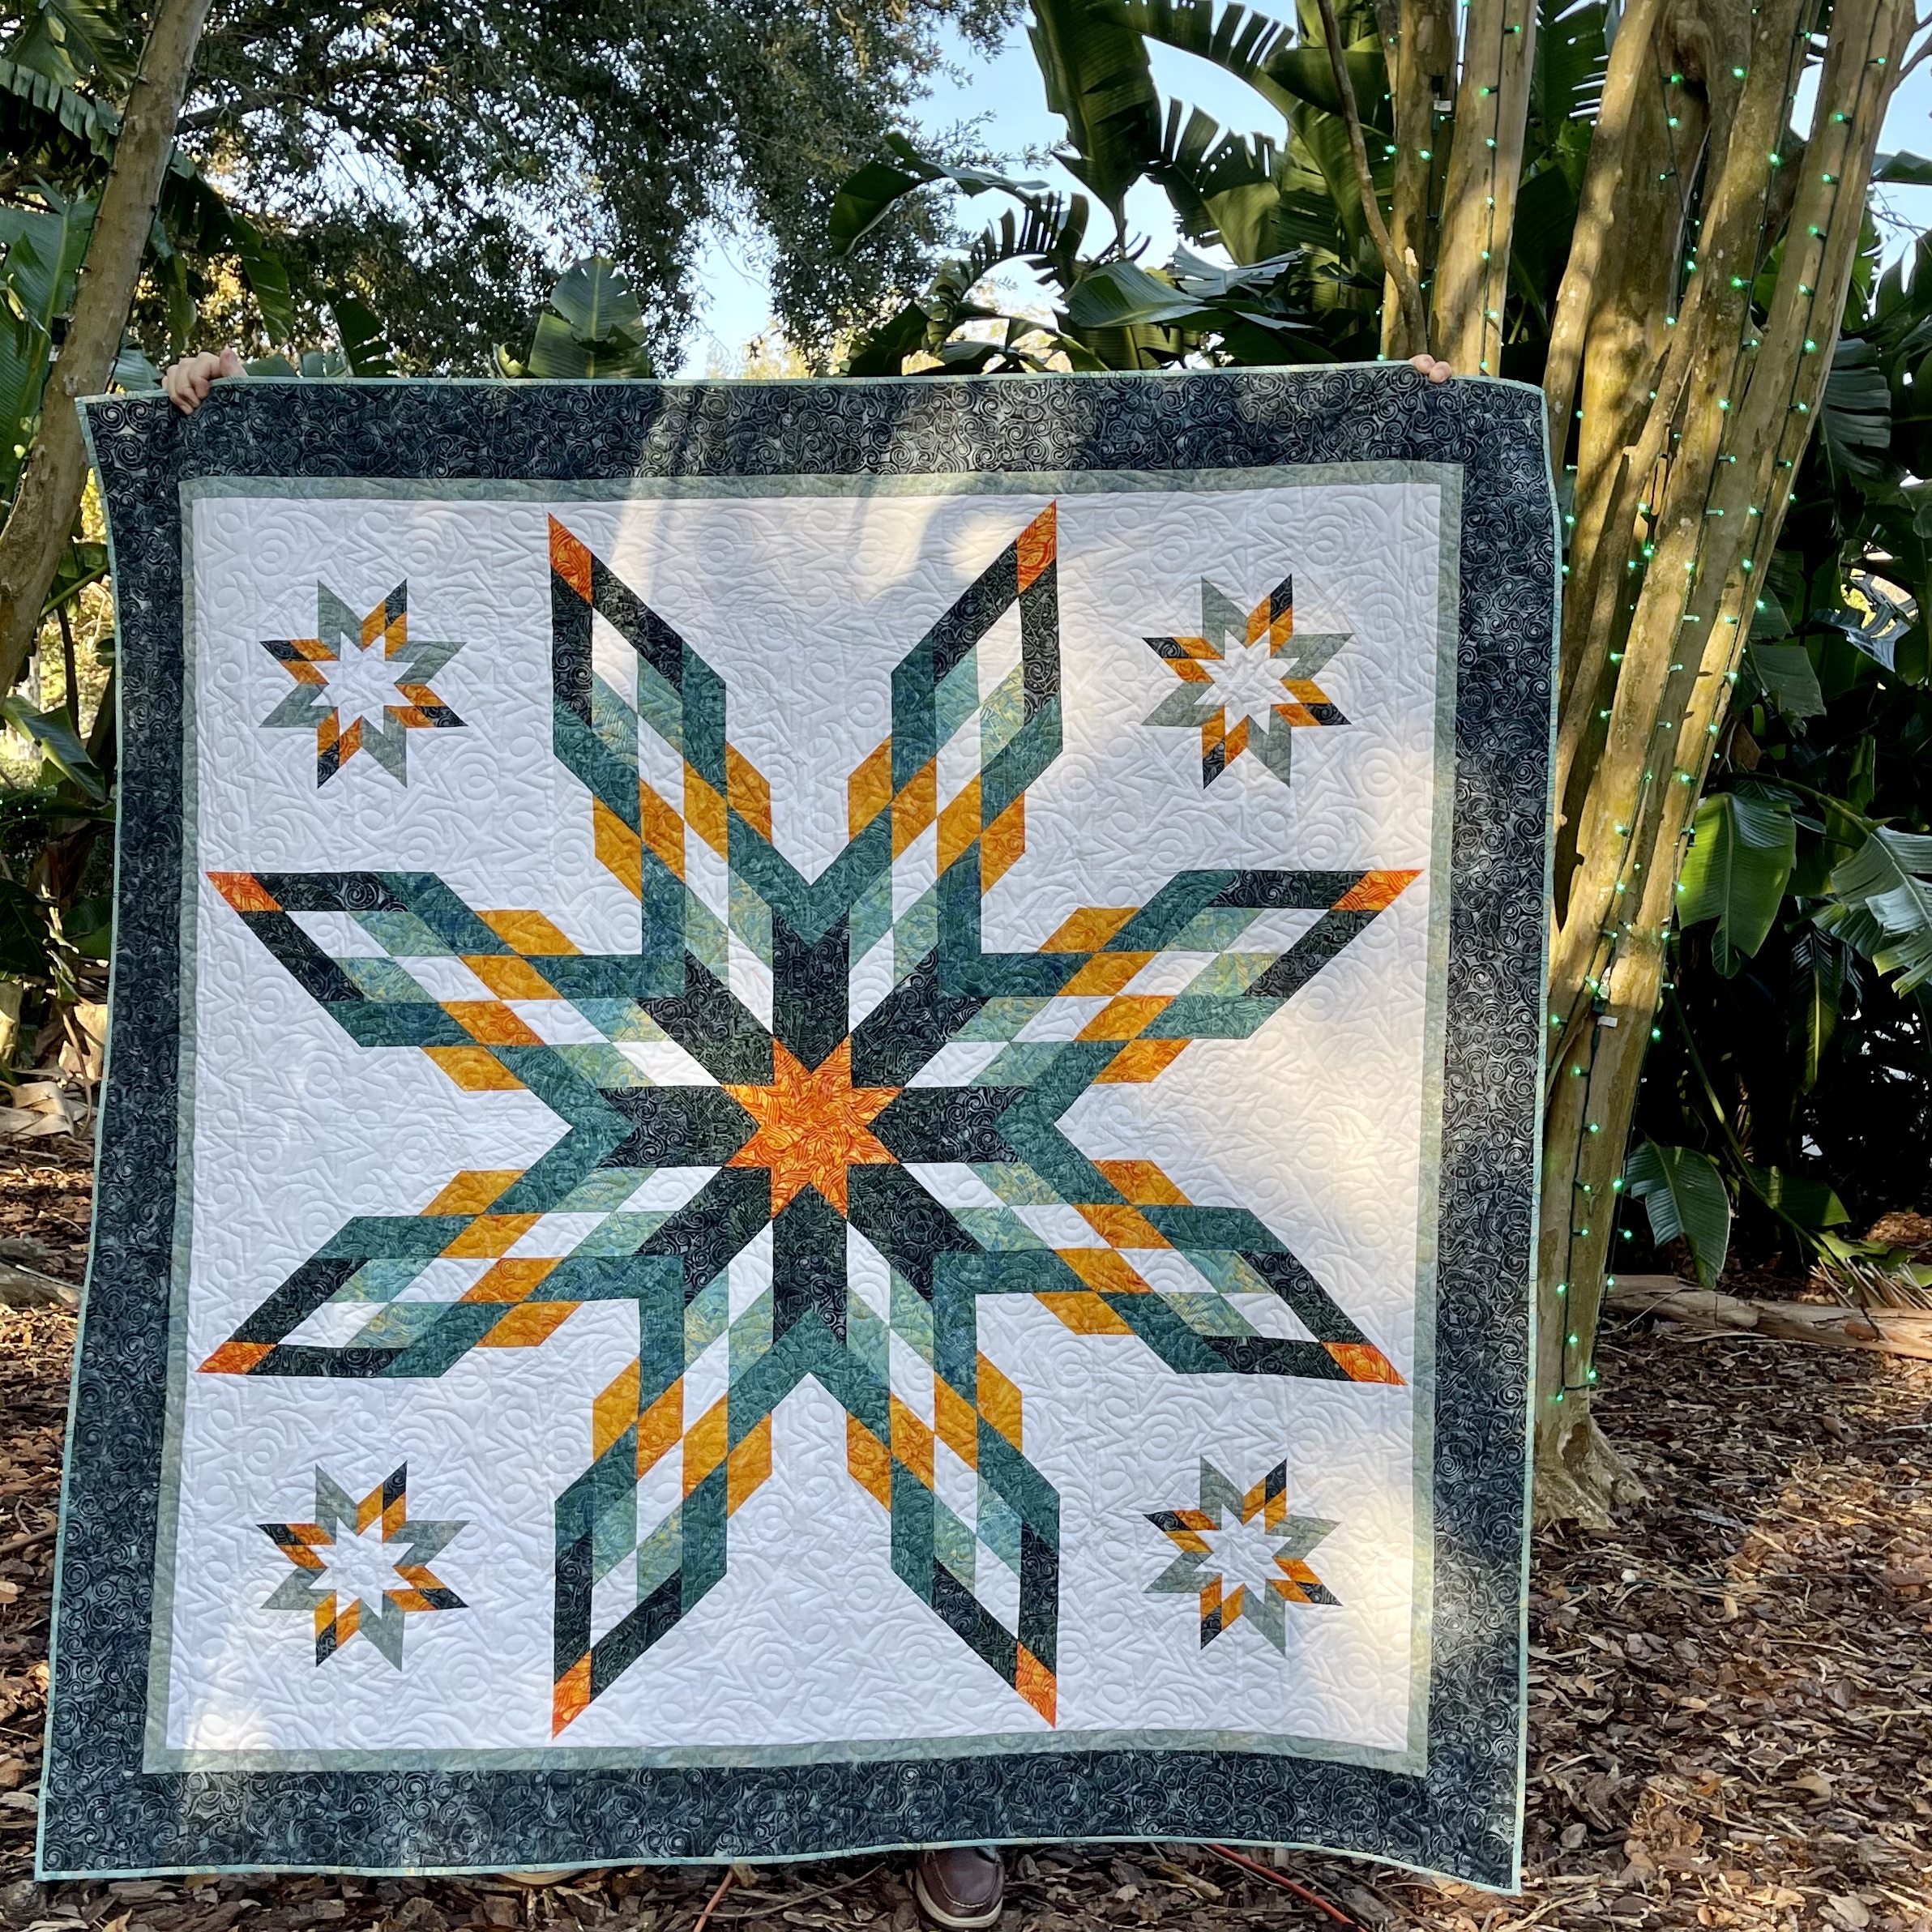
Reach For the Stars quilt

Happy Holidays! This month’s blog hop is called Lone Star as the Island Batik Ambassadors will all be making a lone star quilt using different fabric collections from Island Batik. I love the look of Lone Star quilts and I know you are going to see some awesome quilts with this month’s Island Batik blog hop. Since this month is a blog hop, you can check out the Island Batik blog and enter each week to win a fat quarter bundle of some of the fabrics that the Ambassadors are using in their projects. I will show the other fabric collections later in this blog along with a link to the giveaway from Island Batik and links to other ambassador’s blogs.

I have always liked lone star quilts and yet I have never made one. A very special lone star quilt that I saw in South Dakota is part of the Dignity Statue. This statue is massive. The Dignity Statue is a tribute to the Lakota people of South Dakota. The image of the star quilt is a reminder of the importance of generosity in Lakota culture and is one of the most valued gifts one can receive. Also, if you are looking for some additional inspiration for Lone Star quilts, there are a lot of them featured in the 24th issue of Quiltfolk, which is about South Dakota quilters.

Dignity Statue
Dignity Statue


Dignity Lone Star
Dignity Lone Star


Quiltfolk SD
Quiltfolk SD

The December project was to make a lone star quilt using an upcoming fabric line from Island Batik. I love the fabric I was given to use: Copperfield by Claudia Pfeil. Just look at this gorgeous collection of batik fabrics. The Copperfield collection may be found at your local quilt shop that carries Island Batik, such as Fabric Smart in St. Petersburg FL. You may find them online at www.fabric-smart.com or call them at 727-914-8850.

The quilt I made is called Reach For the Stars. It is a large lap sized quilt- 58″ x 58.” This striking quilt has shades of orange and shades of green on a white background. It’s a more modern lone star in that it has numerous white diamonds that create an open, lacy look to the main star. I live near Central Park- no, not that Central Park, and every year the whole park is lit up with holiday lights and they have a carnival with amusement rides. It was the perfect location to take pictures of this quilt.

Reach For the Stars quilt


quilt ornament
quilt ornament
quilt at the carnival


Quilt on the Merry-Go-Round

Here is a closeup of the Copperfield batik bundle I was provided. What a beautiful selection of orange and green batiks. 

Copperfield
Copperfield

These are the fabrics I chose from the collection to incorporate into my quilt along with white background fabric.

fabrics for quilt
fabrics for quilt

I used my Electric Quilt 8 software to design this quilt. This is what the quilt looked like in the software. This combination of fabrics, with this layout, causes the main star in the quilt to radiate outwards. I think it has this effect even more so in the actual quilt.

Computer lone star
Computer lone star

Now that I had the fabrics and the design, I had to figure out how I was going to make this quilt as I had never made a lone star quilt before. Thanks to my good friend, Eleanor Burns of Quilt in a Day, and her book, Radiant Star Quilts, I knew that I would be able to successfully make this quilt.

Radiant Star Quilts
Radiant Star Quilts

You probably know that Eleanor is a stripper and one method for making a lone star quilt involves sewing strips together. The other method is to sew lots of diamonds together. I wanted to use the strip method in the Quilt in a Day book. You need a lot of strips, so I got out my Creative Grids Stripology Ruler and quickly cut out all the strips I needed to make this quilt. 

CG Stripology Ruler
CG Stripology Ruler

In the next step, the strips have to be sewn together in a certain order to create the diamond points of the main star. Each subsequent strip is offset downward, which creates a 45 degree angle at the end of the strip set. When sewing multiple long strips together, it is a good idea to reverse directions when sewing the subsequent strips on; i.e., start at the bottom instead of the top on every other strip. This helps to prevent bowing in your strip sets.

sewing strips together

To create the diamonds, the strip sets are then cut at an angle. This creates biased edges on the newly cut strips and you have to be careful to not stretch them when pressing and/or sewing. You trim the end at a 45 degree angle and then make subsequent cuts that are the same size as your original strips, which in my case was 2.5.”

strips cut at an angle


There were three or four different combinations of strip sets that had to be sewn together and then cut at an angle. You then have to match up the correct angled strips next to each other and sew them together. This requires a lot of organization so that you have sewn the correct strip sets together and then are sewing the correct angled strips together. The Quilt in a Day book was well written and following the detailed instructions helped with the organization. 

angled strips sewn together

One sign of a well made lone star quilt is that all those diamond points are nicely lined up. There are a lot of intersections to be matched up. In order to accomplish that, it is necessary to mark the quarter inch seam on the strips at the intersections and then hold them together with pins. It’s definitely more work, but you can see from the previous photo, that that extra effort results in nicely matched points.

marking the quarter inch seam

For the smaller inset stars, I was able to cut the strips sets at an angle with the Stripology Ruler, which has 45 degree lines on it. 

angled cuts with stripology ruler

The corner stars were created with a unique placement of the diamonds, which created an outline of a star. In order to get the corner stars the correct size, it was necessary to add setting triangles and then cut the squares down to size to match the length of the diamonds in the main star.

corner stars
corner stars

One of the more challenging aspects of making the quilt was adding the setting corners and setting triangles. They are made the correct size by measuring the length of the diamonds in the main star. Then they are sewn with inset seams. This is accomplished by marking where the quarter inch intersection is located and sewing slow to not stretch the biased edges of the pieces. You are also working with a large quilt top at this point, so there is a lot of fabric to maneuver under the needle.

adding the setting triangles

I like to piece the backing of my quilts with left over fabric from the quilt I am working on. Using many of the large leftover pieces quickly made a backing for the quilt.

Quilt back
Quilt back


The theme of the quilt is stars and thus I picked a quilting design with swirls and stars. When a quilt has a lot of sharp angles in it, it is good to pick a quilting design with curves in it as this will not compete with the quilt. 

My long armer for this quilt was Kim from Sunshine quilts. She used a really fine white thread which allows the quilting to pop in the white background areas but does not overtake the colored fabrics in the main star design. Didn’t she do a fantastic job? Here is a link to her Facebook page if you would like to bring, or send, your quilts to her: Sunshine Quilts.

quilting closeup
quilting closeup


Finally, it was time to bind the quilt and I used a green from the Copperfield collection. My Betty Bobbin sure comes in handy for keeping the binding neat while I am working with it.

Betty Bobbin
Betty Bobbin


Hobbs Heirloom Premium 80/20

The supplies I used to make this project were provided by:

Island Batik Copperfield collection.

Aurifil 50 wt Thread

Hobbs Heirloom Premium 80/20

Schmetz 70/10 Quilting needle

Prairie Spirit Alpacas alpaca wool pressing mat
 
Hobbs-Aurifil-Schmetz-IB-Alpaca.jpg

If you are on TikTok, be sure to check out the video I have posted of me with the quilt. (Look for Blue Bear Quilts)

Blue Bear hopes you like this quilt. Please let him know how much you love the this quilt by writing to him in the comments!

The other amazing Island Batik Ambassadors are also posting their December Blog Hop Lone Star quilts.  Check out their projects by clicking on the links next to their names to be directed to their blog posts.


December 5

Maryellen McAuliffe, Mary Mack Made Mine

Gail Sheppard, Quilting Gail

December 6

Megan Best, Bestquilter

Brenda Alburl, Songbird Designs

December 7

Preeti Harris, Sew Preeti Quilts

Emily Leachman, The Darling Dogwood

December 8

Jennifer Thomas, Curlicue Creations

December 9

Blog Hop Round-Up Week 1 and Giveaway

WEEK 2
December 12

Reed Johnson, Blue Bear Quilts. Thanks for stopping by!

Suzy Webster, Websterquilt

December 13

Gail Renna, Quilt Haven Threads

Jennifer Fulton, Inquiring Quilter

December 14

Denise Looney, For the Love of Geese

Claudia Porter, Create with Claudia

December 15

Leah Malasky, Quilted Delights

Andi Stanfield, True Blue Quilts

December 16

Blog Hop Round-Up Week 2 and Giveaway

WEEK 3
December 19

Mania Hatziioannidi, Mania for Quilts

Michelle Roberts, Creative Blonde Gifts

December 20

Pamela Boatright, Pamela Quilts

Connie Kauffman, Kauffman Designs

Sandra Starley, Textile Time Travels

December 21

Jane Hauprich, Stitch by Stitch Custom Quilting

Lisa Pickering, Lisa’s Quilting Passion

December 22

Brianna Roberts, Sew Cute and Quirky

Anorina Morris, Samelia’s Mum

Elizabeth DeCroos, Epida Studio

giveaway bundles
giveaway bundles

The giveaway of the Blog Hop started on Friday, December 2nd. Each week two lucky winners will each get one Fat Quarter bundle of a complete Island Batik collection. This week, it is Heartland or Emperor’s Treasures  by Kathy Engle! To enter for your chance to win one of the two prizes above, follow the simple Rafflecopter prompts below.

a Rafflecopter giveaway

This giveaway ends on December, 16th at 11:59 pm PDT. Two random winners will be notified by email on December, 17th and announced on our Facebook page on December, 20th. If the winners do not respond within the first three days after being notified, two new random winners will be chosen. Please check your spam folders!

Make sure to follow Island Batik on social media to hop along with the Lone Star Blog Hop. Be sure to check out the Island Batik Blog.

#islandbatikambassador #islandbatik #iloveislandbatik #hobbsbatting #aurifil #aurifilthread #schmetzneedles #doyoueq #Janome #lonestarbloghop #creativegrids #quiltfolkmagazine #electricquilt #eq8


Posted on 6 Comments

Island Batik Ambassador- November Project- Crazy Quilt Stocking- Part of the Creative Christmas Stockings Challenge

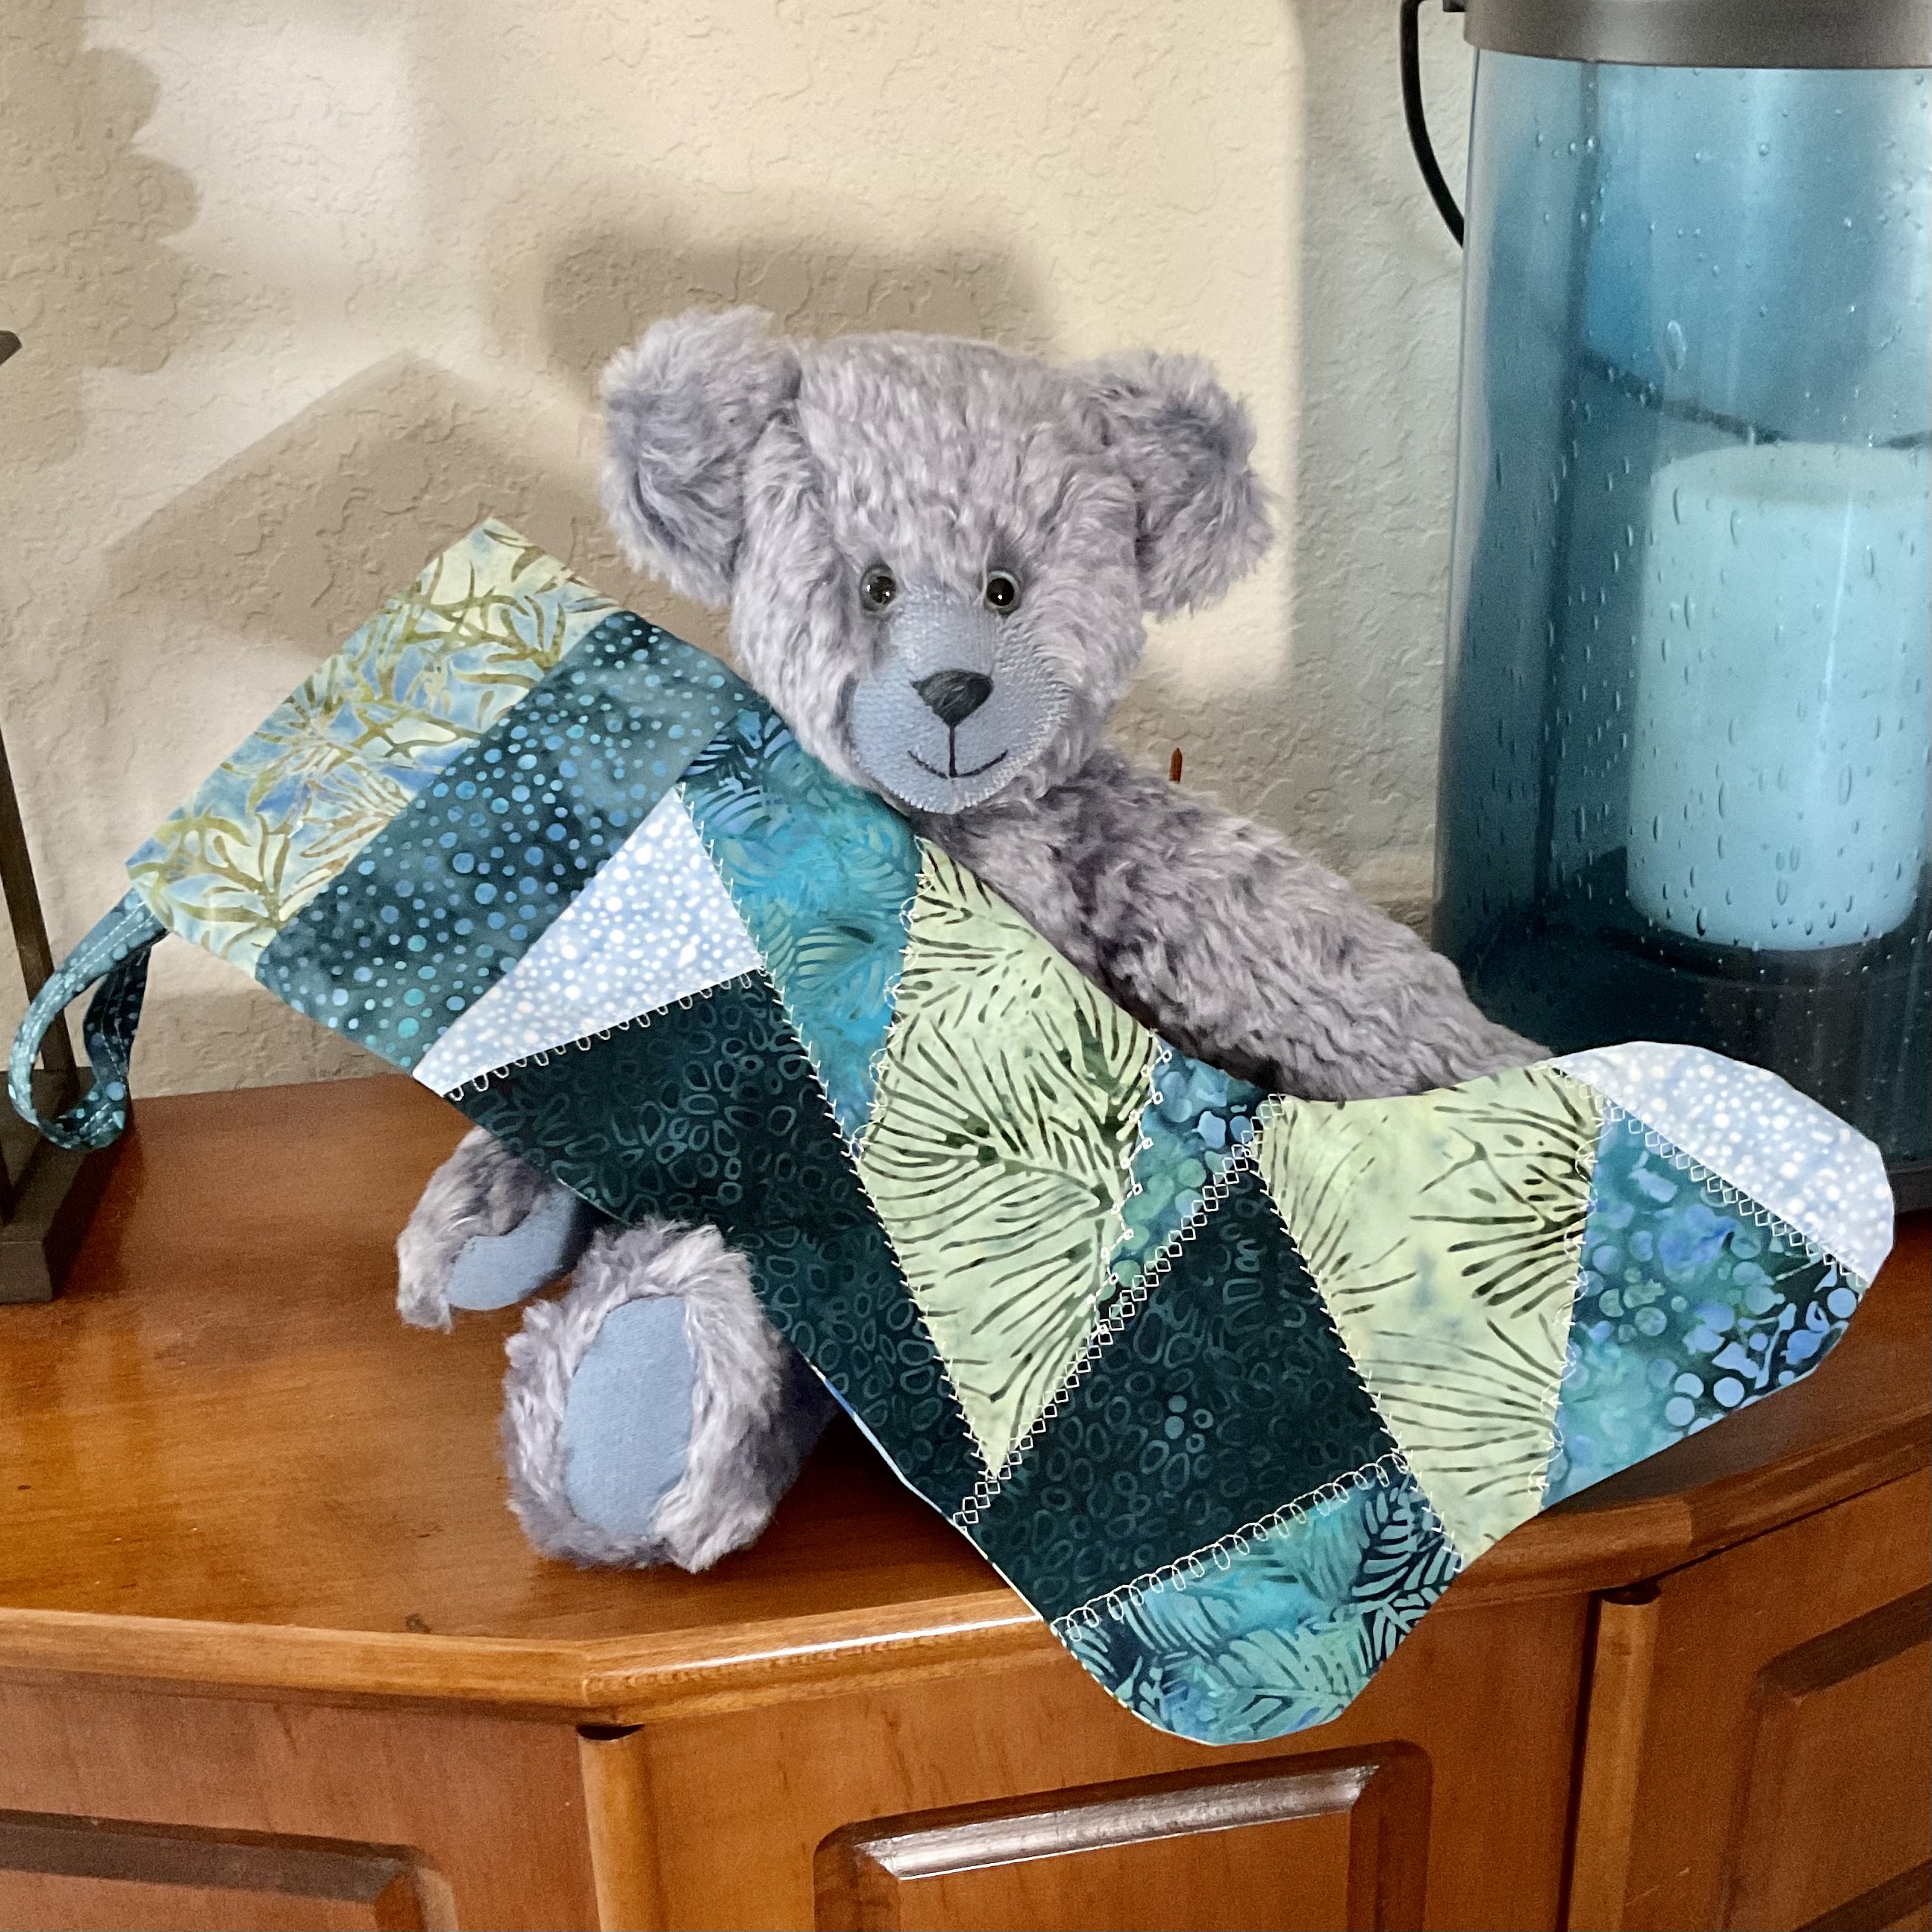
Blue Bear with Stocking

 This month’s challenge is called Creative Christmas Stockings and the Island Batik Ambassadors will all be making stockings and can choose whatever fabric they like from Island Batik.  Maybe some will do unusual piecing or appliqué; maybe some will make stockings in unusual shapes or small gift bags.  I can’t wait to see what the other Ambassadors are going to come up with this month. At the bottom of this blog, I have links to the other designer’s blogs so you can see what they made.

Creative Christmas Stockings

I wanted to make a crazy quilt stocking with a blue wintery theme. I chose the Mountain Gems line by Kathy Engle as my main fabric. Just look at this gorgeous collection of batik fabrics. The Mountain Gems collection may be found at your local quilt shop that carries Island Batik, such as Fabric Smart in St. Petersburg FL. You may find them online at www.fabric-smart.com or call them at 727-914-8850.

Mountain Gems
Mountain Gems


Mountain Gems fabric

I chose to make a crazy quilt stocking using the Crazier 8 templates from Creative Grids and the Studio Stocking Die set from Accuquilt. Crazy quilting is where the shapes are cut at odd angles and then sewn together. Decorative stitches are then sewn over the seam lines, so they show, on the good side of the fabric. Blue Bear and Beauregard Bear are thrilled with their new stocking. 
Blue Bear with Stocking


Beauregard with Stocking


The Crazier Eight templates were used to make crazy quilt blocks and the Accuquilt Studio cutter and die set were used to cut out the stocking shapes. The Studio dies look different from the Accuquilt GO! dies in that they are made of wood with steel blades and foam surrounding the steel blades. They are used in the Studio cutter, which is a more industrial and manual cutter that can cut up to 12 layers of fabric at a time. This is great for quilt shops or designers that need to cut a lot of fabric. If you would like to see a video of how I cut out shapes with an Accuquilt cutter, there is a video on my You Tube channel-Blue Bear Quilts. Here is the link to the You Tube video: https://youtu.be/3-hp6QzFkOo. In this video, I am using an electric GO! Big Cutter, as opposed to the Studio Cutter I used to make this stocking which is manual, but the concept is the same.

Creative Grids Crazier 8 templates and Accuquilt Studio Stocking dies


The great thing about the Crazier 8 template set is that you can cut out the shapes you need for an 8″ block from 10″ squares and you can buy the Mountain Gems fabric in 10″ squares. The squares need to be cut in half diagonally as you can see in the next photo.

10" squares cut in half diagonally
10″ squares cut in half diagonally

In the next photo, you can see how shapes A, B and C are cut out from one half of the fabric, with the Creative Grids Crazier 8 templates, and shapes D and E are cut out from the other half. This makes it easy to cut multiple layers of fabric at a time. The templates also cut off the dog ears which make lining up the pieces easy to sew and no trimming when done. A rotating mat is helpful when cutting out these shapes.

fabric cut with Crazier 8 templates


block sewn together
block sewn together

The photo above shows a Crazier 8 block sewn together. You sew shapes A, B and C together first and then sew shapes D and E together. Finally, you sew the two halves together. Next I sewed three blocks together to create a blocky stocking shape.

three blocks sewn together

Then I applied byAnnies.com Fusible Stabilizer to the back, which was used to stabilze the decorative stitching that I would be putting on the front of the fabric. I had to make one of these for the front of the stocking and one for the back. The decorative stitching had already been done in this photo. And the next photo shows a close up of the decorative stitching I did using my Janome 6600.

stabilizer on the back


close up of crazy quilt stitching

Now that the crazy stitching is all done, it’s time to cut out the stocking shapes. I have my two crazy patchwork pieces, one is a mirror image of the other, and two pieces for a fabric lining. I lay them over the stocking die and crank them through the machine and perfect stocking shapes are cut out.

fabric on Studio cutter and die

One needed to be laid on the die right side up and the other wrong side up. The same thing would be true for the lining fabric, but its is not as crucial with batik fabric as both sides look good. 

cut out stocking an reverse

I also made a pieced cuff for the stocking by sewing strips on both sides of another piece of fabric and then cutting out the cuff with the other Accuquilt die that is part of the set. 

pieced top of stocking cut out

Unfortunately I forgot to take photos of sewing the stocking together. You start by sewing the interior curve of both the outside pieces, and the lining, from the top of the cuff down to the top of the curve. You then sew the top of the exterior pieces to one side of the cuff and the top of the lining pieces to the other side of the cuff. Next, you flip them right sides together and pin all the way around and leave a small opening. You sew 1/4″ all the way around, except for the opening. Finally you turn everything right side out, stitch the opening closed, and then stuff the lining into the stocking. 

I hope you have enjoying reading how I created this Christmas Stocking. Stay tuned for next month when I reveal a lone star quilt.

The supplies I used to make this project were provided by:

Island Batik Mountain Gems fabric.

Aurifil 50 wt cotton thread

Schmetz 70/10 quilting needle

byAnnie fusible stabilizer


Island Batik
Island Batik
Schmetz Needles
Schmetz Needles
Aurifil Thread
Aurifil Thread


If you are on TikTok, be sure to follow me there for more quilting antics. (Look for Blue Bear Quilts)

Blue Bear and Beauregard Bear hope you like their stocking. Please let them know how much you love them by writing to them in the comments!

The other amazing Island Batik Ambassadors are also posting their November Challenge stockings.  Check out their projects by clicking on the links next to their names to be directed to their blog posts.

Gail Renna, Quilt Haven Threads

Michelle Roberts, Creative Blonde Gifts

Sandra Starley, Textile Time Travels

Jennifer Thomas, Curlicue Creations

Brenda Alburl, Songbird Designs

Jennifer Fulton, Inquiring Quilter

Lisa Pickering, Lisa’s Quilting Passion

Suzy Webster, Websterquilt

Denise Looney, For the Love of Geese

Gail Sheppard, Quilting Gail

Preeti Harris, Sew Preeti Quilts

Connie Kauffman, Kauffman Designs

Megan Best, Bestquilter

Maryellen McAuliffe, Mary Mack Made Mine

Elizabeth DeCroos, Epida Studio

Jane Hauprich, Stitch by Stitch Custom Quilting

Emily Leachman, The Darling Dogwood

Andi Stanfield, True Blue Quilts

Leah Malasky, Quilted Delights

Claudia Porter, Create with Claudia

Mania Hatziioannidi, Mania for Quilts

Reed Johnson, Blue Bear Quilts

Pamela Boatright, Pamela Quilts

Anorina Morris, Samelia’s Mum

Brianna Roberts, Sew Cute and Quirky


Make sure to follow Island Batik on social media. Be sure to check out the Island Batik Blog.

#islandbatikambassador #islandbatik #iloveislandbatik #byannie #aurifil #aurifilthread #schmetzneedles #Janome #creativegrids #Accuquilt #Bluebearquilts


Posted on 4 Comments

Island Batik Ambassador- October Project- In Control Caddy Bag- Part of the It’s In the Bag Challenge

In Control Caddy

 This month’s challenge is called It’s In the Bag as the Island Batik Ambassadors will all be using different byAnnie.com patterns and different fabric collections from Island Batik.  I don’t usually make bags, so this will definitely be a challenge for me, but I have been told that byAnnie patterns make bag making a breeze. That’s fantastic as who don’t want to make their own bag with some beautiful batik fabric from Island Batik? I know you are going to see some fabulous bags this month. At the bottom of this blog, I will have links to the other designer’s blogs so you can see what they made.

It's In the Bag Challenge
It’s In the Bag Challenge

The October project was to make a bag using a current fabric line from Island Batik and a pattern from byAnnie.com. I was able to pick any pattern I wanted and any fabric line. I chose The In Control pattern and the Silverado Canyon line by Kathy Engle. Just look at this gorgeous collection of batik fabrics. The Silverado Canyon collection may be found at your local quilt shop that carries Island Batik, such as Fabric Smart in St. Petersburg FL. You may find them online at www.fabric-smart.com or call them at 727-914-8850.

Silverado Canyon
Silverado Canyon

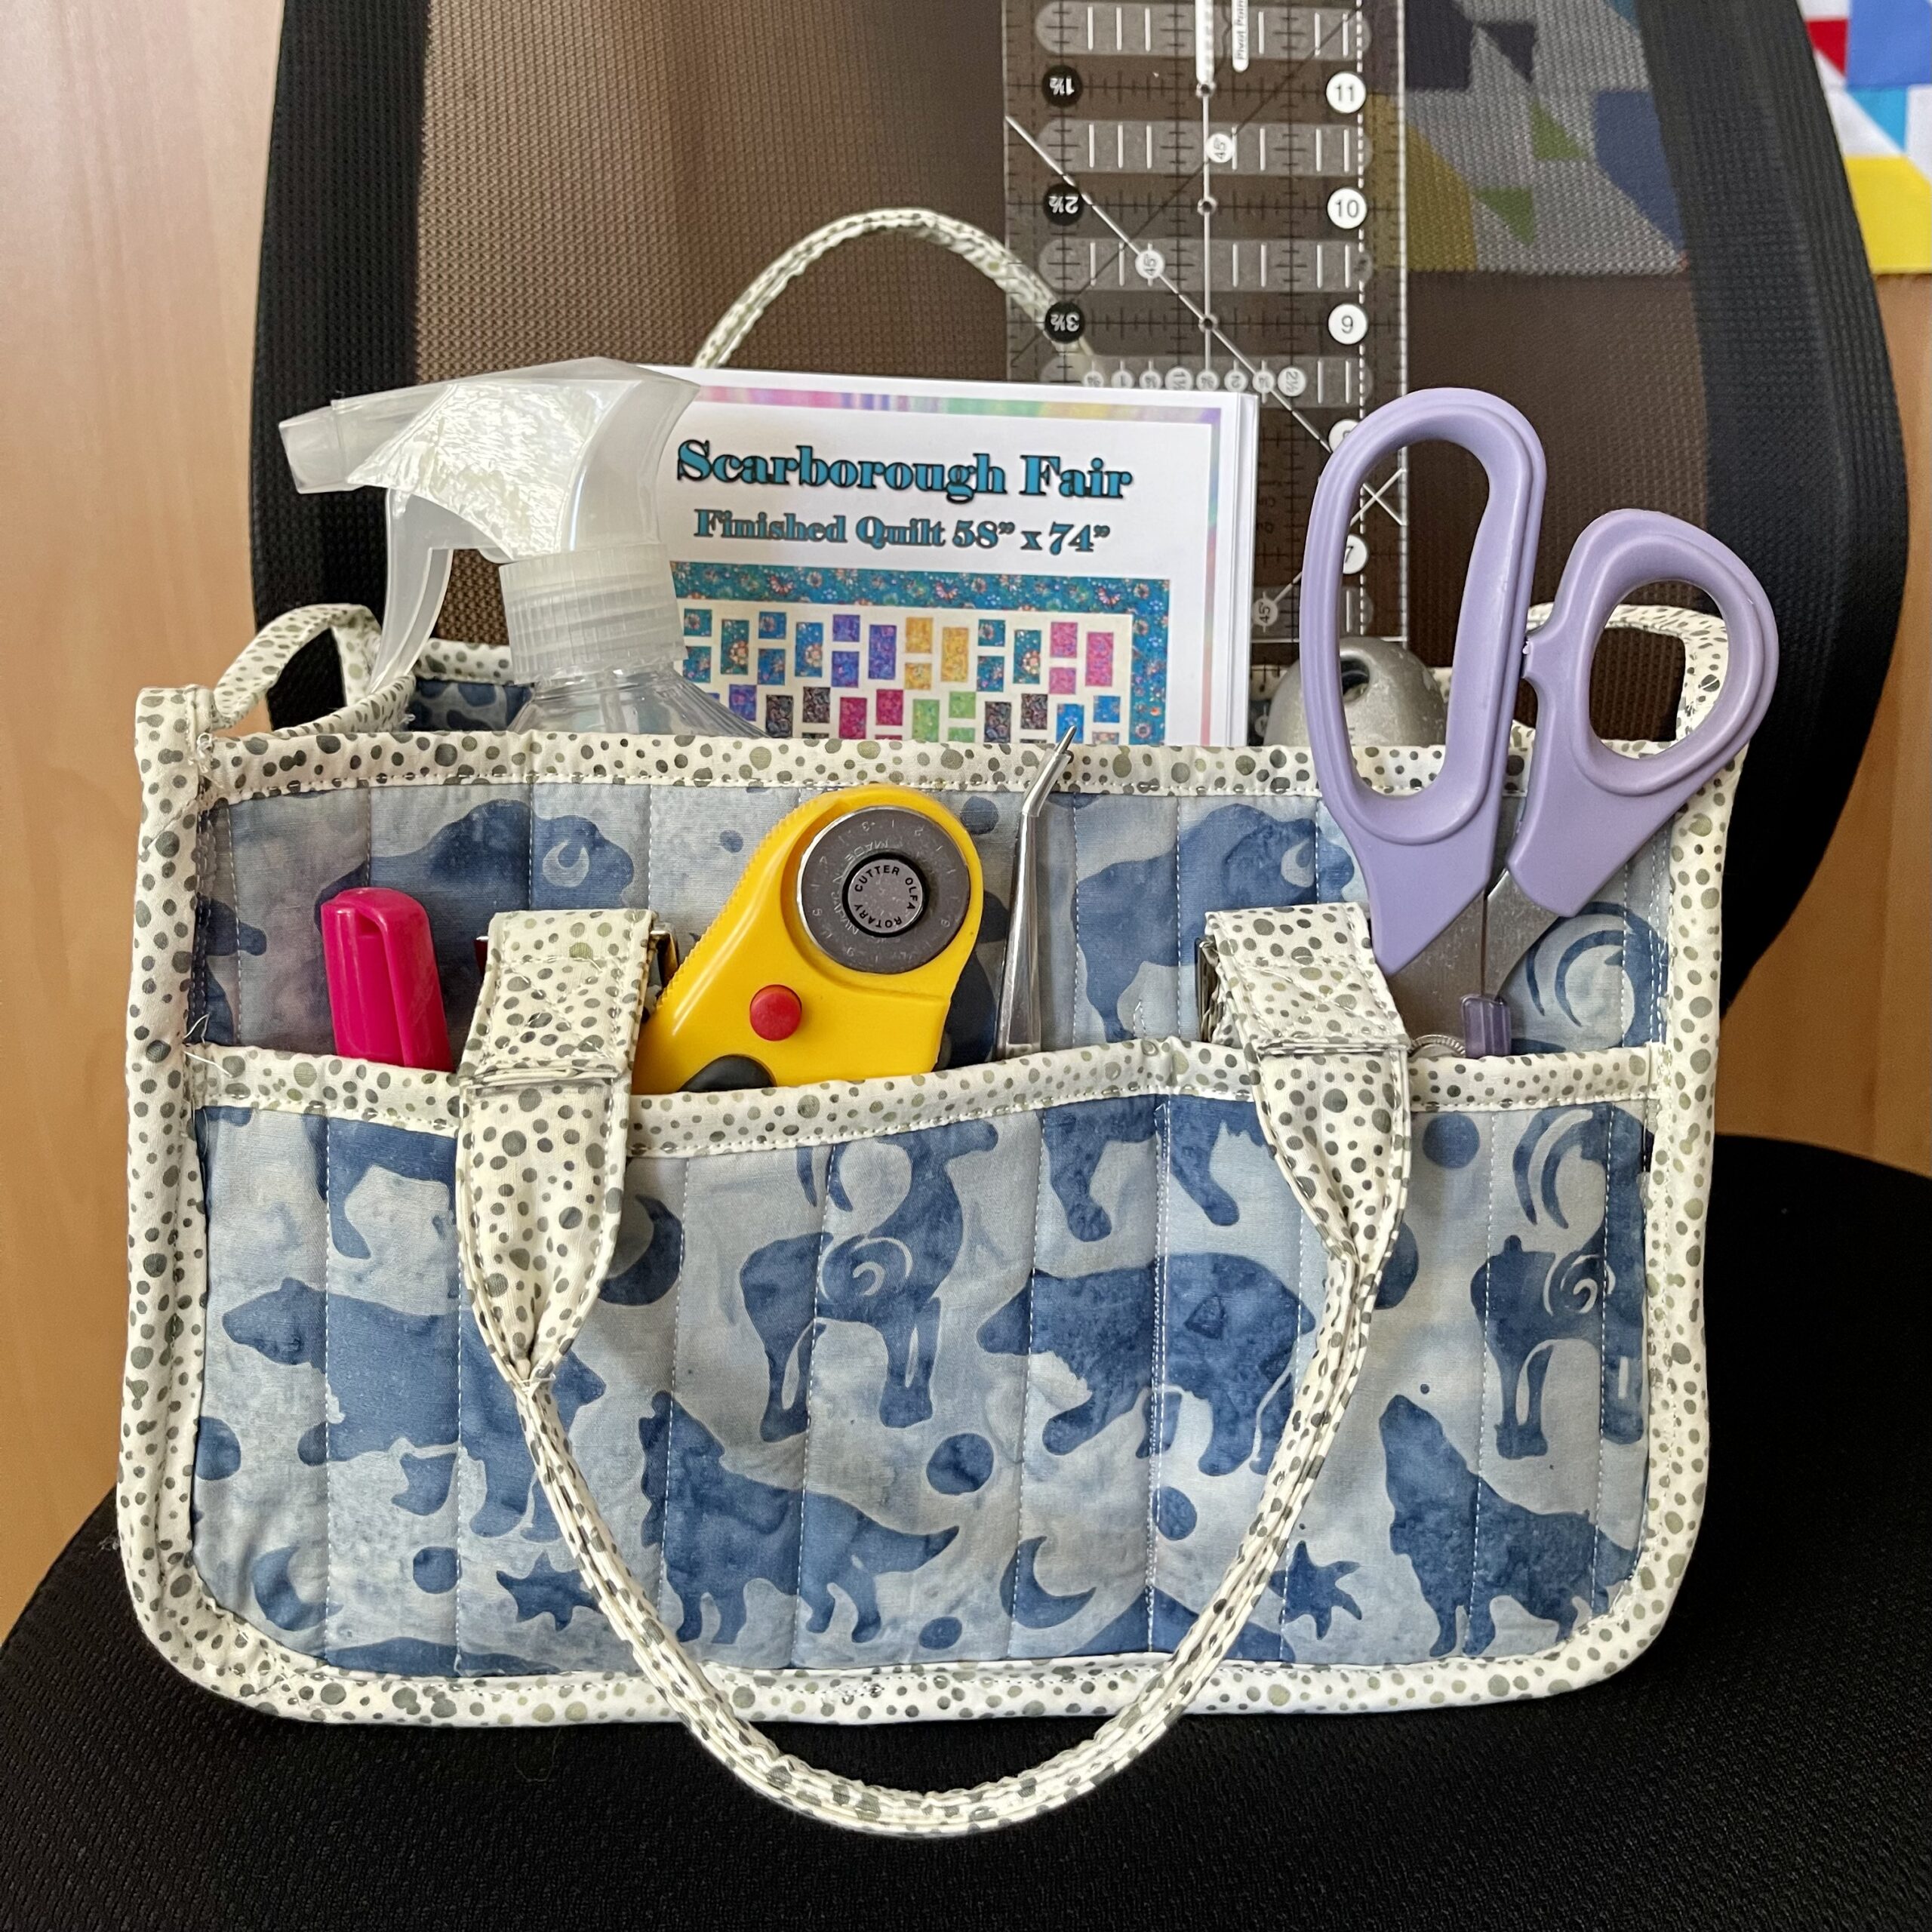
The bag I chose to make is called In Control which is a caddy type bag. It would be perfect to control the remotes in your living room or make a great quilt tool tote. It has outside pockets, a zippered pocket, padded handles and interior baffled dividers. It can definitely help you control the clutter. If you would like to see a video of everything I was able to put in the caddy, there is a current one on my You Tube and TikTok channels-Blue Bear Quilts. Here is the link to the You Tube video: https://youtu.be/3-hp6QzFkOo.

In Control Caddy
In Control Caddy

This caddy can hold a lot of stuff. 

Inside has baffled dividers


The supplies I was provided to work with covered everything I needed to make this bag. There was the wonderful; Silverado Fabric from Island Batik, The byAnnie.com In Control pattern, fusible stabilizer, Soft and Stable foam stabilizer, hardware for the handles, strap webbing and a coordinated zipper.  The directions and diagrams were clearly written and were easy to follow. There were boxes to check off your progress, fabric cutting diagrams and even labels to put on the pieces of fabric you cut out. This made it so easy to stay organized. Annie, the designer of these patterns, has also created add-on videos that give that visual presentation for following some of the written instructions. I was a little intimidated to make this bag at first, but it is so easy to get really great results using the included video and following the written instructions. 

Supplies
Supplies


In Control Instructions
Pieces cut and Labeled

One of the first things I had to do was to quilt the side pieces. I sandwiched a piece of the Soft and Stable stabilizer between the outer and inner fabric layers. Using my Janome 6600, It was so easy to quilt using the Soft and Stable foam stabilizer. I loved working with that stabilizer.

Quilting the sides
Quilting the sides

Some of the handle seams needed to be accurately pressed. I used my Clover Hot Press Perfect Ruler, which allowed me to get that accurate 1/4″ press. The handles were also sewn into a tube and I had to use my tube turning tool to get them right side out.

Pressing the handles


Turning the handles
Turning the handles

The instructions gave precise markings for where to place the handles on the side pieces. After I had attached the handles, it was time to add the outer pockets. It also was necessary to round off the bottom corners of the side pieces and I used my Applipops Rings to accomplish that part of the precess.

Placing the handles
Placing the handles


Adding the side pockets


Rounding the corners

In For the next step, there is a long strip that forms the ends and the bottom of the bag. You can see that I used many Clover clips to hold the pieces together while I was sewing them. One end has a zipper, which was easy to install following the instructions. 

Adding the bottom strip

Finally, the last step was to add the outer binding trim, which was challenging as so much material needed to go under the needle at the same time, but I was able to do it! 

Sewing on the trim
Sewing on the trim

I think the bag turned out great! What do you think? It has padded handles. four side pockets, one end pocket and one zippered end pocket, a padded bottom, and four baffled interior pockets. The Island Batik Silverado Canyon collection gives it a fun, but classy, look.

In Control Caddy
In Control Caddy

 White 50 wt. Aurifil thread was my selection to piece the bag. I used a 80/12 universal needle from Schmetz Needles. 

The supplies I used to make this project were provided by:

Island Batik Silverado Canyon fabric.

Aurifil 50 wt Thread

byAnnie In Control pattern, Soft and Stable Stabilizer, fusible interfacing, zipper and hardware. 

Schmetz 70/10 Quilting needle


Island Batik
Island Batik


byAnnie logo
byAnnie logo
Schmetz Needles
Schmetz Needles
Aurifil Thread
Aurifil Thread


If you are on TikTok, be sure to check out the video I have posted of what all I was able to put into the In Control bag. (Look for Blue Bear Quilts)

Blue Bear hopes you like this bag. Please let him know how much you love the this bag by writing to him in the comments!

The other amazing Island Batik Ambassadors are also posting their October Challenge bags.  Check out their projects by clicking on the links next to their names to be directed to their blog posts.


Gail Renna, Quilt Haven Threads

Michelle Roberts, Creative Blonde Gifts

Sandra Starley, Textile Time Travels

Jennifer Thomas, Curlicue Creations

Brenda Alburl, Songbird Designs

Jennifer Fulton, Inquiring Quilter

Lisa Pickering, Lisa’s Quilting Passion

Suzy Webster, Websterquilt

Denise Looney, For the Love of Geese

Gail Sheppard, Quilting Gail

Preeti Harris, Sew Preeti Quilts

Connie Kauffman, Kauffman Designs

Megan Best, Bestquilter

Maryellen McAuliffe, Mary Mack Made Mine

Elizabeth DeCroos, Epida Studio

Jane Hauprich, Stitch by Stitch Custom Quilting

Emily Leachman, The Darling Dogwood

Andi Stanfield, True Blue Quilts

Leah Malasky, Quilted Delights

Claudia Porter, Create with Claudia

Mania Hatziioannidi, Mania for Quilts

Reed Johnson, Blue Bear Quilts

Pamela Boatright, Pamela Quilts

Anorina Morris, Samelia’s Mum

Brianna Roberts, Sew Cute and Quirky


Make sure to follow Island Batik on social media. Be sure to check out the Island Batik Blog.

#islandbatikambassador #islandbatik #iloveislandbatik #byannie #patternsbyannie #aurifil #aurifilthread #schmetzneedles #Janome #cloverusa


Posted on 8 Comments

Island Batik Ambassador- September Project- SW 60 Quilt- Part of the Tool Talk Blog Hop

I have been waiting all year for this blog hop to get here. This month’s blog hop is called tool talk as the Island Batik Ambassadors will all be using different Studio 180 Design Rulers and different fabric collections from Island Batik.  I love the Studio 180 Design rulers as they create a slightly oversized unit which allows you to obtain great results in making your quilt. Also, most of the Studio 180 Design rulers allow you to make approximately 8 different sized units with one ruler. How awesome is that? I know you are going to see some fantastic quilts with this month’s Island Batik blog hop. Since this month is a blog hop, you can check out the Island Batik blog and enter each week to win a fat quarter bundle of some of the fabrics that the Ambassadors are using in their projects. I will show the other fabric collections later in this blog along with a link to the giveaway from Island Batik and links to other ambassador’s blogs.

tool-talk-blog-hop

The September project was to make a quilt  using an upcoming fabric line from Island Batik and a Studio 180 Design Ruler. I was so excited when the fabric I was given to use was Simply Southwest by Kathy Engle. Just look at this gorgeous collection of batik fabrics. The Simply Southwest collection may be found at your local quilt shop that carries Island Batik, such as Fabric Smart in St. Petersburg FL. You may find them online at www.fabric-smart.com or call them at 727-914-8850.

Simply Southwest

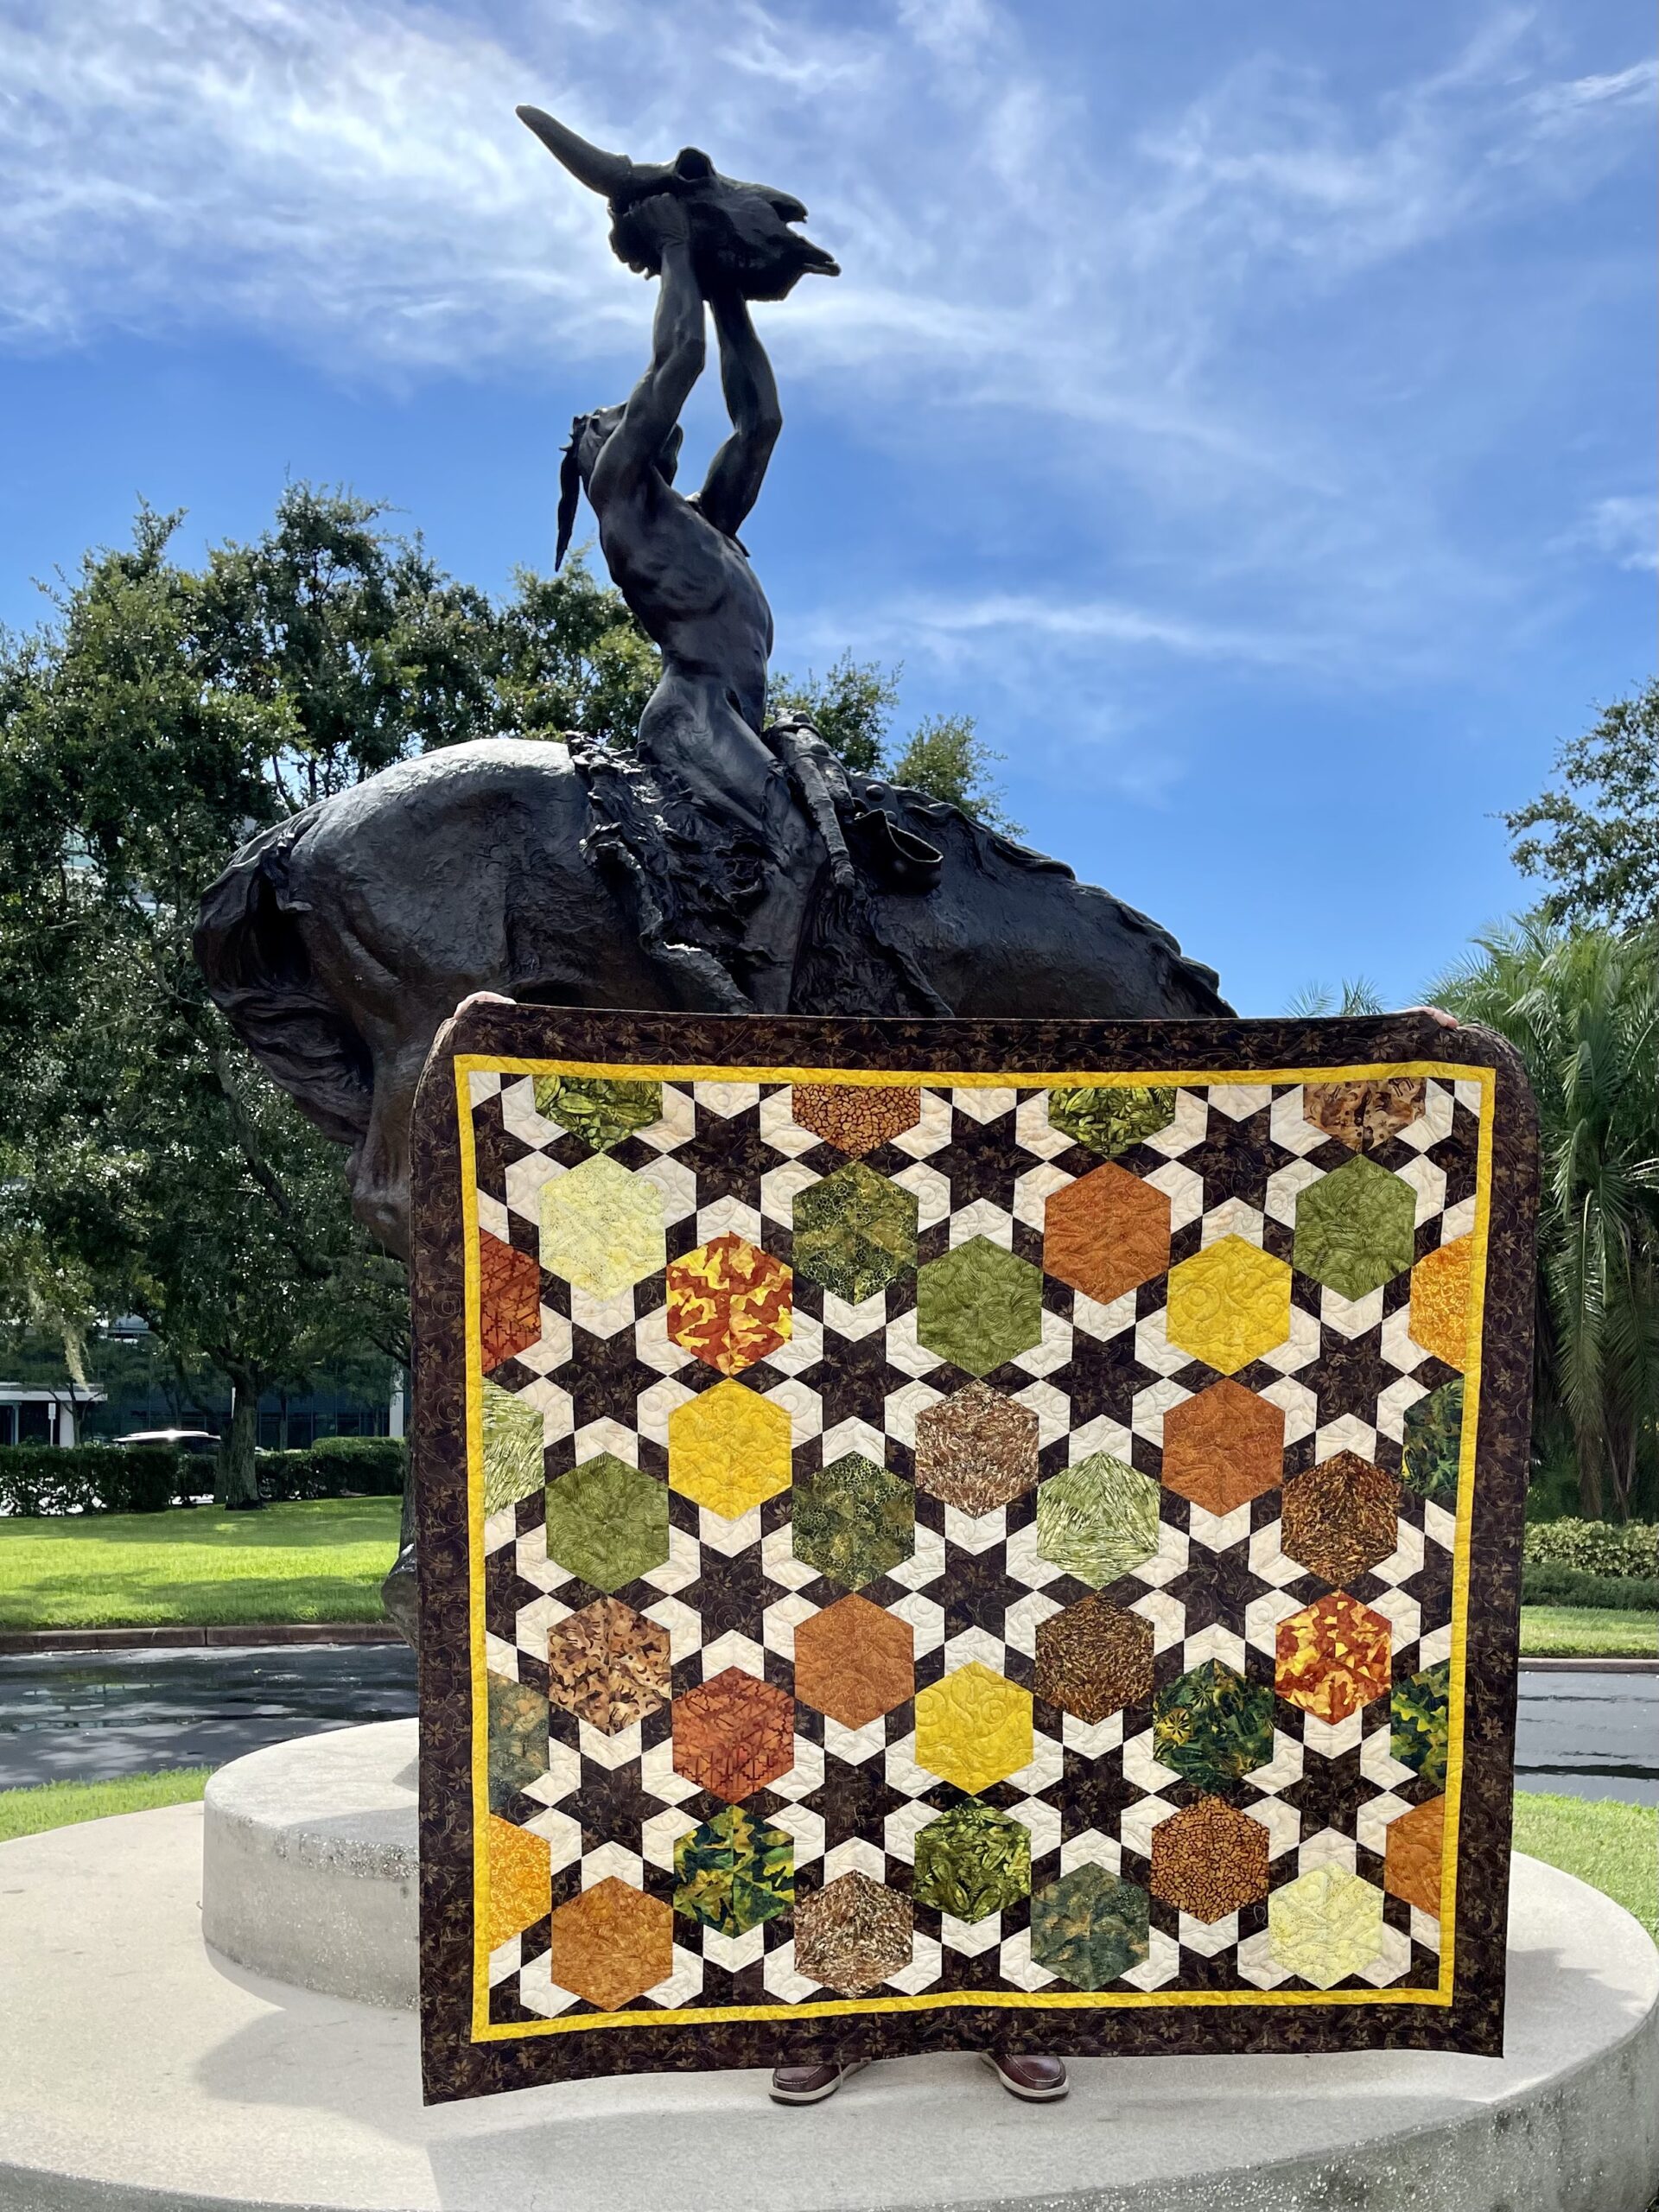
The quilt I made is called SW 60. It is a large lap quilt size 70″ x 66.” This stunning quilt has dark brown stars, highlighted in off-white, and surrounded by large hexagons in gorgeous Southwestern colors. Mr. James of the Raymond James Financial company loves to collect Southwestern art in the form of bronze statues. The art displays outside their headquarters were the perfect backdrop for a photo shoot. It’s always fun to find cool locations for the photo shoot.

SW 60 quilt
SW 60 quilt

This is one of those quilts that looks fantastic with the sun shining through it, and in these glorious fall colors, it is a very masculine quilt.

Sun shining through the quilt

The batik bundle I was provided was the Simply Southwest collection by Kathy Engle. Beauregard loves this glorious selection of rust, brown, green and yellow batiks. These fabrics are so yummy.

Simply Southwest

I downloaded the images of the fabric collection into my Electric Quilt 8 software, which is the software I use to design quilts. Here is what the quilt looked like in the software. It’s amazing how much it looks like the real quilt don’t you think? I love how the colors in this collection invite your eyes to dance across the quilt.

Star 60 quilt

When you work with a fabric collection, such as Simply Southwest from Island Batik, it makes it so easy to create a coordinated quilt. Everything just works well together.

SW 60 2

The tool I was given to work with was the Studio 180 Design Star 60 ruler and with this tool, you can create units from 1″ all the way up to 9″. The size unit I was working with was 8″. It is so awesome that you can create so many different sized block units with one ruler. With the results I was able to obtain with this ruler, I would love to try making a 1″ mini version of this quilt. The ruler also comes with an awesome set of instructions, which are very easy to follow. There are directions, and diagrams, for both left and right handed people. This came in handy with me being a lefty. Deb Tucker, the designer of these rulers, has also created fantastic videos on YouTube that give that visual presentation for  following the written instructions. Deb has also created many technique sheets, which allow you to get even more creative with this tool, as they allow you to create pieced sections within the block unit. I choose to make my diamonds, in the block units, a four patch and I used the Checkerboard 60 technique sheet instructions. There was a video you could watch for the Checkerboard 60 technique sheet as well. It is so easy to get really great results using this tool and following the instructions. I was a little intimidated in making this quilt at first, but with the Studio 180 Design Star 60 tool and following the instructions, it really was easy. The most complicated part for me was keeping all of the pieces organized as I was using so many different colors that had to be placed next to each other.

Star 60 tool

It is easy to cut out the number of side triangle shapes you need as you first cut strips and then use the ruler to cut out the triangles. There is very little waste. If you would like to see some videos of me with the quilt and how I use the Star 60 tool to cut out the various needed shapes, please go to my Tok Tok channel and YouTube channel, they are both called-Blue Bear Quilts. Here is a link to the YouTube Video:   https://youtu.be/Cl9nijmFcvI           

cut side triangles

After I had cut all of the side triangle pieces, it was time to start working on the checkerboard diamonds. They were created by sewing off-white and brown strips together and then sub cutting them into slanted rectangles. Then I sewed those slated rectangles into the pieced diamonds.

checkerboard diamond

The seams are pressed open. which will make for a flatter laying block, for which your long arm quilter will be thankful. Looks like I forgot to press one of the seams open in the picture below. Then, one end of the checkerboard diamond is trimmed so that the side triangles can be added to it.

diamond pressed open on the back


There were so many color combinations and each block unit had a different set of side triangles. In order to be organized, I needed to lay the pieces out before sewing.

laying out side triangles

The right side triangle was added first and was pressed toward the checkerboard diamond.

one side pressed toward the diamond

The left side triangle was pressed toward the left side triangle. The pressing was done this way so that the seams would nest with each other when the units were sewn together. This method of pressing worked for the majority of the block units in this quilt.

other side pressed toward the side triangle

In order to keep this quilt organized as I was making it, it was necessary to number the block units with a label.

each unit is labeled

I made a numbered chart so that I would know where all of the block units were positioned in the quilt. This was absolutely necessary since I was working with so many different colored fabrics. As I completed the units, I colored them in with colored pencils.

organization of the units

Finally, it was time to trim up the block units using the Star 60 tool. First the two sides were trimmed, as shown in the picture below, and then the ruler was repositioned to trim the bottom.

Star 60 tool trims up the units

As you can see, there is very little waste when trimming up the units with this tool. If you are a quilter who does not like to waste fabric, then the Studio 180 Design rulers are for you.

units all trimmed up

Once the units were trimmed up, I sewed three of them together to form a larger triangle.

units formed into larger triangles

Next, I sewed the larger triangles together to form a larger diamond. Doesn’t the back look so nice and pressed flat? I was able to achieve this by following the pressing directions with the tool instructions.

triangles sewn together to great larger diamonds

Finally, the larger diamonds were sewn into rows and then the rows were sewn together. I pressed all of these seams open.

larger diamonds sewn together in rows

Since the quilt had a Southwestern theme, I wanted a Southwestern quilting design. The brown fabric has longhorn skulls on it as you can see in the picture below. So at Urban Elements,  I found this quilting design called Roundup with a longhorn skull and stars on it. Isn’t it just perfect for this quilt? 

longhorn stitching

 I purchased the design and loaded it onto a thumbnail drive to bring to my long armer. My long armer for this quilt was Kim from Sunshine quilts. Didn’t she do a fantastic job with this design? Here is a link to her Facebook page if you would like to bring, or send, your quilts to her: Sunshine Quilts.

longhorn stitching from the back


White 50 wt. Aurifil thread was my selection to piece the blocks. I used a 80/12 universal needle from Schmetz Needles. For the batting, I used Hobbs Heirloom Premium 80/20 batting. 

Hobbs Heirloom Premium 80/20

The supplies I used to make this project were provided by:

Island Batik Simply Southwest for the top.

Aurifil 50 wt Thread

Hobbs Heirloom Premium 80/20

Schmetz 70/10 Quilting needle

Studio 180 Designs Star 60 Ruler

Prairie Spirit Alpacas alpaca wool pressing mat
 
Product sponsors
Hobbs Batting
Hobbs Batting

If you are on TikTok, be sure to check out the video I have posted of me with the quilt. (Look for Blue Bear Quilts)

Blue Bear hopes you like this quilt. Please let him know how much you love the this quilt by writing to him in the comments!

The other amazing Island Batik Ambassadors are also posting their September Blog Hop Tool Talk quilts.  Check out their projects by clicking on the links next to their names to be directed to their blog posts.

WEEK 1

September 6

Gail Renna, Quilt Haven Threads

Michelle Roberts, Creative Blonde Gifts

September 7

Sandra Starley, Textile Time Travels

Jennifer Thomas, Curlicue Creations

September 8

Brenda Alburl, Songbird Designs

Jennifer Fulton, Inquiring Quilter

September 9

Blog Hop Round-Up Week 1 and Giveaway

WEEK 2

September 12

Lisa Pickering, Lisa’s Quilting Passion

Suzy Webster, Websterquilt

September 13

Denise Looney, For the Love of Geese

Gail Sheppard, Quilting Gail

September 14

Preeti Harris, Sew Preeti Quilts

Connie Kauffman, Kauffman Designs

September 15

Megan Best, Bestquilter

Maryellen McAuliffe, Mary Mack Made Mine

September 16

Blog Hop Round-Up Week 2 and Giveaway

WEEK 3

September 19

Elizabeth DeCroos, Epida Studio

Jane Hauprich, Stitch by Stitch Custom Quilting

September 20

Emily Leachman, The Darling Dogwood

Andi Stanfield, True Blue Quilts

September 21

Leah Malasky, Quilted Delights

Claudia Porter, Create with Claudia

September 22

Mania Hatziioannidi, Mania for Quilts

Reed Johnson, Blue Bear Quilts

September 23

Blog Hop Week 3 Round Up + giveaway

WEEK 4

September 26

Pamela Boatright, Pamela Quilts

September 27

Anorina Morris, Samelia’s Mum

Brianna Roberts, Sew Cute and Quirky

September 28

End of Blog Hop + Final Round Up

Week-3-Paisley-Got-Mod-Silverado-Canyon

The giveaway of the Blog Hop started on Friday, June 3rd. Each week two lucky winners will each get one Fat Quarter bundle of a complete Island Batik collection. This week, it is Paisley Got Mod by Kate Colleran Designs or Silverado Canyon by Kathy Engle! To enter for your chance to win one of the two prizes above, follow the simple Rafflecopter prompts below.

a Rafflecopter giveaway

This giveaway ends on September, 23rd at 11:59 pm PDT. Two random winners will be notified by email on September, 24th and announced on our Facebook page on September, 27th. If the winners do not respond within the first two days after being notified, two new random winners will be chosen. Please, check your spam folders!

Make sure to follow Island Batik on social media to hop along with the Tool Talk Blog Hop. Be sure to check out the Island Batik Blog.

#islandbatikambassador #islandbatik #iloveislandbatik #hobbsbatting #aurifil #aurifilthread #schmetzneedles #doyoueq #Janome #studio180design #tooltalkbloghop #Star60


Posted on 6 Comments

Island Batik Ambassador August Project, Star Mini Quilt for Blue Bear

This is my August 2022 project as an Island Batik Ambassador. This month’s challenge was to make a mini quilt using any technique and Island Batik fabric. The quilt could be no larger than 24″ x 24″. I designed this quilt on my computer using Electric Quilt 8 software. This size of this quilt, which is perfect for Blue Bear, is 12″ x 12″.

Blue Bear’s Star Mini Quilt

I chose to use fabrics from the Island Batik collection called “Jewel Carvings” and I also used their solid black. These colors are so delicious.

Jewel Carvings

When designing a quilt, it is important to make sure that you have a proper mix of light, medium and dark shades in your quilt. One way to determine this is to take a monochromatic picture of your fabrics to more clearly see the shades. Notice how the values go from dark to light when looking at the fabrics from left to right. In the completed quilt, I wish there was a little more value change between the purple and blue. Those are the two fabrics farthest to the left in the monochromatic image, followed by the green and yellow.

monochromatic image

This quilt is comprised of 1-1/2″ unfinished squares and half square triangles. I used a method of making 8 half square triangles at a time. You can find many articles for how to do this if you do a google search. I wanted 1-1/2″ unfinished half square triangles, so that meant that I needed to start with 4-1/2″ squares. For example, if I wanted to make the blue/green half square triangles, I would need to place green and blue 4-1/2″ squares right sides together. The nice thing about using Island Batik fabrics for this project is that you don’t really have to worry about right and wrong sides, even though technically there is a right side. Then I drew lines horizontally, vertically and diagonally in both directions in the middle of the square. Next, I sewed 1/4″ on either side of the drawn diagonal lines.

drawn and sewn lines

Next, I cut on the horizontal, vertical and diagonal lines I drew. You don’t cut on the sewn lines. This creates 8 half square triangle units.

8 half square triangles

Next. I needed to press the half square triangles and I chose to press toward the dark side. When the units are lined up for sewing, you may need to press some of them the other way so that they will nest and not create as much bulk in the seams.

press to the dark side

In order to successfully sew a quilt with such small pieces, it’s important to maintain the proper squared-up size of the unfinished units, which in this case is 1-1/2″. I used the small 1-1/2″ Bloc-Loc ruler to accomplish this. This ruler has grooves on the back of it that slide along the ridge of the pressed over fabric and it allows you to trim up 2 sides of the unit at a time.

Bloc-Loc trim up ruler

I have a YouTube video showing how to to trim up these units using the Bloc-Loc ruler. Here is a link to that video: https://youtu.be/hUHR_SmPLe8

YouTube video

Once the units were all squared up, I laid them out in the positions they would be in the quilt. This is where you would look at which blocks are being sewn together and determine if you need to press them the other direction so that seams will nest.

units lined up

Sewing the units together, I slowed my Janome 6600 down and used a quarter inch foot so that I could obtain an accurate 1/4″ seam. This is crucial when sewing a mini quilt as if you are off by an 1/8th of an inch, that adds up quickly and your quilt will no longer be the correct size. I sewed one row at a time and pressed each row in the opposite direction. When sewing the rows together, I pressed the seams open to reduce bulk. Here is a picture of the back of the quilt and you can see that there are a lot of intersecting seams, which is why all of these measurements being accurate is so important.

row seams are pressed open

Finally, I made a quilt sandwich by placing a piece of Hobbs 80/20 black batting between the quilt top and a piece of black backing. I pinned the layers together to prevent shifting when quilting the layers together. I used Aurifil 50 weight cotton thread in several different colors on the top. I loved how easy it was to find shades of thread color that matched the Island Batik fabric. I slowed my Janome 6600 down again and used the dual action walking foot to stitch in the ditch, which was a breeze. I love domestic machine quilting on a project this size. It’s so easy!

stitching in the ditch

I machine stitched on the black binding. Here is a picture of the completed quilt and a close up of the stitching in the ditch.

Star Mini Quilt
Mini quilt close up

Blue Bear’s Quilt is finished. I think he loves it! He is so thankful as he finally has a quilt that is his size. He can’t use the big people’s quilts. He will now have his own quilt to snuggle up with at night and he loves the fact that the quilt has blue stars that are the same color as him.

Blue Bear with his quilt

Be sure to follow along and subscribe to all our social media (Instagram, Facebook, Twitter and Tic Tok) as I will be making a beautiful Southwestern themed 60 degree star quilt using the Deb Tucker’s Studio 180 Star 60 ruler next month. You won’t want to miss it.

Island Batik
Island Batik

The supplies I used to make this project were provided by:

Island Batik Jewel Carvings collection for the top.

Aurifil 50 wt Thread

Hobbs black 80/20 Blend Batting

Schmetz 70/10 Quilting needle

Thank you Island Batik, Aurifil Thread, Hobbs Batting, and Schmetz Needles.

Hobbs Batting
Hobbs Batting
Aurifil Thread
Aurifil Thread
Schmetz Needles
Schmetz Needles

The other Island Batik Ambassadors have also been busy creating Mini quilts in their August projects. If you would like to see what the other ambassadors have been up to, check out their projects by clicking on the links next to their names to be directed to their blog posts.

Jennifer Thomas, Curlicue Creations
Denise Looney, For the Love of Geese

Pamela Boatright, Pamela Quilts
Andi Stanfield, True Blue Quilts

Megan Best, Bestquilter

Maryellen McAuliffe, Mary Mack Made Mine
Brenda Alburl, Songbird Designs

Emily Leachman, The Darling Dogwood
Leah Malasky, Quilted Delights

Suzy Webster, Websterquilt
Connie Kauffman, Kauffman Designs

Brianna Roberts, Sew Cute and Quirky
Sandra Starley, Textile Time Travels

Michelle Roberts, Creative Blonde
Jane Hauprich, Stitch by Stitch Custom Quilting

Claudia Porter, Create with Claudia

Anorina Morris, Samelia’s Mum
Preeti Harris, Sew Preeti Quilts

Elizabeth DeCroos, Epida Studio
Gail Renna, Quilt Haven Threads

Gail Sheppard, Quilting Gail
Jennifer Fulton, Inquiring Quilter

Mania Hatzioannidi, Mania for Quilts
Lisa Pickering, Lisa’s Quilting Passion

#islandbatikambassador #islandbatik #iloveislandbatik #hobbsbatting #aurifil #aurifilthread #schmetzneedles #doyoueq #EQ8 #electricquilt #Janome #bloc-loc

Posted on 4 Comments

Island Batik Ambassador July Project, Tree of Life From the Underside Quilt

This is my July 2022 project as an Island Batik Ambassador. The first part of this month’s challenge was to use the Accuquilt Tree of Life die to create a unique project. Accuquilt provided the Tree of Life die, and Island Batik provided fabric, to the Ambassadors so they could create their projects in this challenge. This die is a BOB or block on board. What that means is that you are able to cut all of the pieces you need to complete a tree of life block with one pass through the cutting machine.

Tree of Life Die and Fabric

The die has metal blades set in foam and when you place the fabric on the die and cover it with a mat, there is a roller in the cutter that presses down on the fabric and cuts out the needed shapes. Here is a Tik Tok video I did showing how I cut out the fabric.

I designed the quilt in Electric Quilt and this is the design I came up with. It is a bright and colorful design, orienting four tree of life blocks toward the outside corners. The blocks are uniquely colored to create the graphic design of the quilt. It almost has an Art Deco feel to it.

I needed some wonderful solids to make this quilt. Did you know that Island Batik has solids? Well, they do! I chose solids in red, blue, yellow, orange, green and lime. I used stash buster strip rolls for the colors and accented them with white and black to make them shine. The stash busters are 5″ wide strips and are great to work with on this type of project as they are already cut into a smaller size to be able to use with the Accuquilt Die.

Here is how I laid out the blocks after I had cut all of the desired shapes. It is really helpful to lay out your block ahead of time to keep everything organized. The half square triangles were sewn in rows and then the rows were sewn together. The Accuquilt die has great instructions for how to sew the block together.

block lay out

As mentioned above, a great thing about cutting out your shapes with the Acccuquilt Tree of Life die is that all of the shapes you need for one block can be cut with one pass through the cutting machine. You can put 6 layers of fabric on the die, so you could cut out 6 blocks at once. Also, the dog ears are cut off and if you are a really good sewist, there is no trimming that is needed to square up the blocks.

cut out shapes

After I had the quilt top sewn together, using my favorite thread, Auriful, it was time to make a quilt sandwich with some awesome batting (Heirloom 80/20 blend) provided by Hobbs Batting.

quilt sandwich

Time to quilt with my Janome 6600. This machine is a power horse! I knew I wanted to quilt in straight lines, so I used my favorite quilting ruler for that purpose- the Line Tamer by Four Paws Quilting. Your ruler work foot just follows the cut out groove in the ruler and gives you nice straight lines.

Line Tamer

Voila! The quilt is all done. I machine pieced the black binding to the front and then used clips to hold the binding in place on the back while I stitched in the ditch on the front.

finished quilt

Part two of this Christmas in July project was to gift the quilt to someone and bring them a little joy. When I decided on the name of the quilt, I knew who I wanted to give it to as a gift. I named the quilt “Tree of Life From the Underside.” Imagine laying on the ground, under a tree, and looking up at the bottom of the branches spreading out. I felt the quilt gave this perspective of the tree.

I see the tree of life as representing life, liberty and the pursuit of happiness. Many in society are able to stand alongside the tree and enjoy the view from many perspectives. Yet there are others around the world who do not have that same ability and they are kept under the tree and can’t enjoy all of the beauty the tree represents. These people may include the elderly, poor. foreigners, women, gays, jewish people, blacks, asians, indigenous people or people with disabilities. They want to see the tree from all sides and the wonderful things it represents, but they are kept down below the branches.

There is a poem, by Poet Laureate, Amanda Gorman, called “_ _ _ _ _Gated.” In the poem she compares how the pandemic was a leveler, and all were equally prevented from doing what they wanted to do, or told what they had to do. Sharing for a brief time what it feels like to be living in the margins.

Here are a few quotes from the poem. “To be haunted is to be hunted by a history that is still hurting. Needing healing as much as we do. … Call us… colonized, …cleansed, controlled, killed, … contained, concentrated, conditioned… We have yielded centuries of sidewalk, trained in this tradition before we even lived it- what it is to bow our heads & make room for someone else’s pride, that ceding of the walkway…Why is it so perturbing for privileged groups to follow restrictions of place & personhood. Doing so means for once wearing the chains their power has shackled on the rest of us….Meanwhile for generations we’ve stayed home,…kept out of public spaces…kept out of ballot boxes, kept out of office, kept out of the army, kept out of hospitals…kept out of jobs, kept out of schools, kept out of sports…kept out of land, kept out of kept in kept from kept behind kept below kept down kept without life. Some were asked to walk a fraction/ of our exclusion for a year & it almost destroyed all they thought they were. Yet here we are. Still walking, still kept. To be kept to the edges of existence is the inheritance of the marginalized. …If we remember anything, let it be to remember. A road forward we shall have if we keep walking.”

This poem is powerful and it is found in her book called ” Call us what we carry.” If you can find a copy of the book at your local bookstore, or library, I would urge you to do so.

For me, the tree also represents hope. growth and rebirth. The leaves of the tree are all unique and yet they are interconnected. The tree is strong and provides shelter from the storms. Under the tree is also a place for peace and tranquility. Finally it is a place for growth and rebirth. A mighty oak grows from a tiny acorn. Each year the leaves turn brown and die but then are reborn in the Spring with the prospect of new growth. As we keep walking, the tree keeps inspiring growth.

I wanted to give this quilt to someone who treats everyone as equal and places no one in the margins, even as difficult as that may be in a society that likes to create margins. Someone who keeps walking. Someone immediately came to mind. It was a friend, Pastor Joyce Stone. She is a pastor of a church in Florida that not only welcomes all but affirms their very nature. Christ the Cornerstone is a beacon of light for all. When I told Pastor Joyce about the gift, she told me that they have a tree of life in the church where people can place leaves about the things God has done for them in their lives. I knew I had made the right choice for the gift recipient.

I placed a hanging sleeve on the back of the quilt so that it may be hung for all to see. It is my desire that the quilt will stand as a symbol of the hope, growth and rebirth the tree represents. I hope it will inspire those who can stand alongside the tree, and enjoy all of its beauty and freedom, to come to the underside and see the shelter, strength and connectivity the tree provides and invite those living under the tree to come and stand beside the tree with them. I also hope that those who may only see the tree from the underside will keep walking so that one day they will be able to stand alongside the tree and see the life, liberty and happiness it provides from all angles.

Here is a picture of Pastor Joyce with the quilt. Her smile radiates Joy!

Pastor Joyce with quilt
Pastor Joyce and I in front of the Tree of Life in her church

If you would like to see me talking about the quilt, I also have a YouTube video about it on my YouTube channel, Blue Bear Quilts. Here is a link to the video: https://youtu.be/duB3fqtL2ac

YouTube Video
Island Batik
Island Batik

The supplies I used to make this project were provided by:

Island Batik Stash Buster 5″ strip roll for the top.

Accuquilt Tree of Life Die

Aurifil 50 wt Thread

Hobbs 80/20 Blend Batting

Schmetz 70/10 Quilting needle

accuquilt
accuquilt

Thank you Island Batik, Accuquilt, Aurifil Thread, Hobbs Batting, and Schmetz Needles.

Hobbs Batting
Hobbs Batting
Aurifil Thread
Aurifil Thread
Schmetz Needles
Schmetz Needles

The other Island Batik Ambassadors have also been busy creating Christmas in July projects. If you would like to see what the other ambassadors have been up to, check out their projects by clicking on the links next to their names to be directed to their blog posts.

Jennifer Thomas, Curlicue Creations
Denise Looney, For the Love of Geese

Pamela Boatright, Pamela Quilts
Andi Stanfield, True Blue Quilts

Megan Best, Bestquilter

Maryellen McAuliffe, Mary Mack Made Mine
Brenda Alburl, Songbird Designs

Emily Leachman, The Darling Dogwood
Leah Malasky, Quilted Delights

Suzy Webster, Websterquilt
Connie Kauffman, Kauffman Designs

Brianna Roberts, Sew Cute and Quirky
Sandra Starley, Textile Time Travels

Michelle Roberts, Creative Blonde
Jane Hauprich, Stitch by Stitch Custom Quilting

Claudia Porter, Create with Claudia

Anorina Morris, Samelia’s Mum
Preeti Harris, Sew Preeti Quilts

Elizabeth DeCroos, Epida Studio
Gail Renna, Quilt Haven Threads

Gail Sheppard, Quilting Gail
Jennifer Fulton, Inquiring Quilter

Mania Hatzioannidi, Mania for Quilts
Lisa Pickering, Lisa’s Quilting Passion

#islandbatikambassador #islandbatik #iloveislandbatik #hobbsbatting #aurifil #aurifilthread #schmetzneedles #doyoueq #EQ8 #electricquilt #Janome #Accuquilt #AccuquiltGO #ChristmasinJuly #AccuQuiltChristmasInJuly #fourpawsquilting

Posted on 16 Comments

Island Batik Ambassador- June Project- New York Beauty Quilt

Beauty Pageant

The world could use a little bit of beauty right now. I hope you will find some beauty, joy and inspiration from this month’s Island Batik blog hop. I have completed my June project as an Island Batik Ambassador and I am so excited to share it with you. This month is a blog hop and if you check out the Island Batik blog, you can enter each week to win a fat quarter bundle of some of the fabrics that the Ambassadors are using in their projects. I will show the other fabric collections later in this blog along with a link to the giveaway from Island Batik and links to other ambassador’s blogs.

New York Beauty Blog Hop

The June project was to make a quilt with New York Beauty blocks using an upcoming fabric line from Island Batik. I was so excited when the fabric I was given to use was Jewel Carvings by Kathy Engle. Just look at this gorgeous collection of batik fabrics. The Jewel Carvings may be found at your local quilt shop that carries Island Batik, such as Fabric Smart in St. Petersburg FL. You may find them online at www.fabric-smart.com or call them at 727-914-8850.

Jewel Carvings

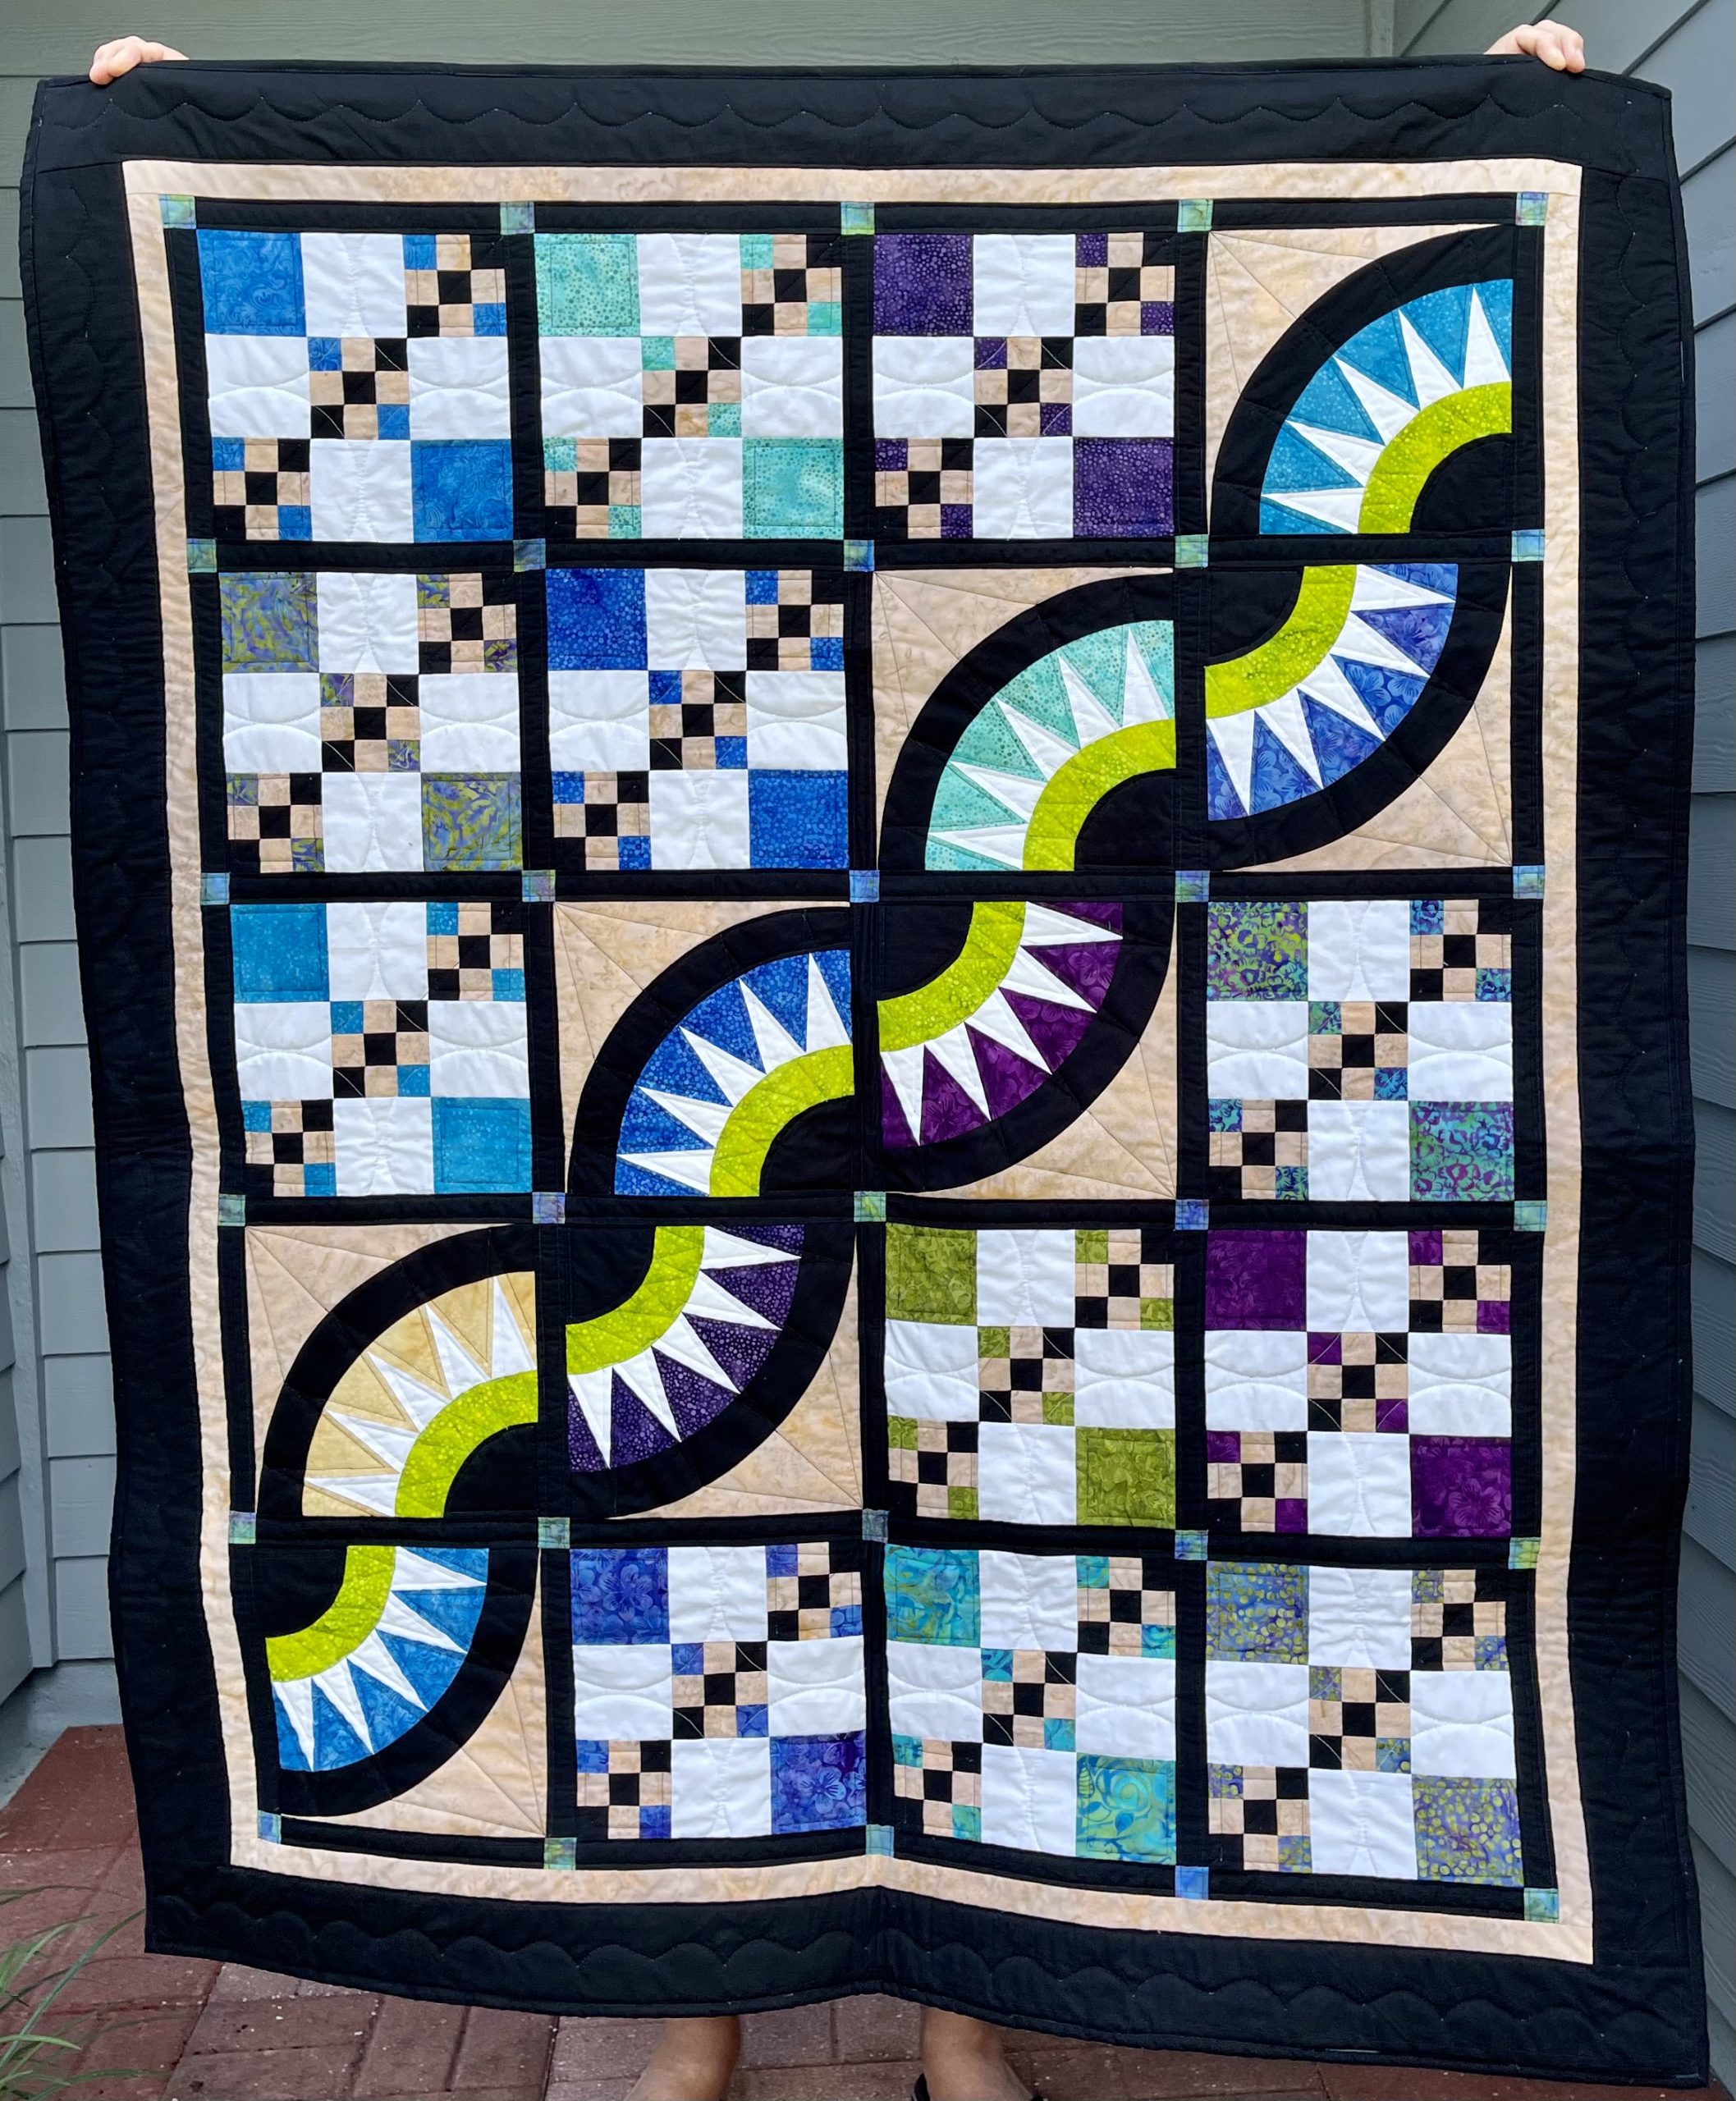
The quilt I made is called Beauty Pageant. It is a large lap quilt size 49″ x 59.” This is a dazzling quilt has a diagonal row of New York Beauty blocks surrounded by intricate nine patch blocks. 

Beauty Pageant
Beauty Pageant

I will have a pattern coming out later this summer or fall for this quilt after the testers are done testing the pattern. It’s always fun to find cool locations for the photo shoot.

NY Beauty Mystery solved

The batik bundle I was provided was the Jewel Carvings collection by Kathy Engle. Look at this glorious selection of blue, teal, green and purple batiks. These fabrics were so beautiful that it was really hard to cut them up.

Jewel Carvings

I downloaded the images of the fabric collection into my Electric Quilt software, which is the software I use to design quilts. This is what the quilt looked like in the software. It’s pretty close to the real quilt don’t you think? I love how the white and black fabrics highlight the fabrics in the Jewel Carvings collection.

NY Beauty

New York Beauty quilts are called that as they have New York Beauty blocks in them. The New York Beauty block got its name as it has spikes just like the famous Statue of Liberty in NYC.


statue of liberty

I decided to showcase the NY Beauty blocks as though they are walking on a central catwalk among a sea of admiring fans. The fans are all of the squares in the nine patch blocks. The spikes in the New York Beauty blocks are made with paper piecing so you can achieve those nice sharp points. You lay two fabrics right side together and then sew on the lines. 

paper piecing

When you sew the other pieces to the arch with the spikes, there is curved piecing involved. I wanted to make sure that the pieces lined up correctly as I slowly sewed a quarter inch along those gentle curves. Thus, a lot of pinning was involved. This will insure success with those curves. When you press, the block will naturally tell you which direction it wants to be pressed. What’s great about working with Island Batik fabric is that there is no right or wrong side, making the paper piecing much easier and, that the fabrics cut, and press, nice and crisp.

pinning

To sew the smaller nine patches, I sewed long strips together and then sub cut units into the appropriate sizes. I then chain pieced the smaller nine patches to the larger nine patch pieces. Mama always said that the back of the block should look as neat as the front.

chain piecing
back of block

New York Beauty blocks can be a little challenging to sew and thus even though my blocks look pretty accurate, I knew there could be trouble if I had to place the blocks right next to each other. Thus, I decided to separate them with sashing. This is a good little trick if you are worried that the seams of your blocks may not  line up properly. It also creates some definition to the blocks.

sashing


I used Amanda Murphy’s Good Measure Circle rulers to quilt some circular designs around the squares in the nine patch blocks. These rulers work well with the rulerwork foot on my Janome 6600. I also used some of the Creative Grids quilting rulers by Angela Walters.  I used white and black 50 wt. Aurifil thread on the front and a teal on the back. I used a 70/10 quilting needle from Schmetz Needles. For the batting, I tried Hobbs Tuscany Collection Silk batting. I had never used this batting before and it was very easy to quilt on my Janome. Hobbs Tuscany Silk Batting breathes naturally, making it an excellent choice for airy, lightweight quilts, and while it’s a cool quilt, it can also provide excellent warmth. Hobbs Tuscany Silk Batting is a blend of 90% very fine imported silk filaments and 10% fine polyester, ingredients which are carded and bonded to help retard bearding and fiber migration.

Hobbs Tuscany Silk Batting

The supplies I used to make this project were provided by:

Island Batik Jewel Carvings for the top.

Aurifil 50 wt Thread

Hobbs Tuscany Silk Batting

Schmetz 70/10 Quilting needle

Island Batik
Island Batik


Aurifil Thread
Aurifil Thread


Schmetz Needles
Schmetz Needles


Hobbs Batting
Hobbs Batting


If you are on TikTok, be sure to check out the video I have posted of me with the quilt. (Look for Blue Bear Quilts)

Blue Bear hopes you are ready for summer. Please let him know how much you love the this quilt by writing to him in the comments!

Blue Bear


New York Beauty Angels

The other amazing Island Batik Ambassadors are also posting their June Blog Hop New York Beauty quilts.  Check out their projects by clicking on the links next to their names to be directed to their blog posts.

Week 1

June 6:

Gail Sheppard, Quilting Gail
Elizabeth DeCroos, Epida Studio

June 7:

Reed Johnson, Blue Bear Quilts
Andi Stanfield, True Blue Quilts

June 8:

Sandra Starley, Textile Time Travels

June 9:

Jennifer Fulton, Inquiring Quilter
Mania Hatziioannidi, Mania for Quilts

June 10:

Blog Hop Round-Up Week 1 and Giveaway

Week 2

June 13:

Jennifer Thomas, Curlicue Creations
Maryellen McAuliffe, Mary Mack Made Mine

June 14:

Pamela Boatright, Pamela Quilts
Anorina Morris, Samelia’s Mum

June 15:

Michelle Roberts, Creative Blonde Gifts
Lisa Pickering, Lisa’s Quilting Passion

June 16:

Denise Looney, For the Love of Geese
Connie Kauffman, Kauffman Designs

June 17:

Blog Hop Round-Up Week 2 and Giveaway

Week 3

June 20:

Claudia Porter, Create with Claudia
Brianna Roberts, Sew Cute and Quirky

June 21:

Gail Renna, Quilt Haven Threads
Preeti Harris, Sew Preeti Quilts

June 22:

Megan Best, Bestquilter
Leah Malasky, Quilted Delights

June 23:

Suzy Webster, Websterquilt
Emily Leachman, The Darling Dogwood

June 24:

Blog Hop Round-Up Week 3 and Giveaway

Week 4

June 27:

Jane Hauprich, Stitch by Stitch Custom Quilting
Brenda Alburl, Songbird Designs

June 28:

End of Blog Hop and Final Round-Up

The week one giveaway of the Blog Hop started on Friday, June 3rd. Two lucky winners will each get a Fat Quarter bundle of a complete Island Batik collection by Kathy Engle – the luminous Jewel Carvings or the bold Nightshade!

To enter for your chance to win one of the two prizes above, follow the simple Rafflecopter prompts below.


This giveaway ends June, 10 at 11:59 pm PST. Two random winners will be notified by email on June, 11 and announced on the Island Batik Facebook page on June, 14. If the winners do not respond within the first two days after being notified, two new random winners will be chosen and notified.

Make sure to follow Island Batik on social media to hop along with the New York Beauty Blog Hop. Be sure to check out the Island Batik Blog at https://islandbatik.com/new-york-beauty-blog-hop/#more-61710

#islandbatikambassador #islandbatik #iloveislandbatik #hobbsbatting #aurifil #aurifilthread #schmetzneedles #doyoueq #Janome

Posted on 4 Comments

Island Batik Ambassador- March Project- Italian Color Builder Challenge with Aurifil

Milan WH

I have completed my March project as an Island Batik Ambassador and I am so excited to share it with you. This month’s challenge was to to make a wall hanging using one of the Aurifil Color Builders.  

The Aurifil Color Builders are twelve curated mini-collections inspired by (and named after) Italy’s most vibrant and colorful destinations. Each collection contains three large spools of 50wt thread — a warm, a medium, and a dark — within the location’s primary color palette. From the lemon groves of Sicily to the pink sand beaches of Sardinia to the clear teal waters of Capri to the stark city grey of Milan… each collection is crafted to evoke images of Italian landscapes. The colors were selected not only for their aesthetic appeal, but for their practicality in every day use. Click on the links at the bottom to see the other collections used by the Island Batik Ambassadors in their projects. 

03 - Italian Color Builders
03 – Italian Color Builders


I received Milan as my collection from Aurifil. Just look at this awesome collection of light, medium and dark grays. The colors included are 2600, 2610 and 5004. The blue batiks I used from Island Batik are part of their Brilliant Blues collection and I also used white, black and gray.

MILAN-box
MILAN-box

MILAN-spools
MILAN-spools

Milan
Milan

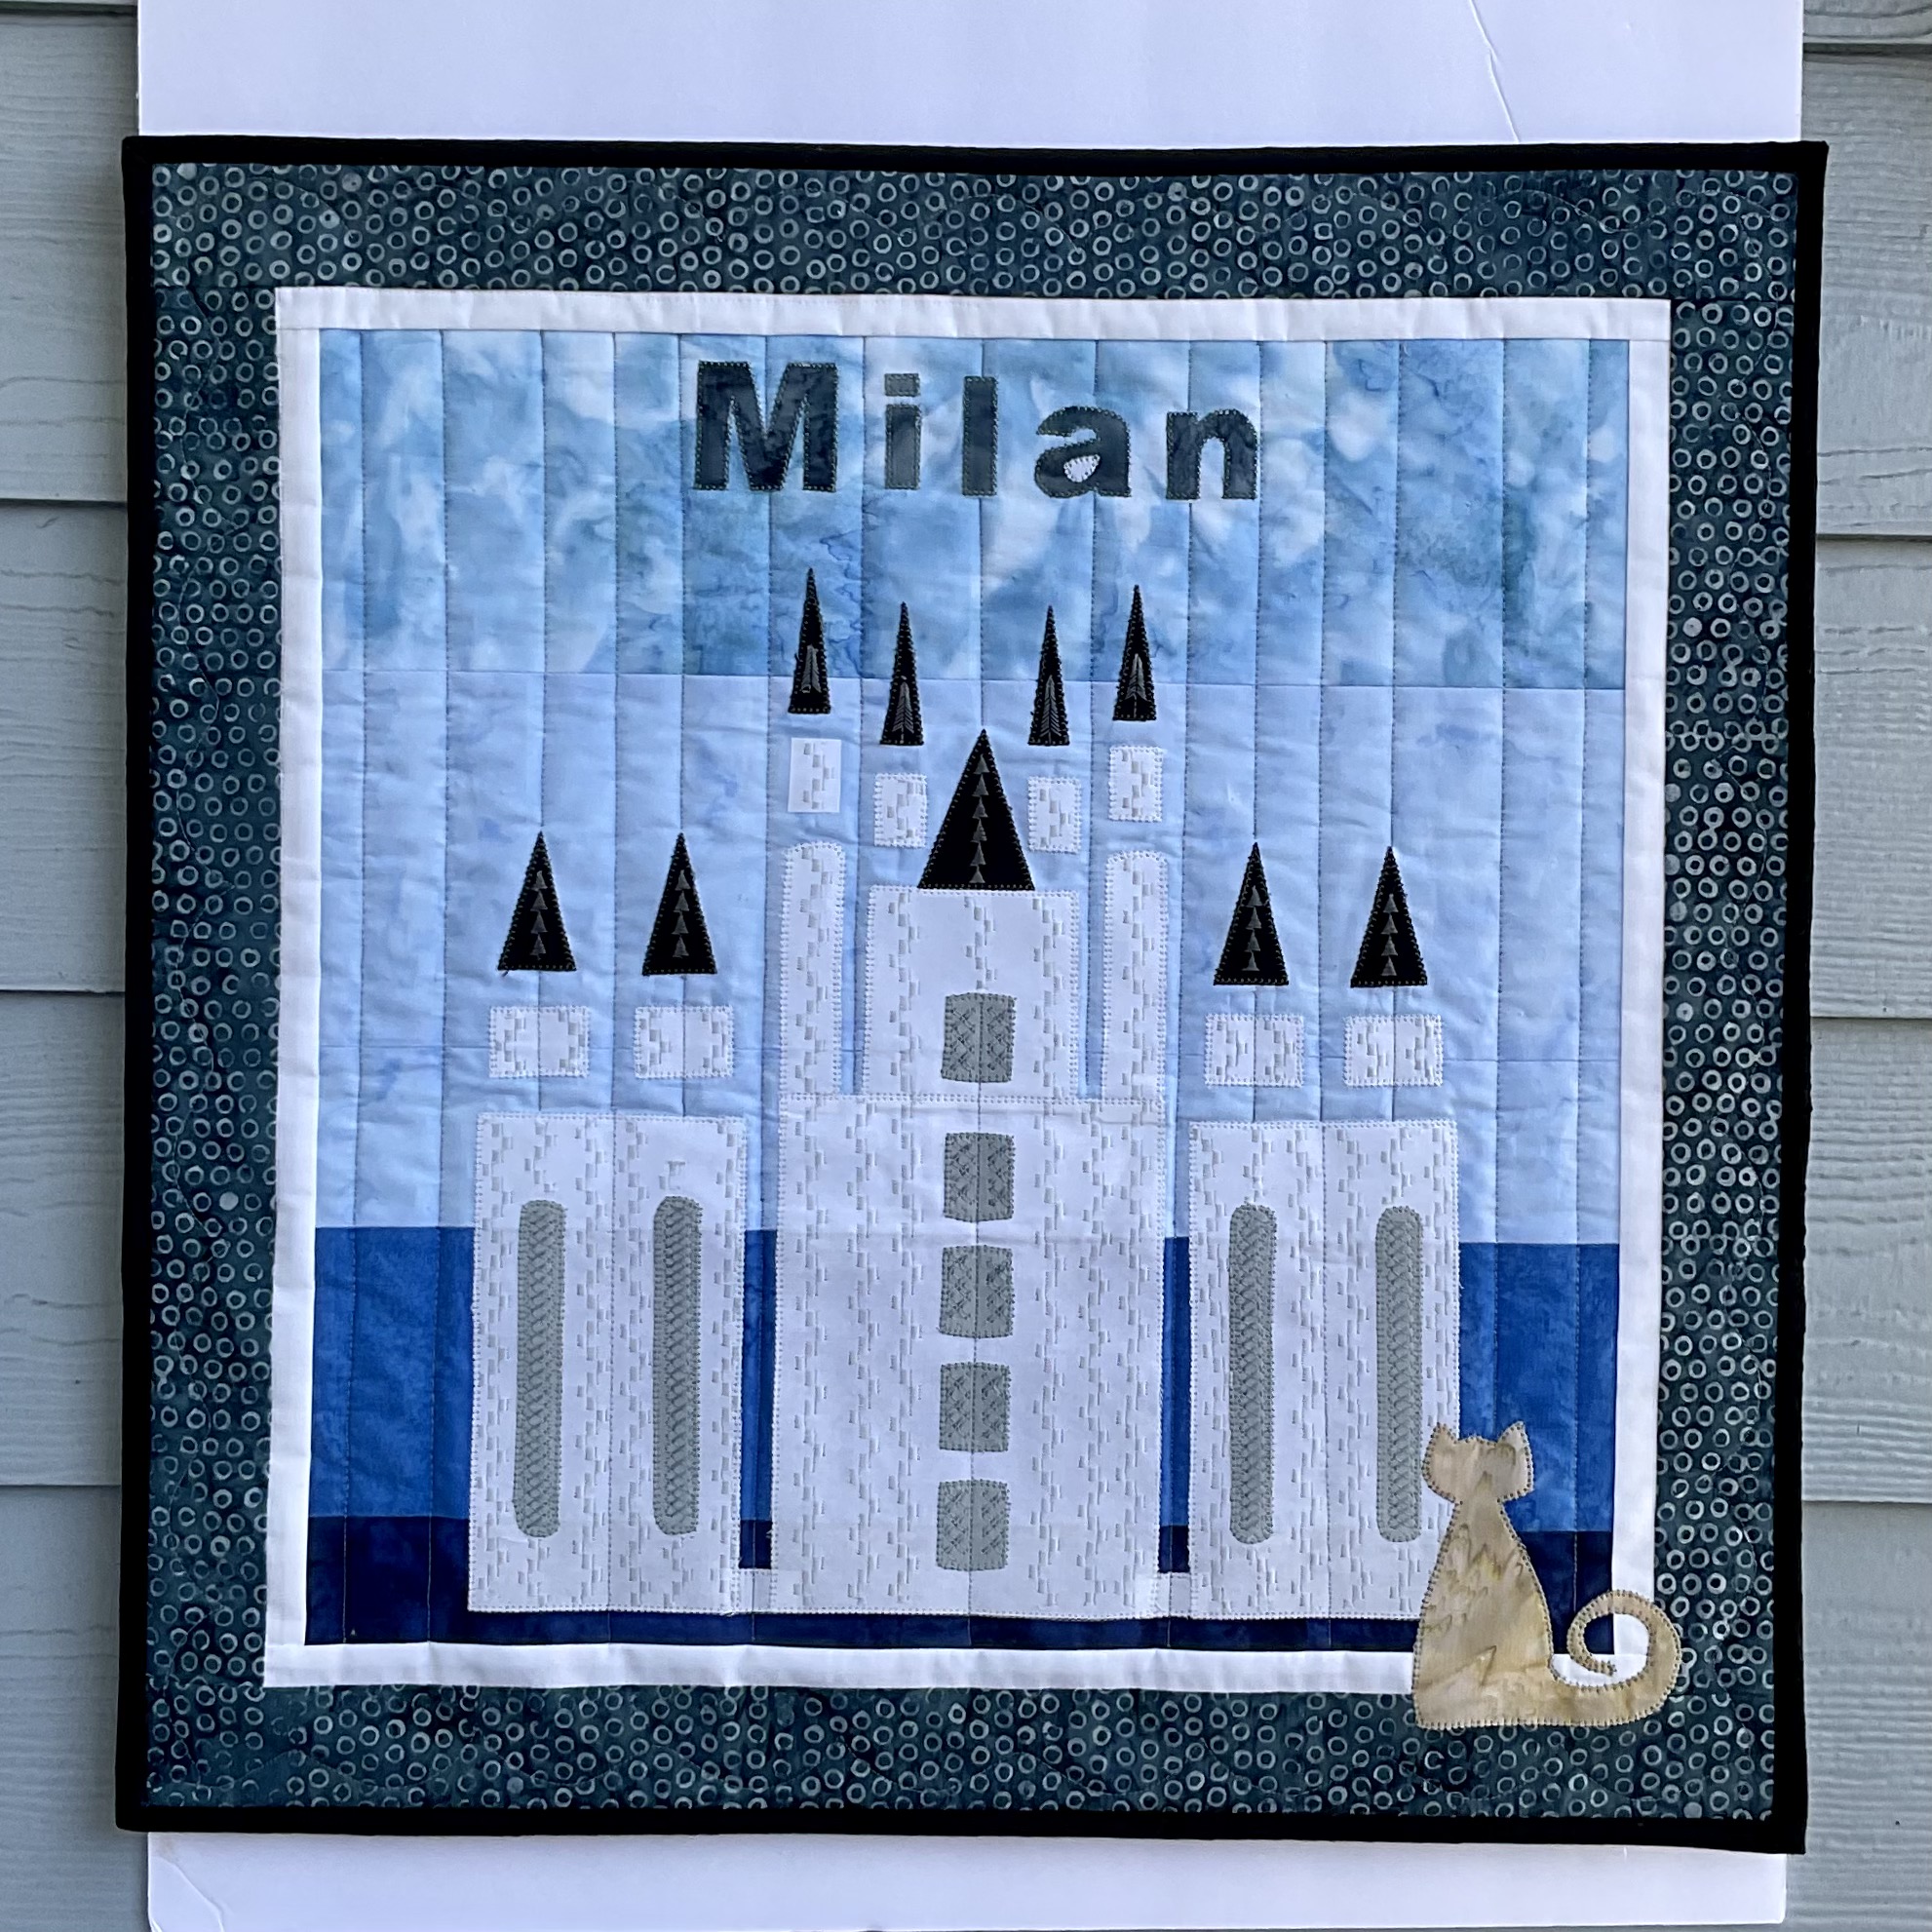
The wall hanging I made is a reflection on the beautiful Italian city of Milan and its size is 20″ x 20.” My inspiration for the wall hangin was the beautiful Milan Cathedral (In Italian: Duomo di Milano, which literally means Cathedral of Milan. The church is the largest church in Italy (excluding the Vatican), and 3rd largest in the world. It is the most visited tourist attraction in Milan.

milan-cathedral
milan-cathedral

Here are some interesting facts about the Milan Cathedral:

1. It took nearly six centuries to complete. The construction of the church began in 1386, and was officially completed in 1965 when the last bronze door was installed, although most parts of the building had been completed in 1813.

2. The church is based on a Latin cross form that covers 11700 square meters and can accommodate about 35000 people.

3. The building features a variety of architectural styles, such as Gothic, Neo Classic, Baroque, and Decorative Gothic, which is the main style.

4. Milan Cathedral has 135 spires on its roof, more than any other church in the world, and each spire is topped off by a sculpture of a biblical figure. The exterior of the church is decorated with 2245 statues sculpted on the facades of the church.

Milan cathedral sculptures

5. One of the nails reputedly from the Crucifixion of Christ has been placed in the cathedral. The Holy Nail is retrieved and exposed to the public every year, during a celebration known as the Rite of the Nivola.


I wanted to create the wall hanging in the graphic style of a vintage travel poster, such as this example of Florence.

florence
florence


I loaded the fabrics into my Electric Quilt Software and created this design.

Milan EQ
Milan EQ

I created the background sky and ground by stitching four of the Island Batik Brilliant Blues together and then appliquéd the white cathedral, with gray windows and black spires. Here is what it looked like with the appliqué pieces fused on and some of the decorative stitching in the windows and spires.

applique fused
applique fused

Then I decided to apply decorative stitches with my Bernina 770 to give the appliqué pieces some definition and texture. The light, medium and dark gray threads, from the Milan collection, worked perfectly with the white, gray and black from Island Batik. Here are some close ups of the decorative stitching.

closeup
closeup


Since the quilt is so graphic and boxy, I wanted to do some straight line quilting. I used a ruler foot for my Janome 6600 and a quilting ruler that I love from Four Paws Quilting called the Line Tamer. It has a slot down the middle that allows the ruler foot to ride in that groove and create a straight line with your quilting.

four paws ruler
four paws ruler

Here is the finished project.

Milan wall hanging
Milan wall hanging

I used the medium gray 50 wt. Aurifil thread on the front and on the back. Schmetz Needles sent the Ambassadors some of their needles and I used a 70/10 quilting needle. I used Hobbs Premium 80/20 Cotton/Poly Blend Batting. This batting is wonderful to quilt by hand or machine. It is made with a blend of  80% natural cotton and 20% fine polyester, is needle punched, and has a light resin bonding to provide exceptional strength and durability. Close quilting yields a flat, low-loft appearance, while more space between stitching lines yields a slightly higher loft.

Heirloom Premium cotton/poly blend


The supplies I used to make this project were provided by:

Island Batik Brilliant Blues, white, gray and black.

Aurifil 50 wt Thread (Milan Color Builders box)

Hobbs Heirloom® Premium 80/20 Cotton/Poly Blend Batting

Schmetz 70/10 Quilting needle


Thank you Island Batik, Aurifil Thread, Hobbs Batting,and Schmetz Needles.

Island Batik
Island Batik

Aurifil Thread
Aurifil Thread

Schmetz Needles
Schmetz Needles

Hobbs Batting
Hobbs Batting


We have two Spring quilt patterns for sale starting today and through the month of April. They are Golden Gate Park Table Runner and Spring Friends Table Runner.

Cover
Cover

cover
cover

Blue Bear says hi from Milan!

Blue Bear
Blue Bear

Please let him know how much you love this wall hanging by writing to him in the comments. The comment box is at the top left of the blog post, below Reed’s picture.

The other amazing Island Batik Ambassadors are also posting their March Color Builder Challenge projects. Check out their projects by clicking on the links next to their names to be directed to their blog posts.


Jennifer Thomas, Curlicue Creations
Denise Looney, For the Love of Geese

Pamela Boatright, Pamela Quilts
Andi Stanfield, True Blue Quilts

Megan Best, Bestquilter

Maryellen McAuliffe, Mary Mack Made Mine
Brenda Alburl, Songbird Designs

Emily Leachman, The Darling Dogwood
Leah Malasky, Quilted Delights

Suzy Webster, Websterquilt
Connie Kauffman, Kauffman Designs

Brianna Roberts, Sew Cute and Quirky
Sandra Starley, Textile Time Travels

Michelle Roberts, Creative Blonde
Jane Hauprich, Stitch by Stitch Custom Quilting

Claudia Porter, Create with Claudia

Anorina Morris, Samelia’s Mum
Preeti Harris, Sew Preeti Quilts

Elizabeth DeCroos, Epida Studio
Gail Renna, Quilt Haven Threads

Gail Sheppard, Quilting Gail
Jennifer Fulton, Inquiring Quilter

Mania Hatzioannidi, Mania for Quilts
Lisa Pickering, Lisa’s Quilting Passion

#islandbatikambassador #islandbatik #iloveislandbatik   #hobbsbatting #aurifil #aurifilthread #schmetzneedles #doyoueq #bernina #janome 


Posted on 6 Comments

Island Batik Ambassador- February Project- Row by Row Quilt

Timberland Tumble Quilt

I have completed my February project as an Island Batik Ambassador and I am so excited to share it with you. This month is a blog hop and if you check out the Island Batik blog, you can enter each week to win a fat quarter bundle of some of the fabrics that the Ambassadors are using in their projects. I will show the other fabric collections later in this blog post and there will be a link to the giveaway from Island Batik.

Row by Wow Blog Hop
Row by Wow Blog Hop


The February project was to make a row by row quilt using an upcoming fabric line from Island Batik. I was so excited when the fabric I was given to use was Evergreen and Pine by Kathy Engle. Just look at this gorgeous collection of green and tan batik fabrics. The Evergreen & Pine Batiks may be found at your local quilt shop that carries Island Batik, such as Fabric Smart in St. Petersburg FL. You may find them online at www.fabric-smart.com or call them at 727-914-8850.

Evergreen & Pine
Evergreen & Pine

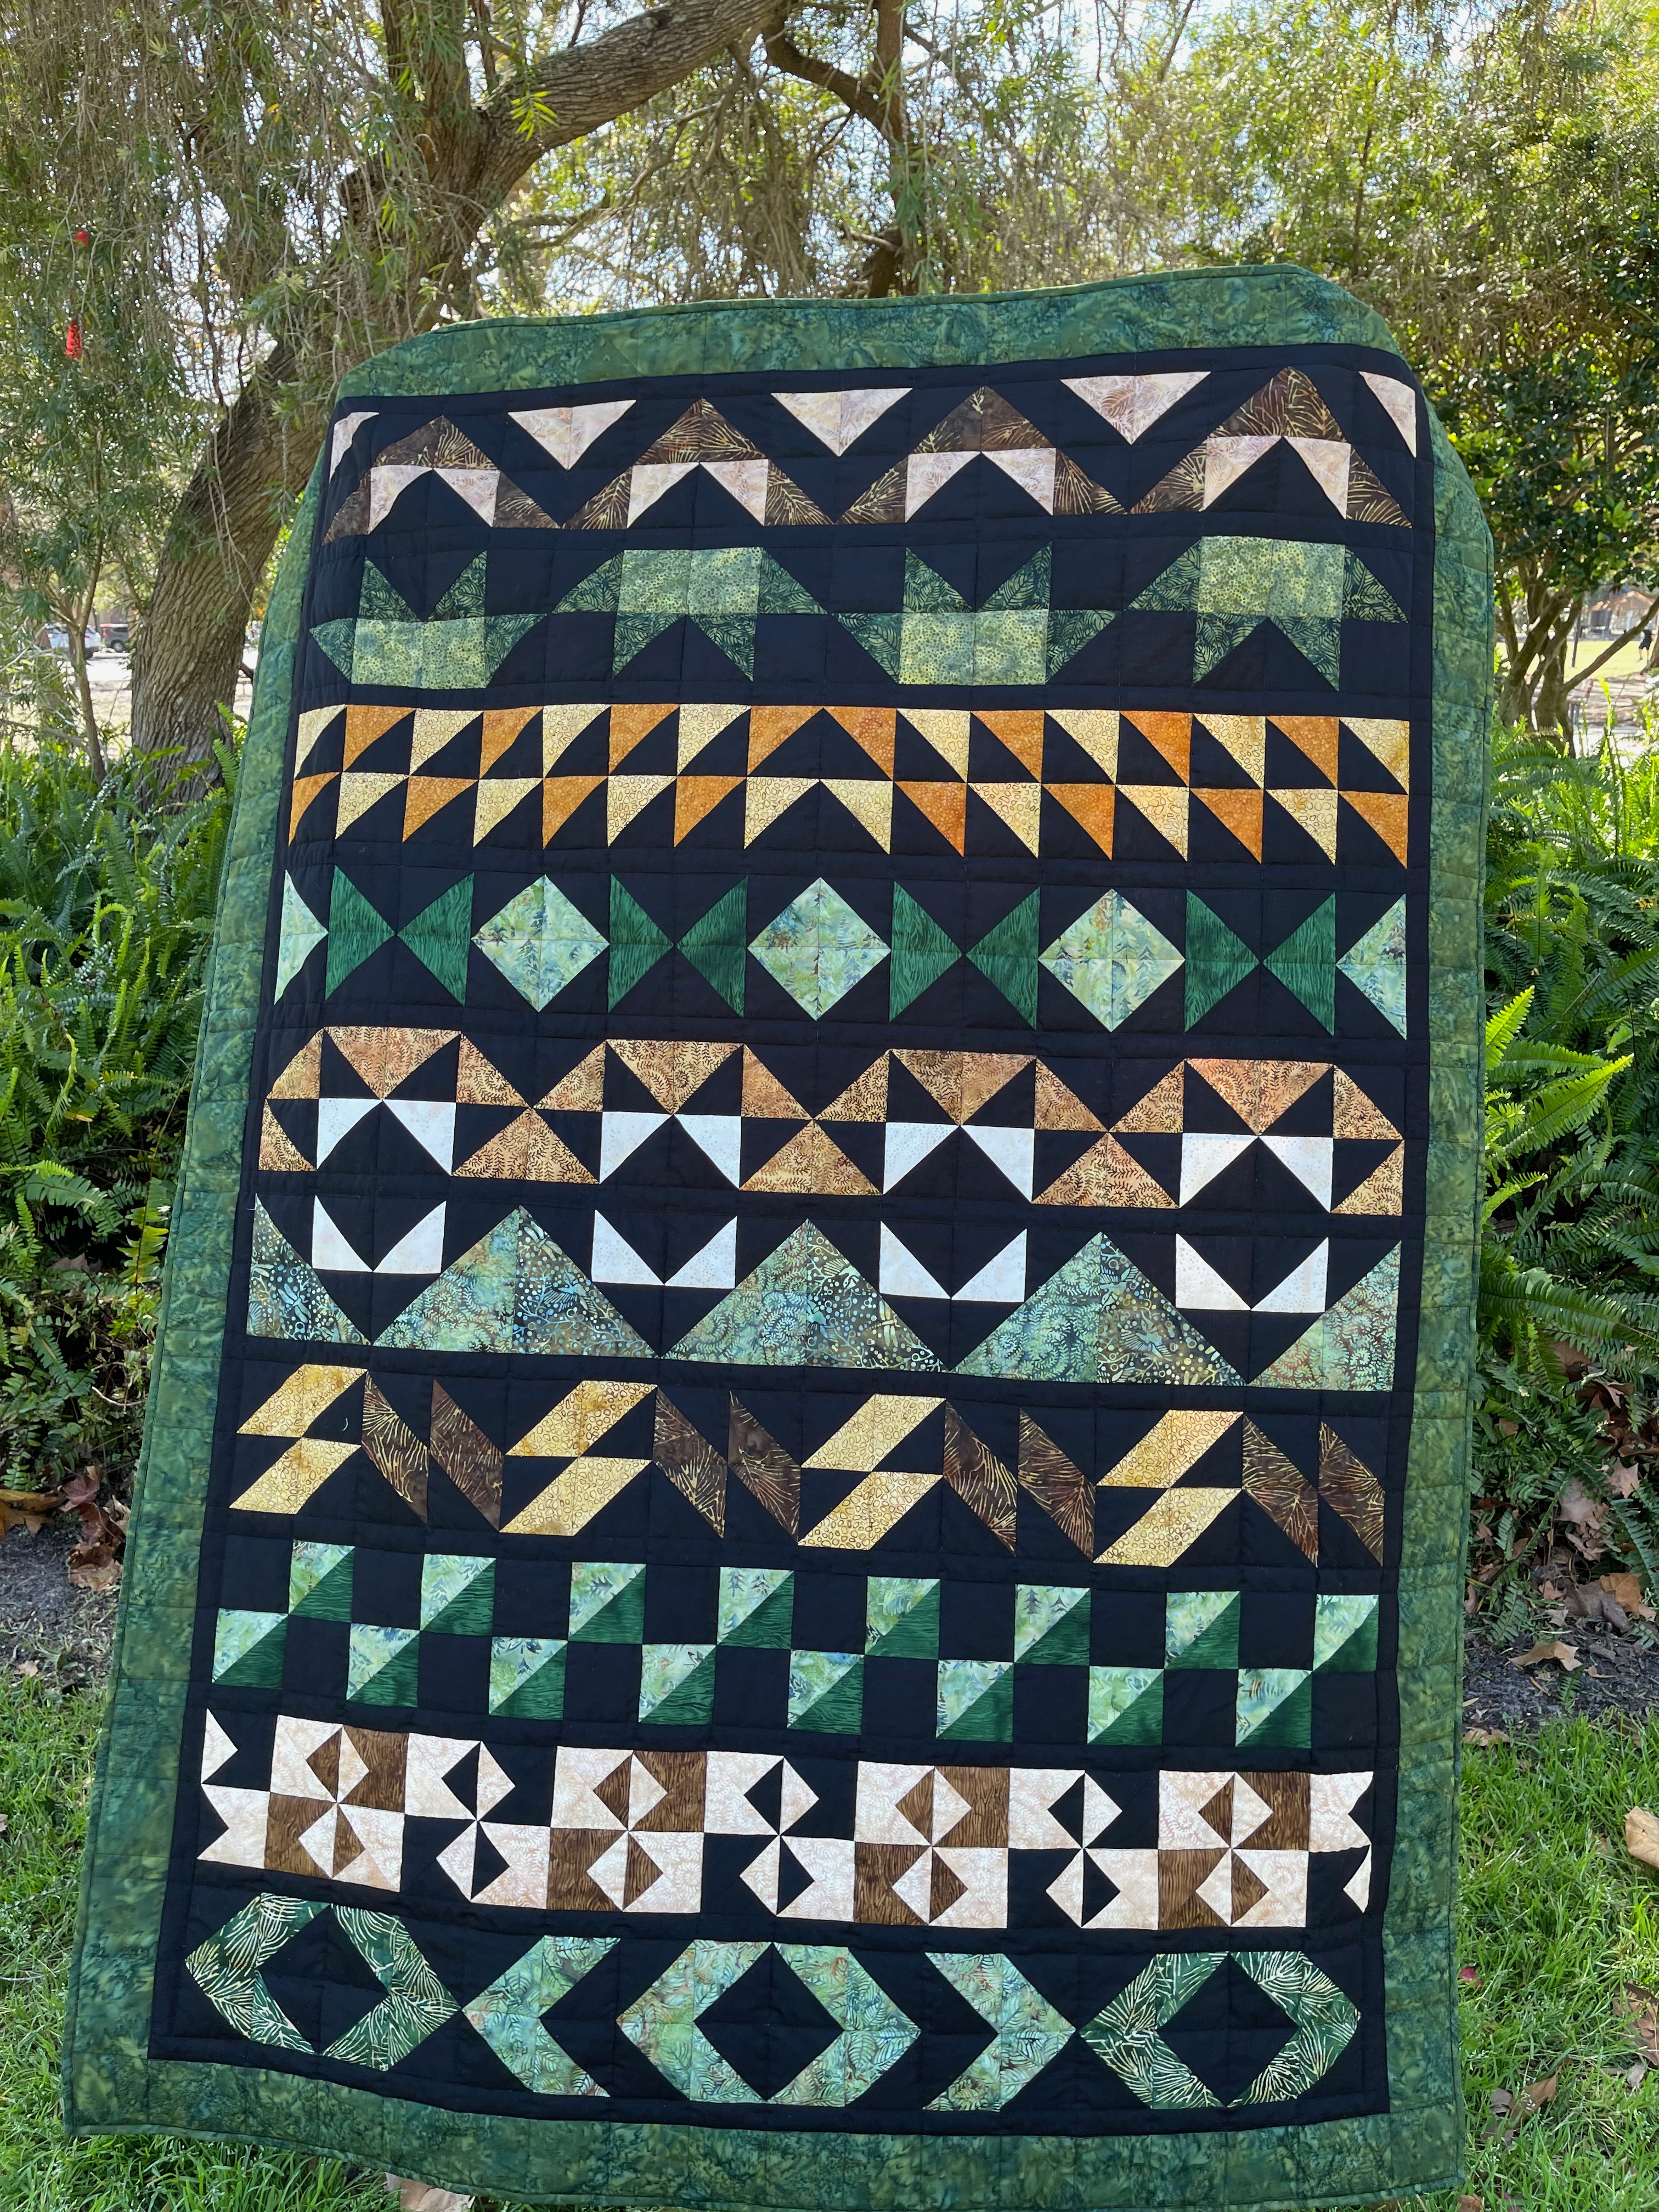
The quilt I made is called Timberland Tumble. It is a large lap quilt size 56″ x 77.” This is a striking quilt with a different block in each row. I think it is sometimes difficult to come up with fabrics and quilt patterns that would be appropriate to make for a man, but I feel this quilt accomplishes that and would be an awesome quilt to make for the men in your life. This quilt is easy to make as it is composed mainly of half square triangles, a few squares and maybe a quarter square triangle or two.

Timberland Tumble Quilt

TT location
TT location

I will have a pattern coming out in March 2022 for this quilt after the testers are done testing the pattern.  The batik bundle I was provided was the Evergreen and Pine collection by Kathy Engle. Look at this glorious selection of green and tan batiks. These fabrics were so beautiful that it was really hard to cut them up.

Evergreen and Pine
Evergreen and Pine

E&P
E&P

Row by Row quilts are made with rows of quilt blocks, with each row distinct from the others. I decided to showcase the wide world of blocks that can easily be made from half square triangles. Although all of these blocks can be made from half square triangles, and a few squares and quarter square triangles, I did construct a few of the blocks using larger quarter square triangles and trapezoids as I wanted to showcase the fabric and have less seams to sew after cutting the pieces with my Accuquilt Go! Big Cutter. Here is a picture of using the Accuquilt cutter to cut out some of the shapes.

Accuquilt cutter
Accuquilt cutter

You can see that it makes beautiful cuts which are so easy to piece together. Also, I love the fact that there are no dog ears to trim and if you do a really accurate job of sewing your 1/4″ seam, there is nothing that needs to be trimmed. This really saves a lot of time and effort.

I downloaded the images of the fabric collection into my Electric Quilt software, which is the software I use to design quilts. This is what the quilt looked like in the software. I have included a couple of close ups of the blocks with the gorgeous Evergreen and Pine fabric in them.

TT EQ8
TT EQ8

row 10
row 10

row 5
row 5

row 6
row 6

I also like to often piece the backs of my quilts, which I did for this one. I used some of the fat quarters that I did not use in the quilt to add some interest to the back of the quilt. Here is picture of the back. If you are on TikTok, be sure to check out the video I have posted with me and the quilt. (Look for Blue Bear Quilts)

back of the quilt
back of the quilt

To quilt the quilt on my Bernina 770 QE, I did stitch in the ditch with the edgestitch #10D foot, which was easy to do as there was a square grid of the half square triangle shapes. I used black 50 wt. Aurifil thread on the front and a tan on the back. Schmetz Needles sent the Ambassadors some of their needles and I used a 70/10 quilting needle. I used Hobbs Premium Polyester Poly-down batting. I had never used this batting before and it was very easy to quilt on my Bernina. Hobbs Poly-Down Batting is made with very fine, white, denier polyester which enables the batting to provide a soft feel and lovely drape. It is prized by machine quilters for its wonderful loft which accentuates quilting details. It is also very light weight.

Polydown_batting
Polydown_batting


The supplies I used to make this project were provided by:

Island Batik Evergreen and Pine for the top and Pearl for the backing.

Aurifil 50 wt Thread (black and Tan)

Hobbs Premium Polyester Poly-down batting

Schmetz 70/10 Quilting needle

Accuquilt Go! Big Cutter and 6″ Qube


Thank you Island Batik, Aurifil Thread, Hobbs Batting, Schmetz Needles and Accuquilt.

Island Batik
Island Batik

Aurifil Thread
Aurifil Thread

Schmetz Needles
Schmetz Needles

Hobbs Batting
Hobbs Batting

accuquilt
accuquilt

Blue Bear is sending you some love for Valentine’s Day. Please let him know how much you love the quilt by writing to him in the comments!

TT Quilt with heart
TT Quilt with heart

Be sure to check out the Island Batik Blog at https://islandbatik.com/row-by-row-blog-hop-week-one/ where you can enter to win a fat quarter bundle. Check it out! a Rafflecopter giveaway  Citified and Contempo are the two fabric lines that are being given away this week. Good luck!

week two prize
week two prize

The other amazing Island Batik Ambassadors are also posting their February Blog Hop quilts. For this week in the blog hop, on Tuesday, Suzy Webster and Connie Kauffman posted on the Contempo fabric line and on Thursday, Brianna Roberts and Sandra Starley will be posting on the Graphic line from Island Batik. Check out their projects by clicking on the links next to their names to be directed to their blog posts.

Be sure to check out the other amazing Row by Row quilts (I have seen some amazing quilts so far) and all the fabulous new Island Batik Collections!

January 31:

Jennifer Thomas, Curlicue Creations
Denise Looney, For the Love of Geese

February 1:

Pamela Boatright, Pamela Quilts
Andi Stanfield, True Blue Quilts

February 2:

Megan Best, Bestquilter

February 3:

Maryellen McAuliffe, Mary Mack Made Mine
Brenda Alburl, Songbird Designs

February 7:

Emily Leachman, The Darling Dogwood
Leah Malasky, Quilted Delights

February 8:

Suzy Webster, Websterquilt
Connie Kauffman, Kauffman Designs

February 9:

Reed Johnson, Blue Bear Quilts

February 10:

Brianna Roberts, Sew Cute and Quirky
Sandra Starley, Textile Time Travels

February 14:

Michelle Roberts, Creative Blonde
Jane Hauprich, Stitch by Stitch Custom Quilting

February 15:

Claudia Porter, Create with Claudia

February 16:

Anorina Morris, Samelia’s Mum
Preeti Harris, Sew Preeti Quilts

February 17:

Elizabeth DeCroos, Epida Studio
Gail Renna, Quilt Haven Threads

February 18:

Blog Hop Round-Up Week 3 and Giveaway

February 21:

Gail Sheppard, Quilting Gail
Jennifer Fulton, Inquiring Quilter

February 22:

Mania Hatzioannidi, Mania for Quilts
Lisa Pickering, Lisa’s Quilting Passion

#islandbatikambassador #islandbatik #iloveislandbatik   #hobbsbatting #accuquilt #accuquiltgo #aurifil #aurifilthread #schmetzneedles #doyoueq #bernina 

Posted on Leave a comment

Island Batik Ambassador- January Project- Step by Step Quilt

South Seas Shuffle Quilt

I am so excited to be an Island Batik Ambassador for 2022.


Each month, I will be sharing a different project using upcoming fabric lines from Island Batik.

Unboxing video
Unboxing video


If you would like to see my unboxing video, where I show all of the fabric and batting Island Batik and Hobbs sent to me, here is a link to my YouTube video: https://youtu.be/Q-MN2HbI6dg. Be sure to subscribe and click the bell so the you will be notified when I post more videos.

For the month of January, the challenge was to create a step by step quilt using the Island Batik basic line of Gradations.

01 - Step by Step Challenge
01 – Step by Step Challenge


The quilt I made is called South Seas Shuffle. It is a large lap quilt size 56″ x 62.”

South Seas Shuffle Quilt.

South Seas Shuffle Quilt


This is a modern quilt using the traditional flying geese block. It’s modern in that the geese are going in many directions, there are large white negative spaces and there are partial seam blocks in the construction of the quilt. I will have a pattern coming out in February 2022 for this quilt after the testers are done testing the pattern. I also will have a YouTube video for how to sew the partial seam block unit in this quilt. The batik bundle I was provided was Brilliant Blues. Look at this glorious selection of blue batiks. Island Batik developed ten different colorways of gradations with 20 steps in each. There are so many quilt projects that make use of gradations in color and value. Yardage for the Gradation Batiks may be found at your local quilt shop that carries Island Batik, such as Fabric Smart in St. Petersburg FL. You may find them online at www.fabric-smart.com or call them at 727-914-8850.

BB Bundle
BB Bundle

Brilliant Blues
Brilliant Blues


The idea behind the step by step challenge was to incorporate the gradation of light, medium and dark colors into a quilt. Sometimes it is difficult to determine if a color should be placed into the light, medium, or dark category. In order to do that, it helps to place them next to each other. If it is still too difficult to determine, a little trick is to take a picture of them and then use the filters in your phone’s camera app to turn the picture into a B&W monochromatic picture. Then it is easier to see the differences in values. Squinting at the photos and fabrics helps as well. In the photos below, it looks like the 1st and 3rd batiks might be about the same value, but in the B&W photo, you can see the the 3rd batik is clearly lighter that the 1st. So in the color photo, the 1st batik is the dark, the 2nd and 3rd are the mediums and the 4th batik is the light value. The value of a fabric can change when you place different lights and darks next to it.

Color values
Color values

black and white image


I downloaded the images of the fabric collection into my Electric Quilt software, which is the software I use to design quilts. This is what the quilt looked like in the software.

South Seas Shuffle Quilt in EQ8


I used the measurements of the Accuquilt Flying Geese die to create the size of the blocks. Then the EQ8 software told me how much yardage I needed of each fabric and gave me the rotary cutting diagrams for the non-Accuquilt pieces.

Each one of the flying geese blocks has a blue batik with a light, medium and dark value. This creates the gradation in colors. I cut the blue batik quarter square triangles, which are in the flying geese blocks, using the Accuquilt cutter and die. Since the Accuquilt cutter and die cuts off the dog ears, it is easy to line up the pieces for sewing and there is no trimming that needs to be done after the pieces are sewn together.


When the quilt top was all sewn together, I took it outside to let the sun shine through the quilt as I knew these brilliant blue batiks would sing in the sunshine and wow did they.

SSS see through
SSS see through


Looking at this photo on my iPhone, I discovered something new called Lookup -Artwork. When I clicked on that, it showed me different artist’s works that were similar in feel to my quilt. I was amazed by what they came up with, so I though I would share those other artist’s works with you.

Other's Artwork
Other’s Artwork

Other's Artwork
Other’s Artwork

Other's Artwork
Other’s Artwork

Other's Artwork
Other’s Artwork

Other's Artwork
Other’s Artwork


To quilt the quilt on my Bernina 770 QE, I did stitch in the ditch with the edgestitch #10D foot.

Stitch in the ditch quilting


I did some quilting in the negative white spaces to mimic the flying geese that were in the other blocks. I used the Creative Grids “Chevy” ruler, designed by Angela Walters, to do this quilting.

Negative space quilting


I also wanted to do some echo quilting, which means quilting next to the seam lines, within the blue flying geese. So, I switched to a blue Aurifil thread and then used the Line Tamer ruler by Fourpawsquilting.com to get straight lines with my echo quilting.

Four Paws ruler
Four Paws ruler

Echo quilting
Echo quilting


I used a new Schmetz 70/10 quilting needle. Using new needle on a new quilting project just makes your life so much easier.


I used Hobbs Heirloom 80/20 Bleached batting as the quilt top had a lot of white in it and I did not want the batting to show through the fabrics. This batting was very easy to quilt on my Bernina. It is fairly thin and gives your quilt a beautiful drape and also lays fairly flat. It is also light weight and breathable so it makes a good batting for a summer quilt or if used in a warmer climate.  It’s loft is 1/8″; it’s shrinkage is 3-5% and the maximum stitch distance when quilting is 4.”

HobbsHeirloom8020Bleached


What I liked about using Island Batik fabrics:

  1. The colors are so vibrant.
  2. There is a wonderful texture in the fabrics.
  3. They have very little fraying after they have been cut.
  4. They produce very little lint in your sewing machine.
  5. They are tightly woven, yet very light. I had been working with the batiks for awhile and then switched to regular quilting cotton. I thought the quilting cotton was so heavy that I had a double layer, but I did not. The light weight of the batiks would make for an overall lighter quilt, depending on your batting and how much quilting you put onto the top.

The supplies I used to make this project were provided by:

Island Batik Foundations Fabrics: Brilliant Blues, White, and Black for the top and Pearl for the backing.

Aurifil 50 wt Thread (white. black and blue)

Hobbs Heirloom 80/20 Bleached Batting

Schmetz 70/10 Quilting needle

Accuquilt Go! Big Cutter and die #55456 Flying Geese 


Thank you Island Batik, Aurifil Thread, Hobbs Batting, Schmetz Needles and Accuquilt.

Island Batik
Island Batik

Aurifil Thread
Aurifil Thread

Schmetz Needles
Schmetz Needles

Hobbs Batting
Hobbs Batting

accuquilt
accuquilt


Blue Bear likes this quilt because of its fabulous blue colors. He hopes you like it too!

Blue Bear with quilt

The other amazing Island Batik Ambassadors are also posting their first quilts of the year. They are all making wonderful gradation quilts in a rainbow of colors. Check out their projects by clicking on the links next to their names to be directed to their blog posts.

Brenda Alburl ~ Songbird Designs

Megan Best ~ Bestquilter

Pamela Boatright ~ Pamelaquilts

Elizabeth DeCroos ~ Epida Studio

Jennifer Fulton ~ Inquiring Quilter

Preeti Harris ~ Sew Preeti Quilts

Mania Hatziioannidi ~ Mania for quilts

Jane Hauprich ~ Stitch By Stitch Custom Quilting

Connie Kauffman ~ Kauffman Designs

Emily Leachman ~ The Darling Dogwood

Denise Looney ~ For The Love Of Geese

Leah Malasky ~ Quilted Delights

Maryellen McAuliffe ~ Mary Mack Made Mine

Anorina Morris – sameliasmum.com

Lisa Pickering ~ Lisa’s Quilting Passion

Claudia Porter ~ Create with Claudia

Gail Renna ~ Quilt Haven Threads

Brianna Roberts ~ Sew Cute And Quirky

Michelle Roberts ~ Creative Blonde

Gail Sheppard ~ Quilting Gail

Andi Stanfield ~ True Blue Quilts

Sandra Starley ~ Textile Time Travels

Jennifer Thomas ~ Curlicue Creations

Suzy Webster ~ Websterquilt

#islandbatikambassador #islandbatik #iloveislandbatik 

 #hobbsbatting #accuquilt #accuquiltgo #aurifil #aurifilthread #schmetzneedles #doyoueq #bernina