Posted on 4 Comments

Island Batik Ambassador- December 2023 Project- Winter Solstice Quilt- Part of the Celebration Challenge

WS Quilt

The Island Batik Ambassadors are challenged this month to make any project they want that is inspired from a celebration. And they are using Island Batik fabric of course. I can’t wait to see all of their celebration inspired projects. Links to the other Ambassador’s blogs may be found at the bottom of this post.

Celebration Challenge


For my fabric selection, I needed yardage and I had the Island Batik Porcelain Blue Collection which was perfect for a winter celebration theme. Island Batik fabrics may be found at your local quilt shop that carries Island Batik, such as Fabric Smart in St. Petersburg FL. You may also find them online at www.fabric-smart.com or call them at 727-914-8850. Another online option for you to shop for this fabric would be Hancocks of Paducah: Hancocks of Paducah

Porcelain Blue Collection

The Winter Solstice marks the shortest day of the year and there are many Winter Solstice celebrations that occur around this time such as Christmas and Hanukkah. The Winter Solstice marks the lengthening of days, leading to its reputation as a time of rebirth. The Porcelain Blue collection with its blues, ranging from light to dark, and coordinating the collection with white was the perfect palette to signify this transition from dark to light. The Porcelain Blue collection definitely has a wintery feel to it.


WS Quilt
WS Quilt

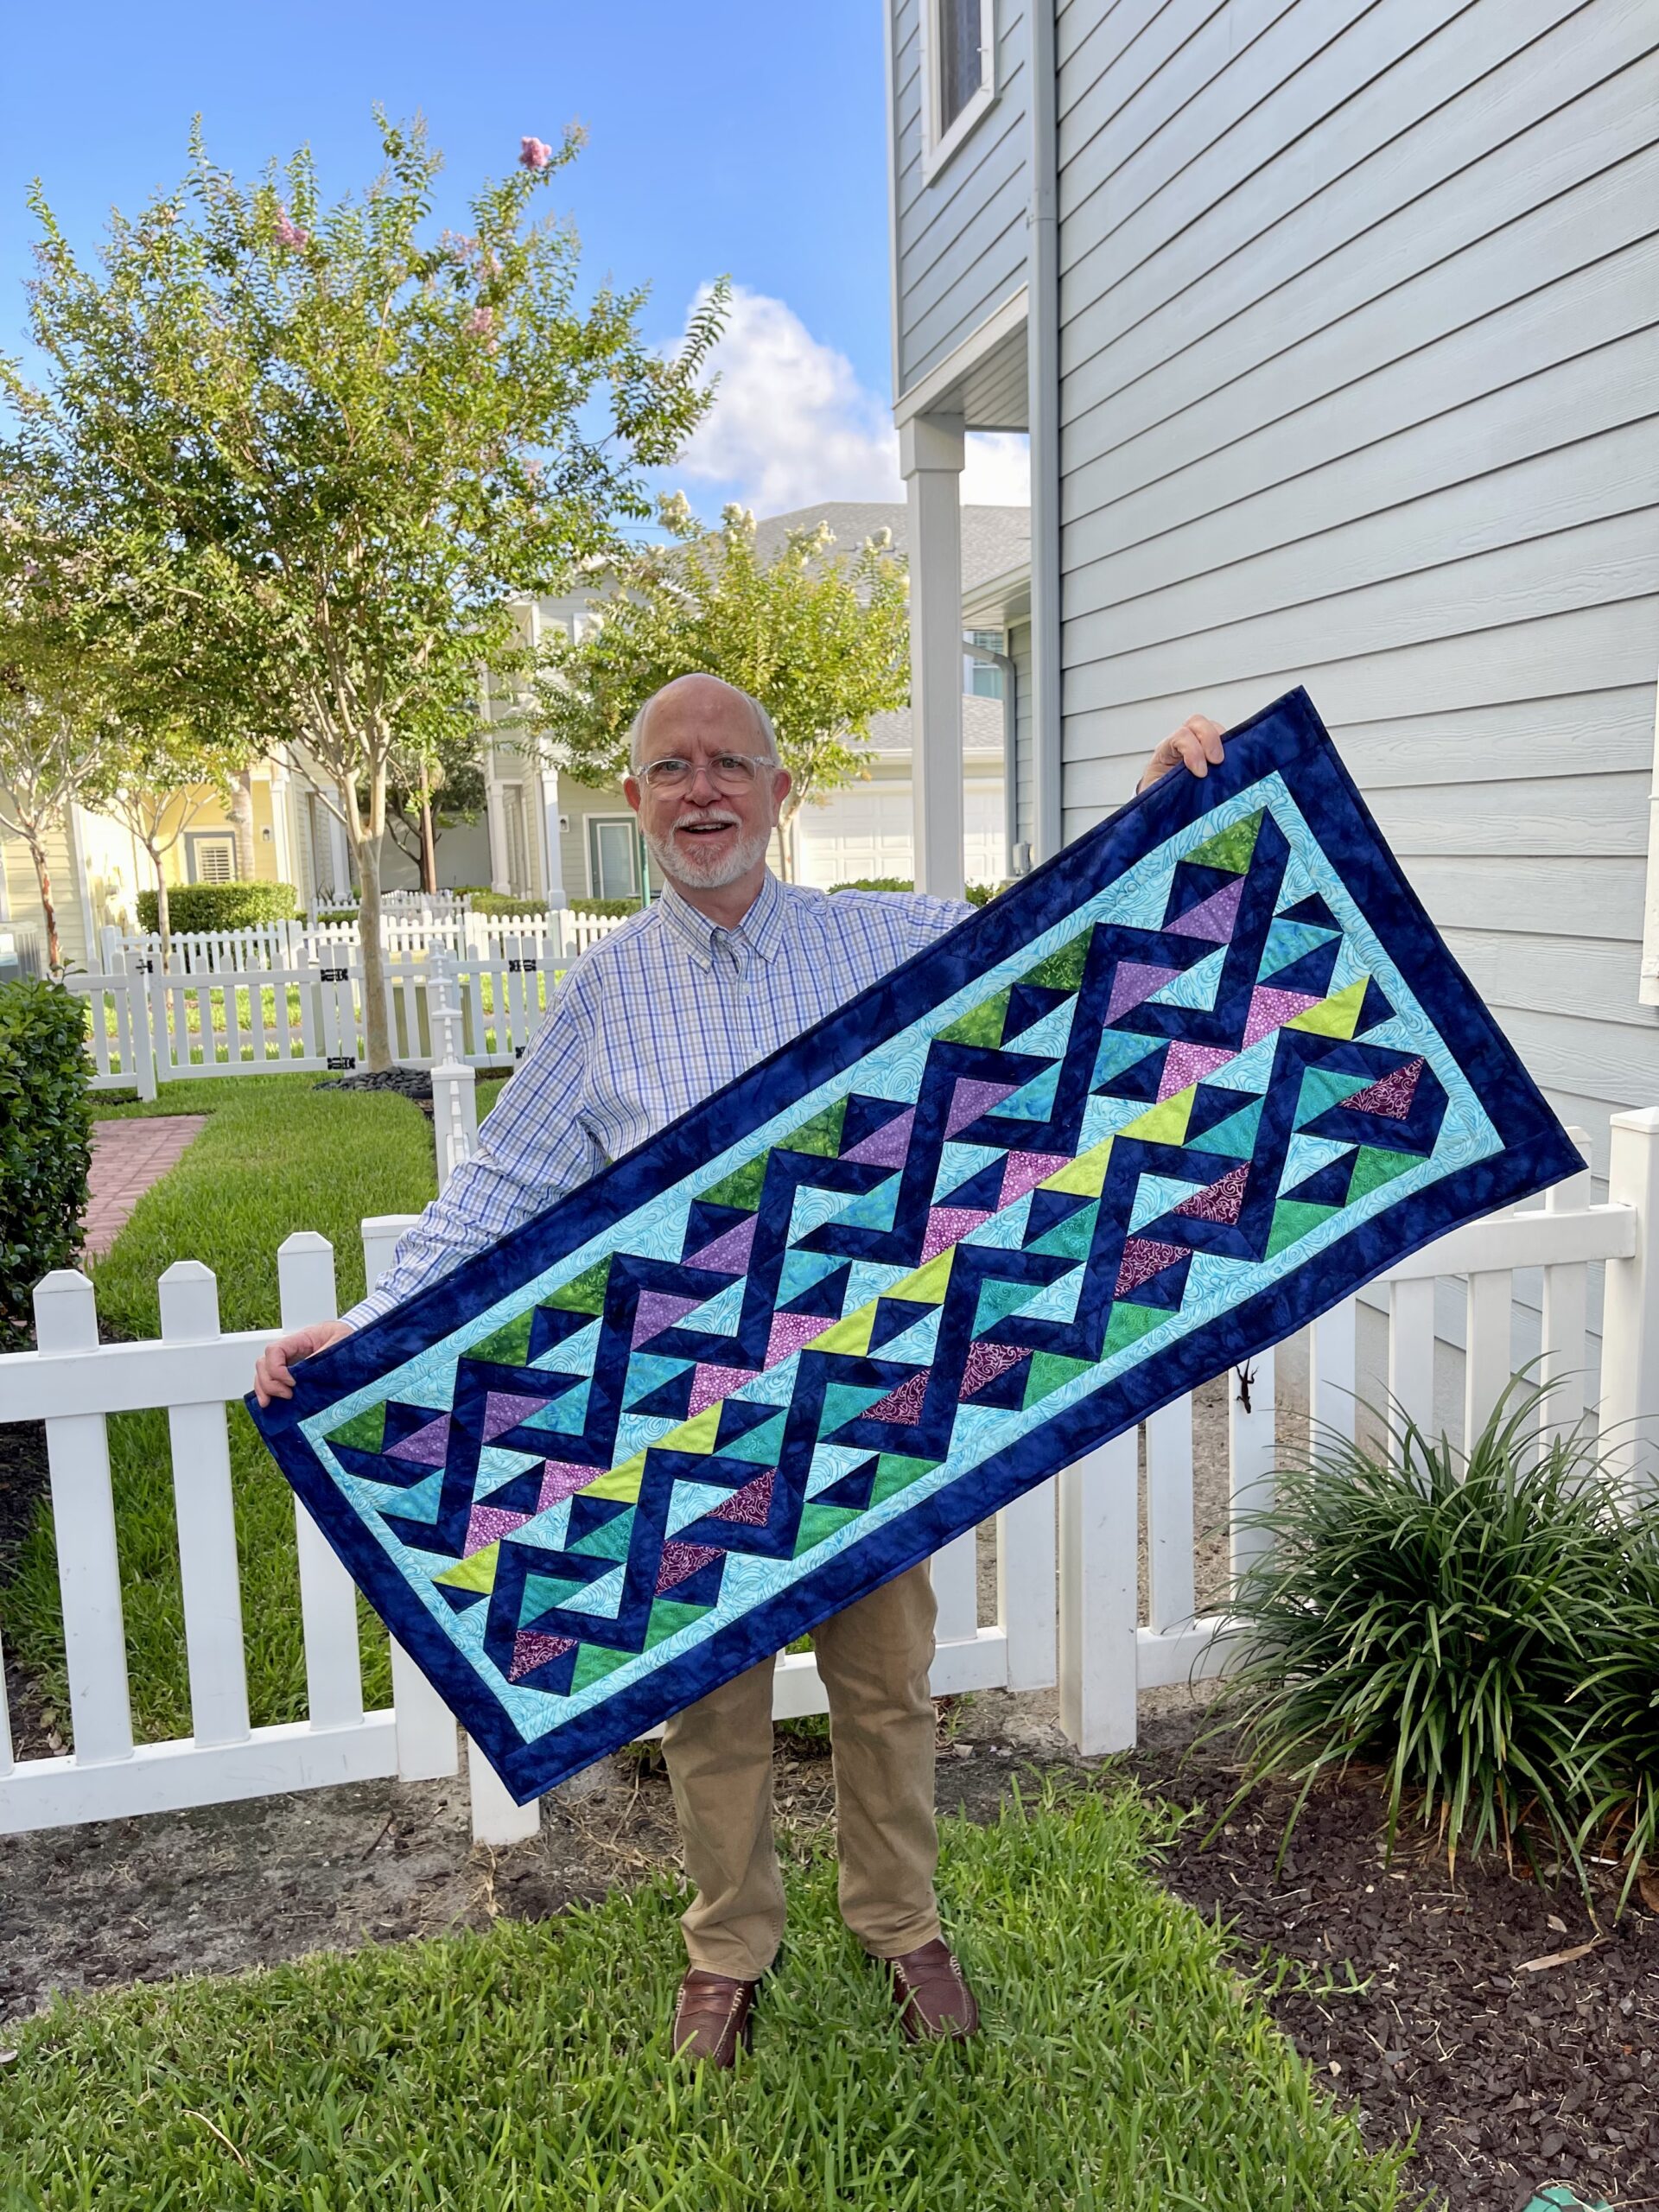
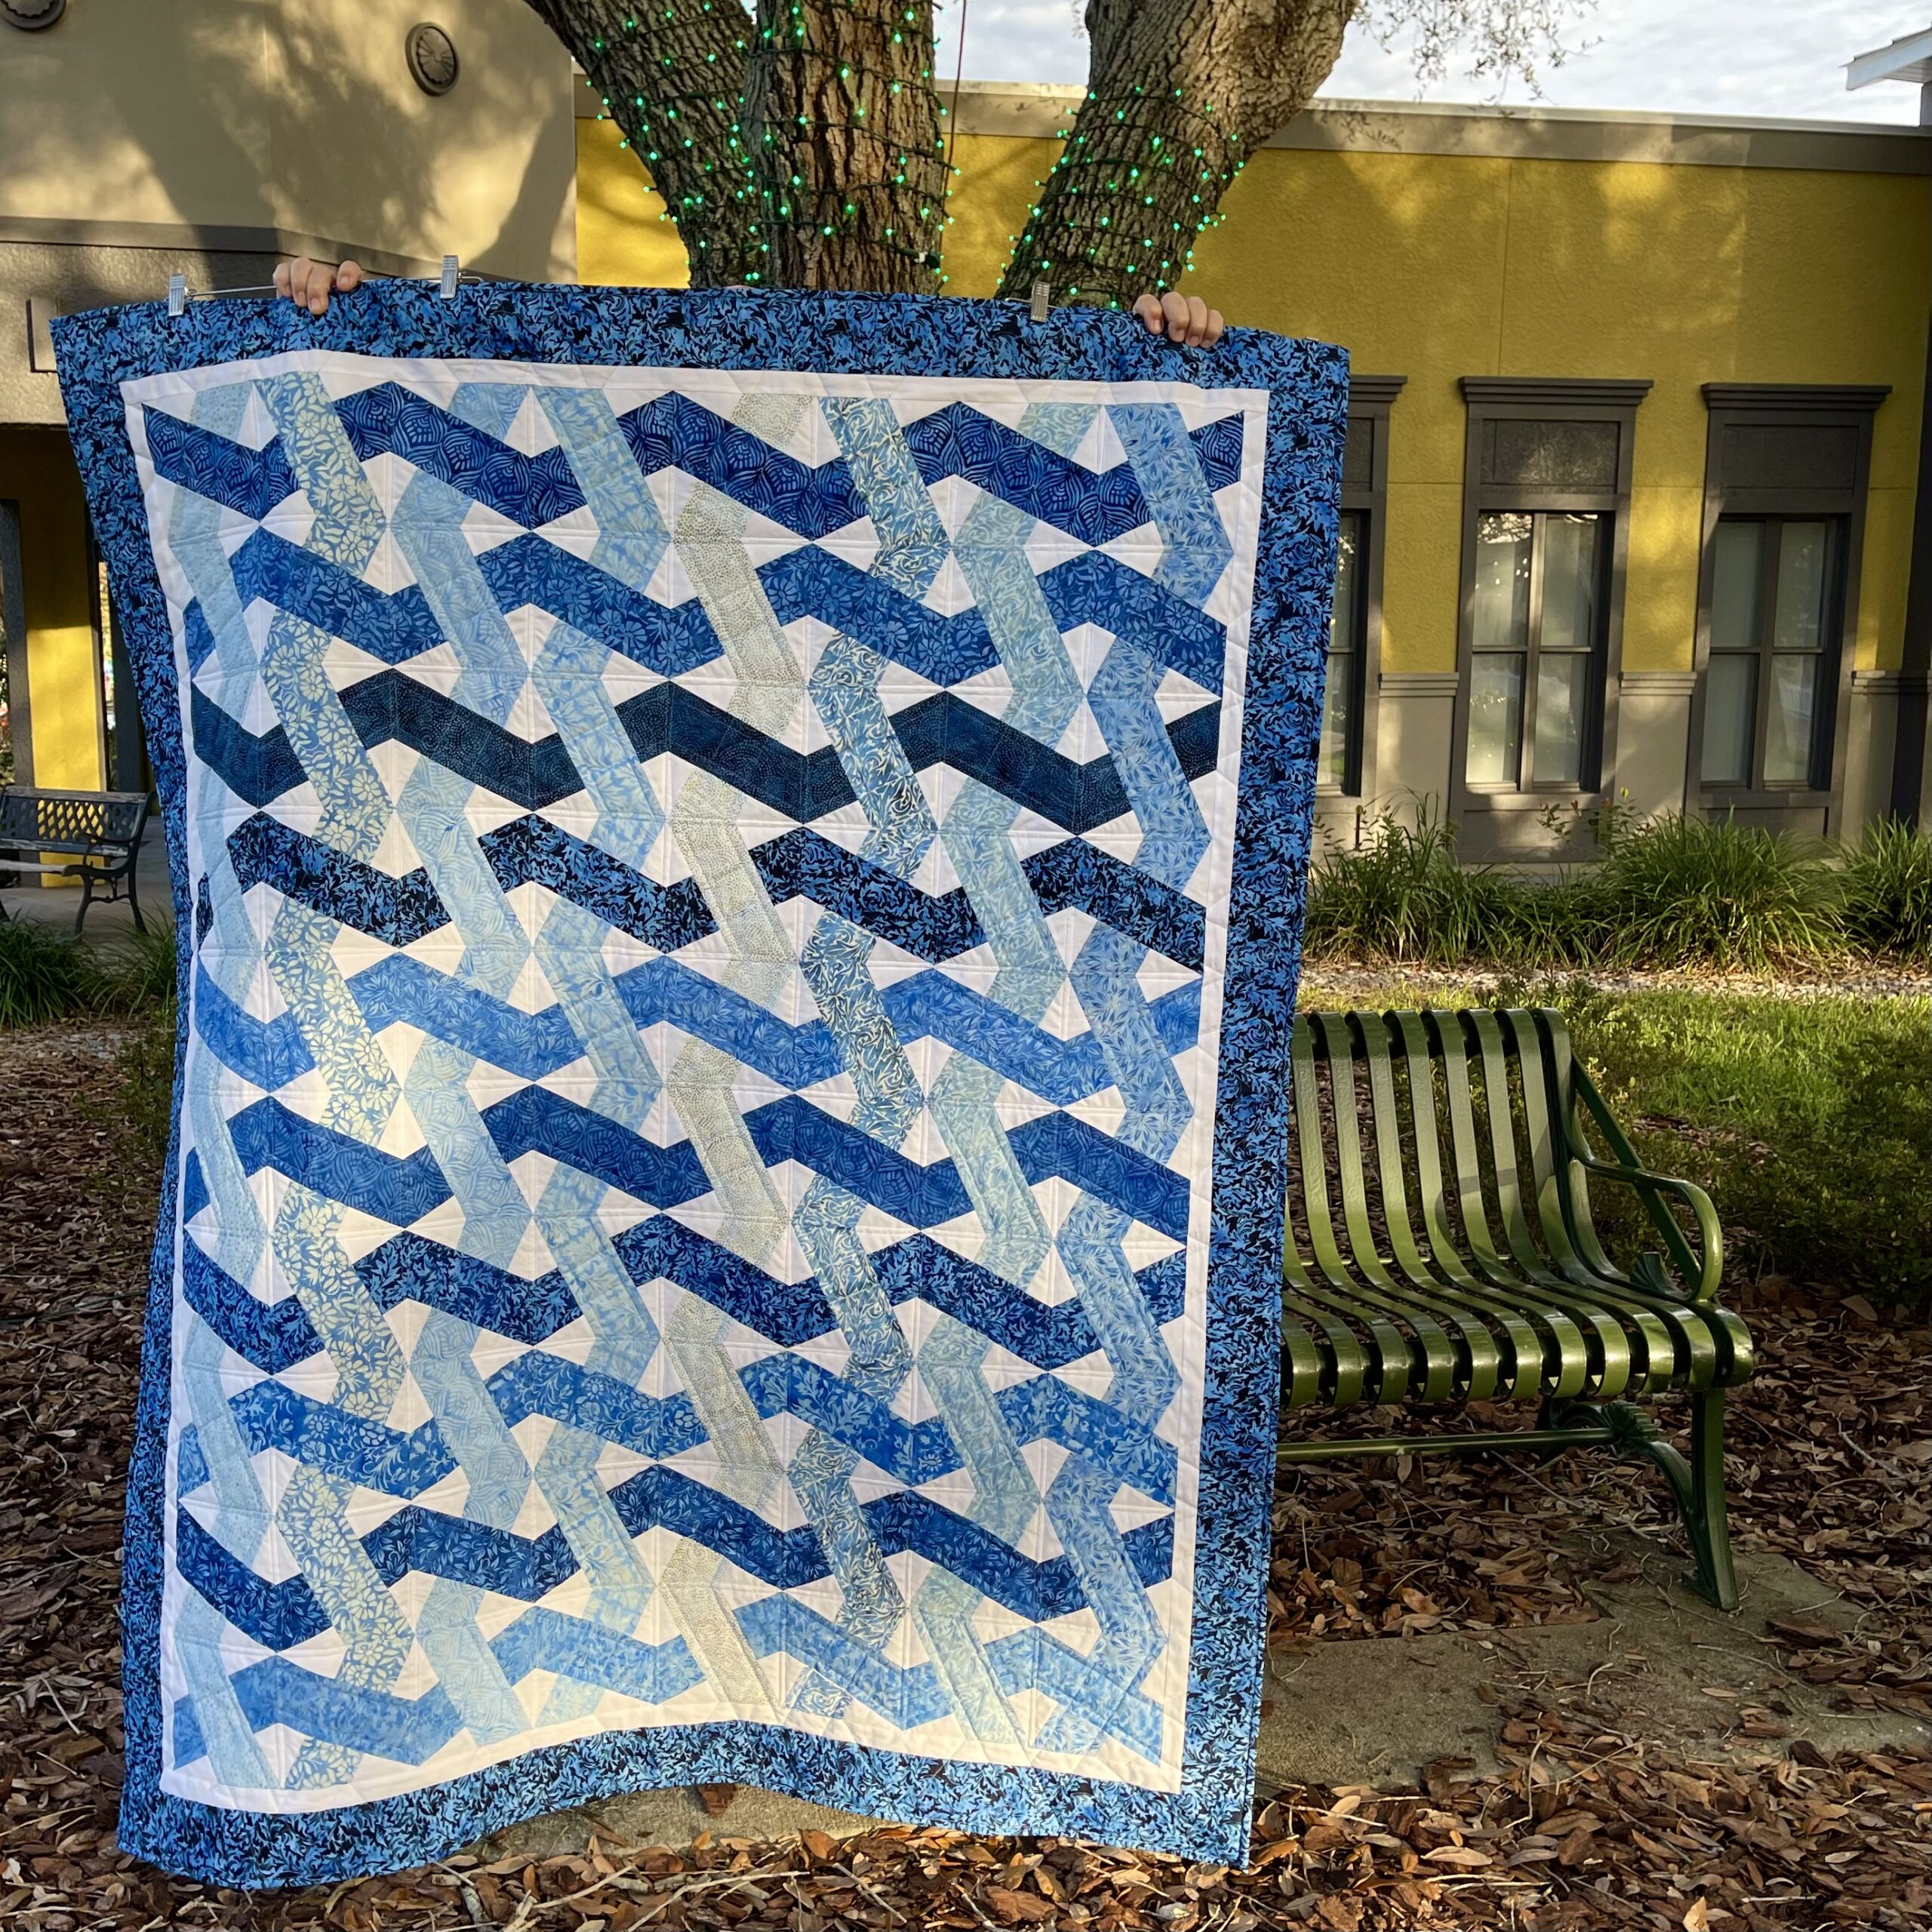
The quilt I made, is a nice lap size measuring 56″ x 68.” The range of blues, paired with white, gives this quilt a cool, crisp feeling, yet it’s inviting and would be great to snuggle under next to a fire.

Winter Solstice Quilt

I designed the quilt in Electric Quilt 8. This is a rendering of the pattern in EQ8. It’s amazing how close it looks to the final quilt when you are able to download the fabric jpegs into the program and work with the actual fabrics before you ever buy or start cutting them.

cutting fabric into strips

To make this quilt, I first needed to cut the fabric into different size strips. It was a breeze with my heavy duty Quilter’s Select rotary cutter and the Creative Grids Quick Trim and Circle ruler. 

stack of strips
stack of strips

There are 19 different fabrics in this quilt, so you end up with quite a stack of beautiful blue strips. This quilt, while it looks complicated, is really pretty easy to make if you can sew strips together and then use a specialty ruler to trim the sewn 9-patch blocks. 

strip sets
strip sets

One of the steps is to make strip sets with a blue in the middle and white strips on either side of the blue strip. If you want your points to look sharp, it is necessary to sew with an accurate 1/4″ seam. 

cutting strips apart

Next, the strip sets are sub cut into units that will be used to make a modified 9 patch block. The units for a block get laid out like the picture below.

laying out block
laying out block

Quilted Hexagons

modified 9 patch
modified 9 patch


block pressing
block pressing

The units are sewn together in a modified 9 patch. The block is pressed so that it lays nice and flat.

X Block ruler
X Block ruler

Now that the block is sewn, you used the X-Block ruler to trim it into a block that looks like an X. In order to get your seams to line up in the blocks, it is necessary to be careful in trimming the blocks and making sure that all the markings on the ruler are lined up correctly.

mirror image blocks
mirror image blocks

In order to make this quilt, mirror image blocks are used, so it is necessary to flip the ruler over so the backside is up and trim 50% of the blocks this way. This is what creates the illusion of the ribbons intertwining in the quilt.

trimmings
trimmings

Since you are trimming 4 corners off of the original modified 9 patch block, there can be a lot of waste. However, the instructions that come with the X-Block ruler have instructions for how to sew these waste pieces into a border that could be used in the quilt.


laying blocks out
laying blocks out

This quilt can be a little tricky to make sure that it is laid out correctly. To make sure that I got it right, I laid the blocks out on a bed to make sure they were forming the pattern. Then I sew the blocks together in rows, pressing the seams open. Finally, I sewed the rows together and again pressed the seams open.


echo quilting
echo quilting

This quilt is fairly easy to quilt on your domestic machine using a walking foot. I echo quilted each of the ribbons. What that means is that I stitched approximately 1/4″ next to the seams on the ribbon.


quilting closeup
quilting closeup

Here is a closeup to show the echo quilting on the quilt. I chose a light blue variegated Aurifil thread so that it would blend fairly well with the white and the various blues. I used Hobbs Thermore Batting and it is wonderful to use when quilting on your domestic machine as it is thin, lays flat and holds the layers together nicely. If you would like to see a video of me making this quilt, I  have a video on my You/Tube Channel at “Blue Bear Quilts.” Here is a link to the YouTube video where you can watch: Making the Winter Solstice Quilt If you like the video, please be sure to like it, share it with your friends and subscribe so you don’t miss any upcoming videos.

Me with quilt
Me with quilt

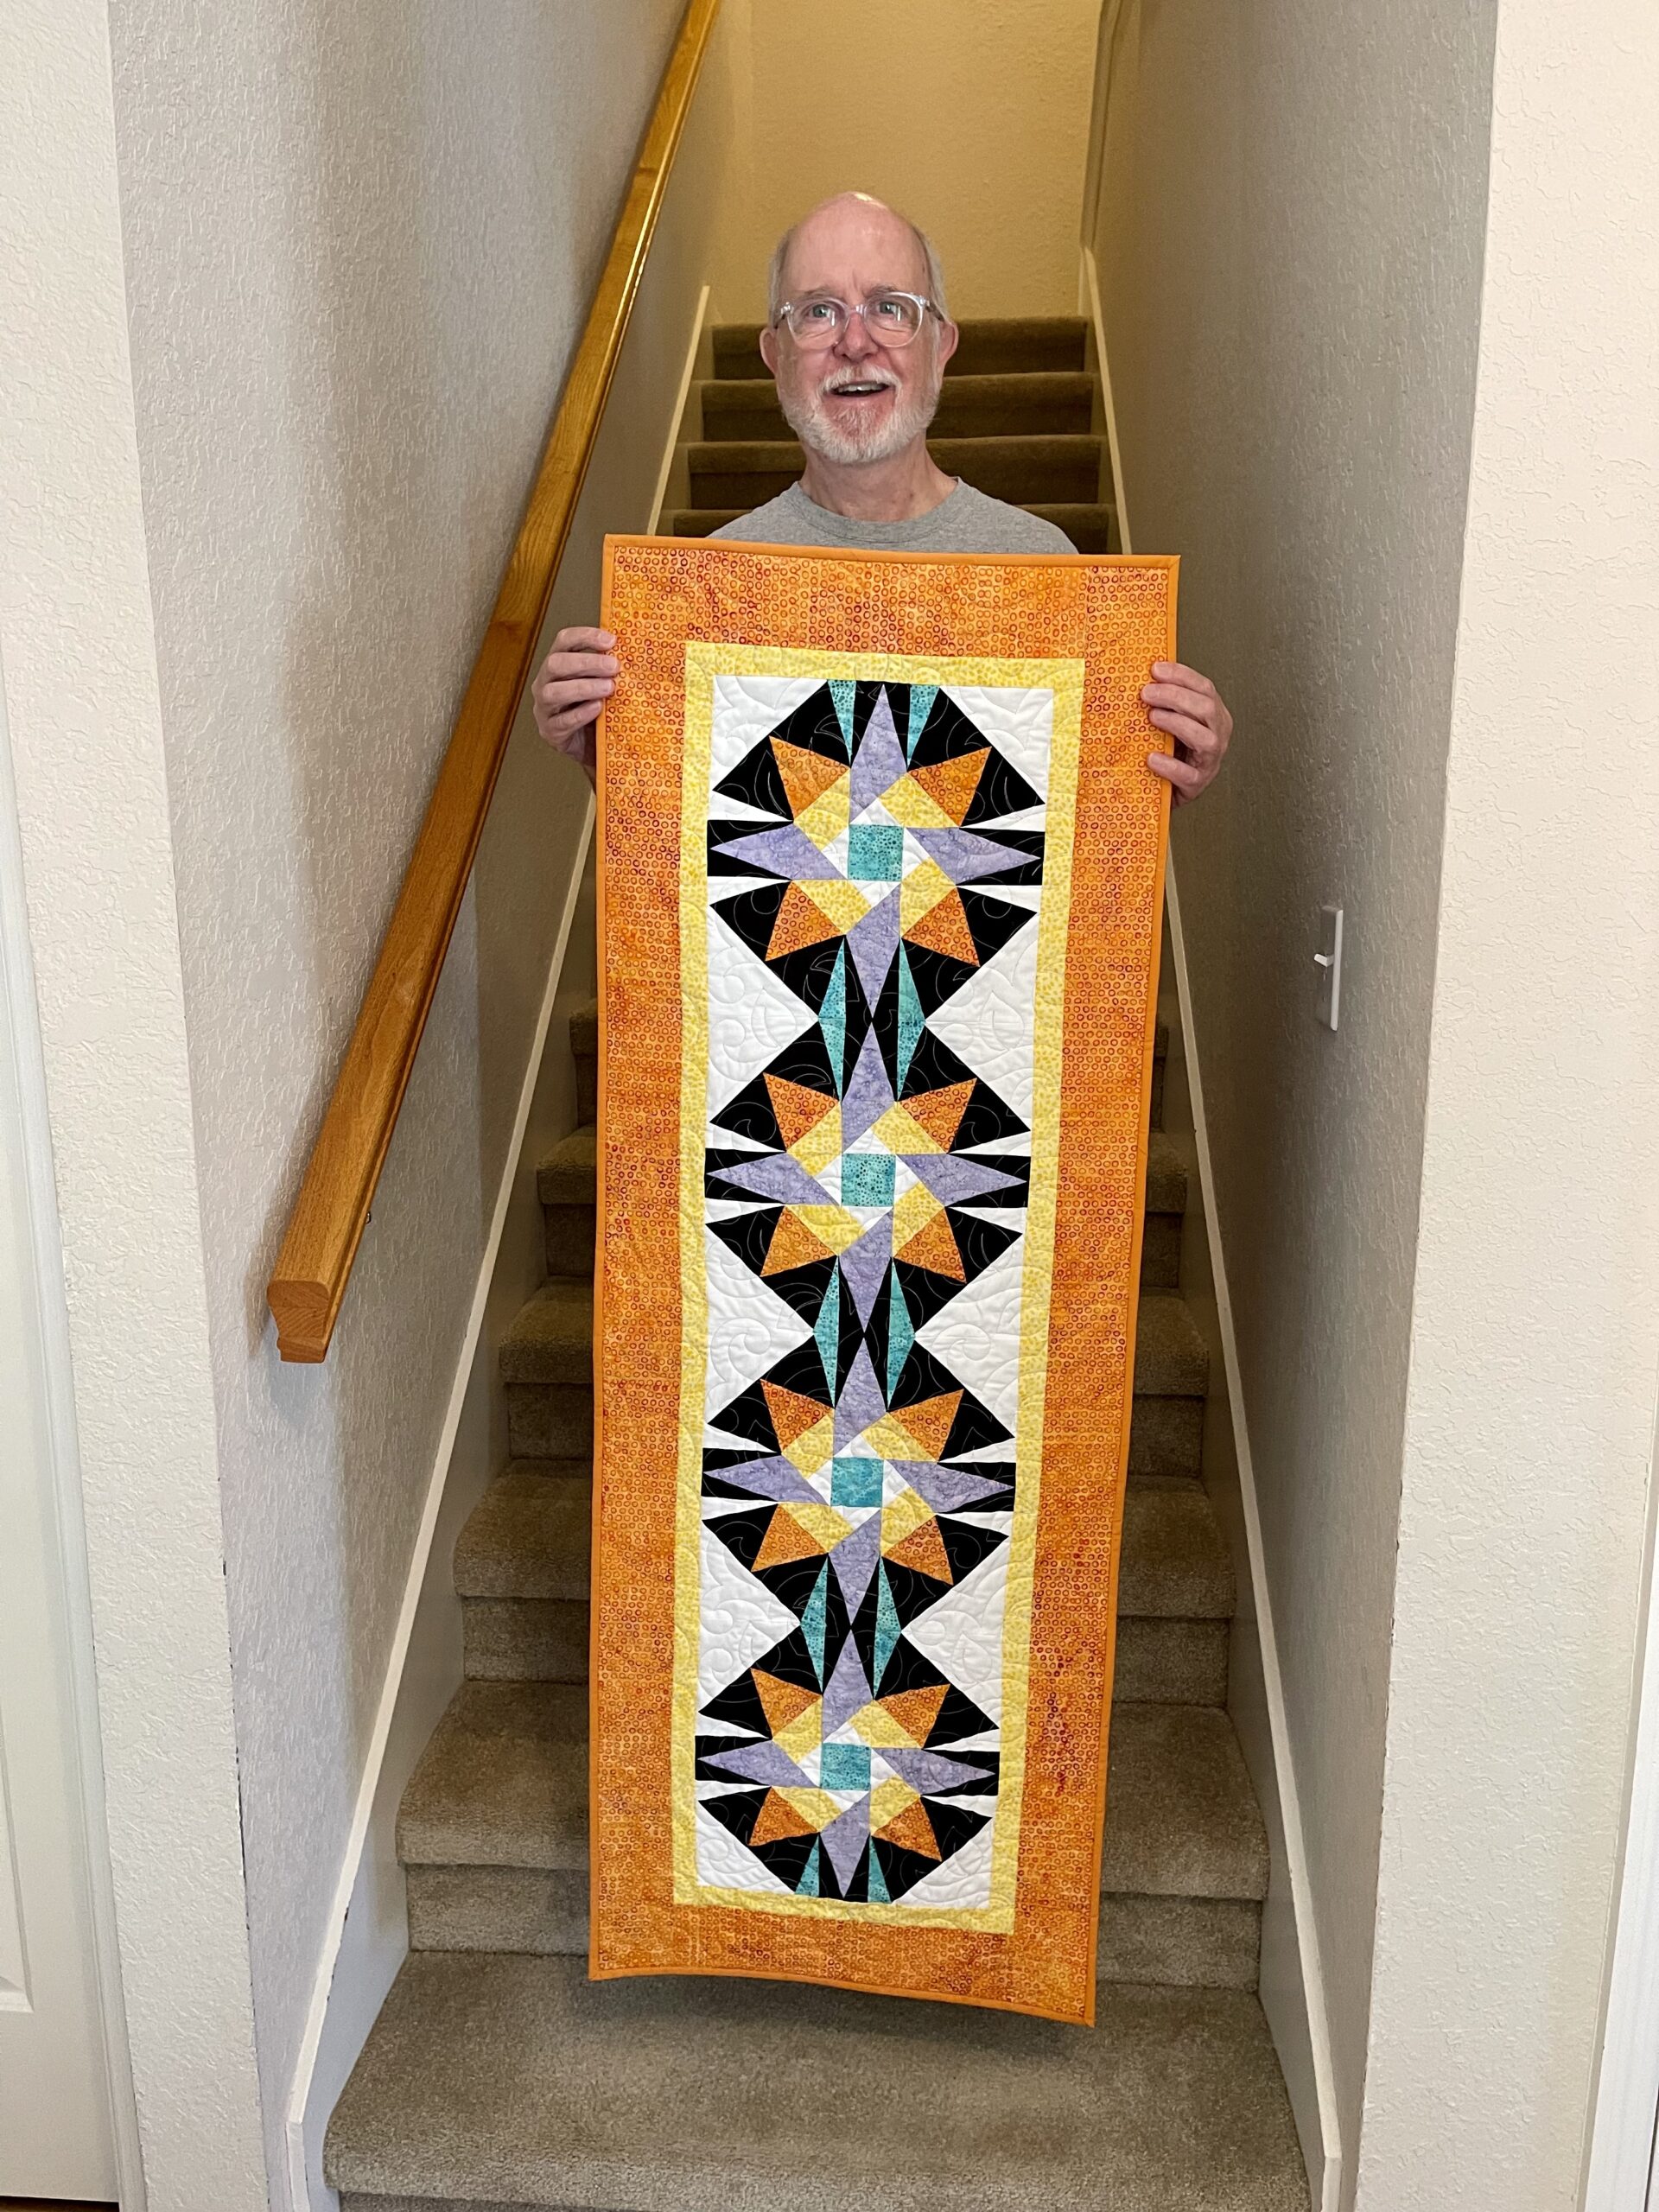
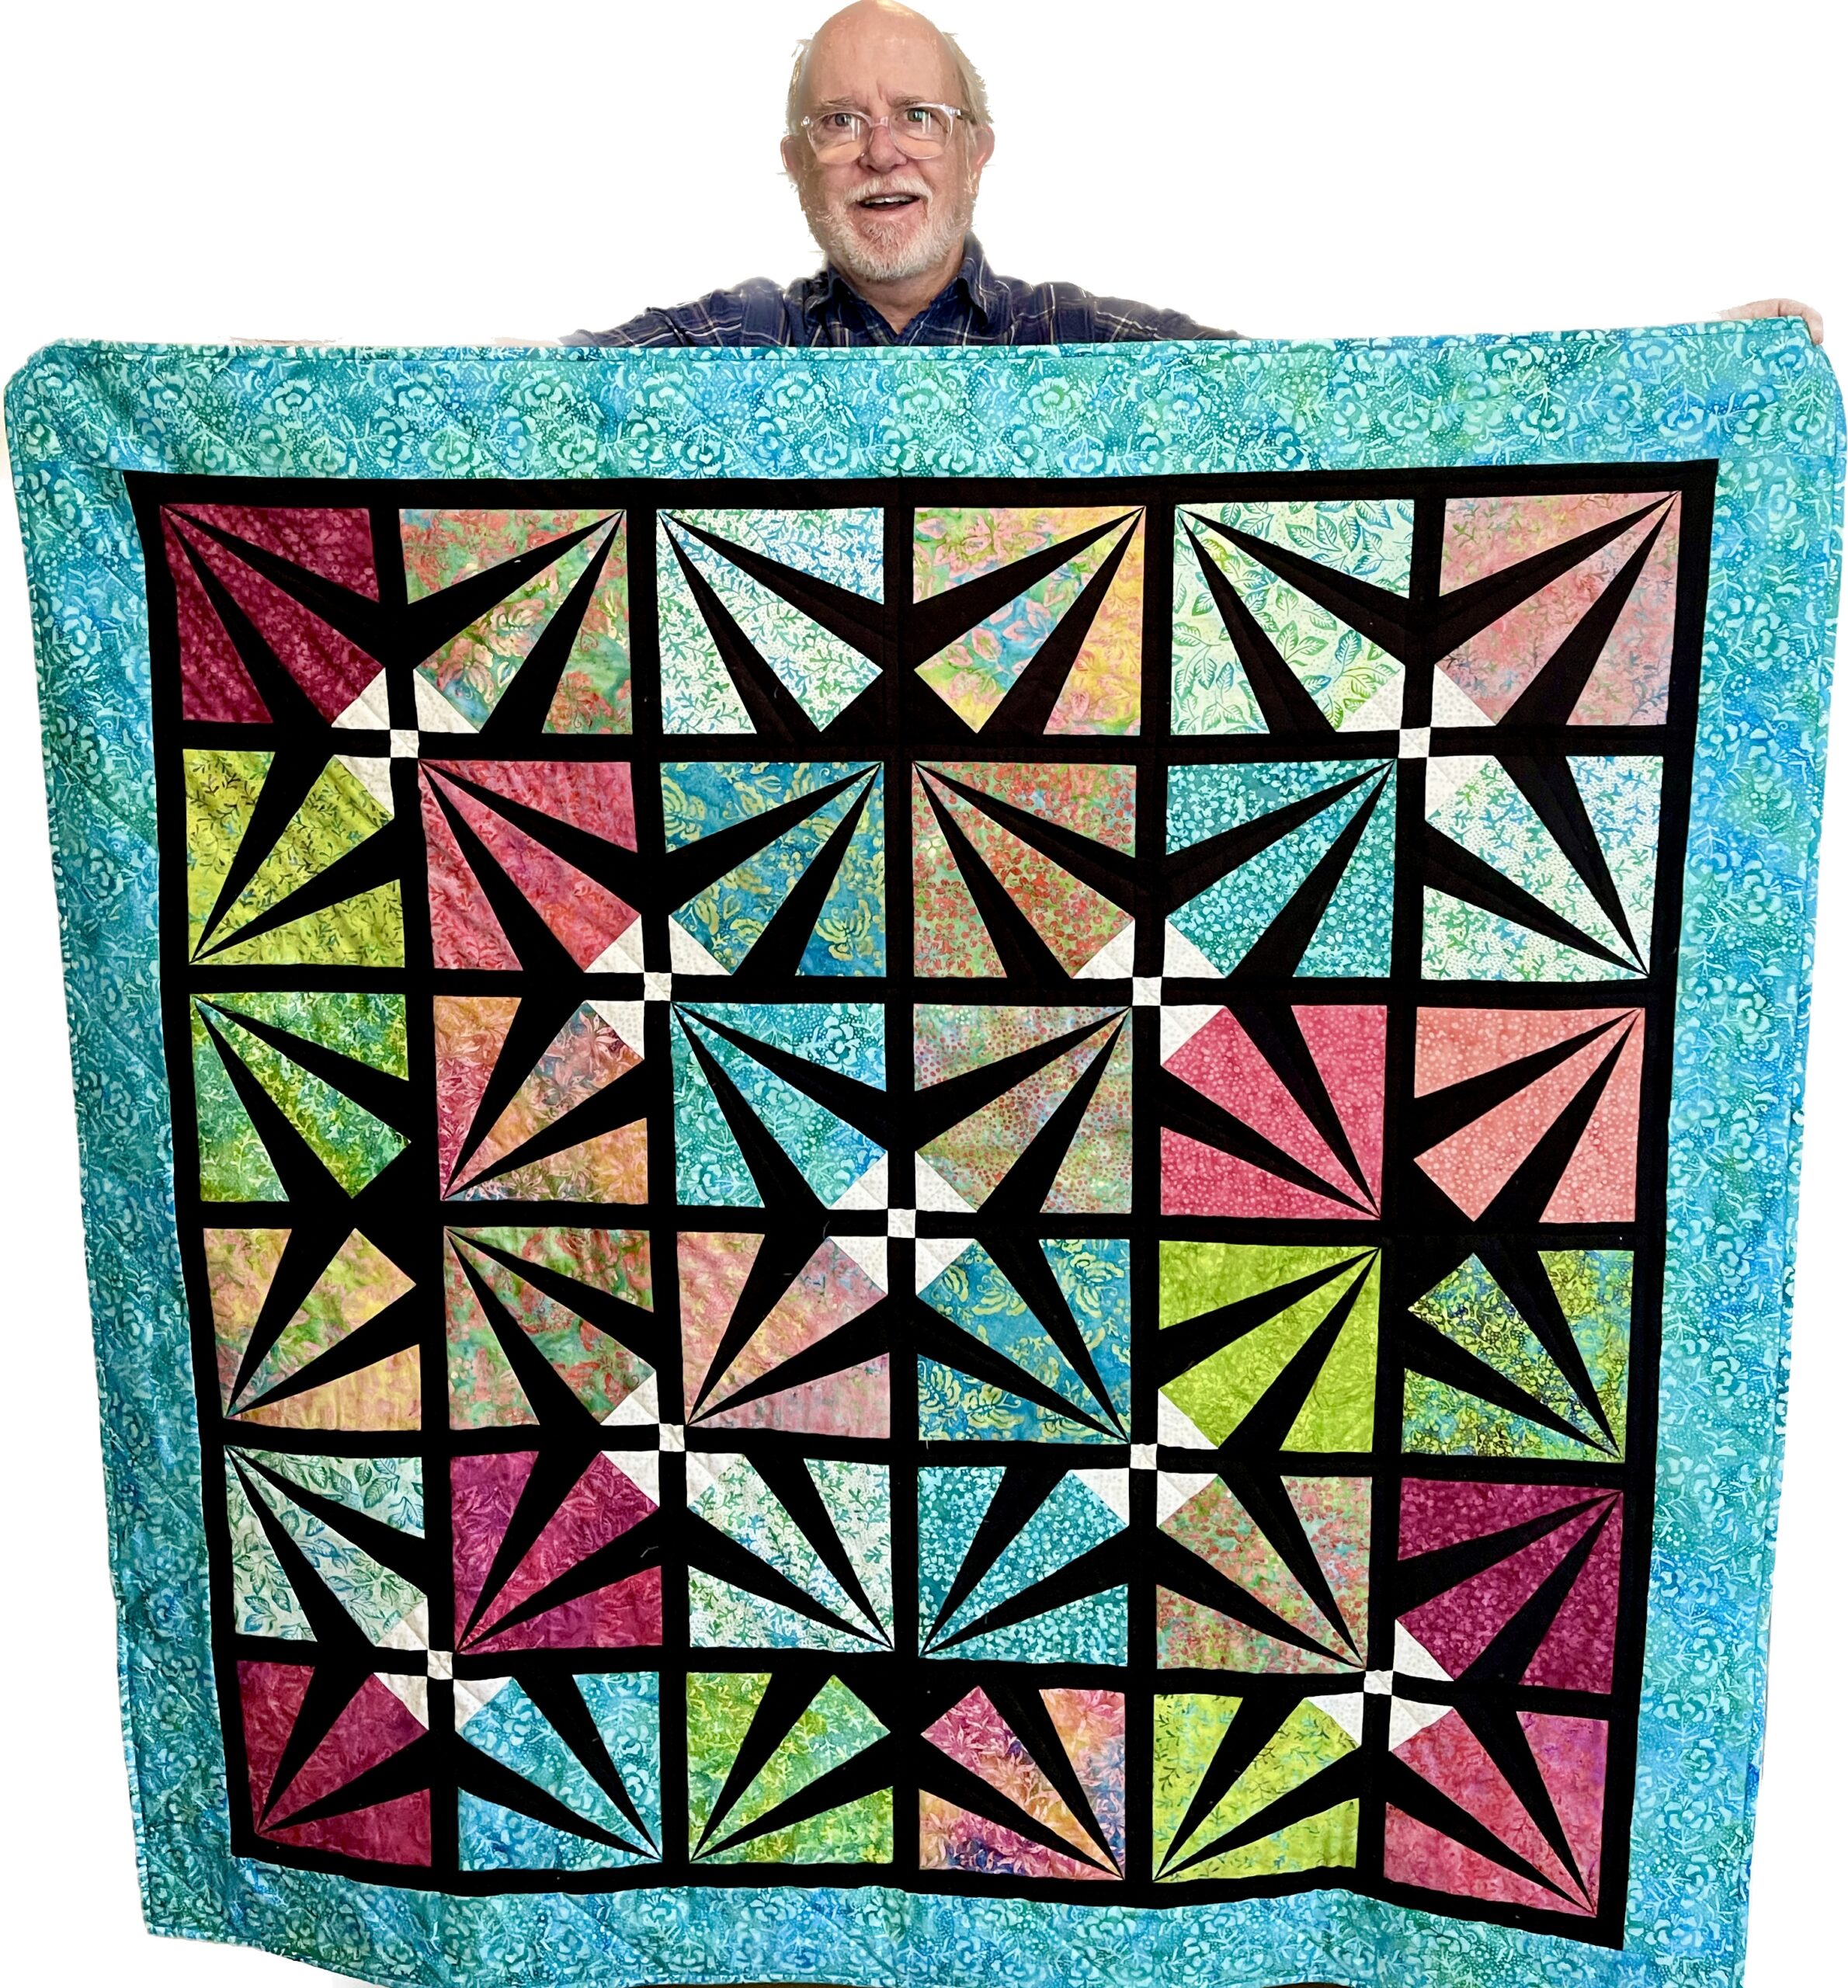
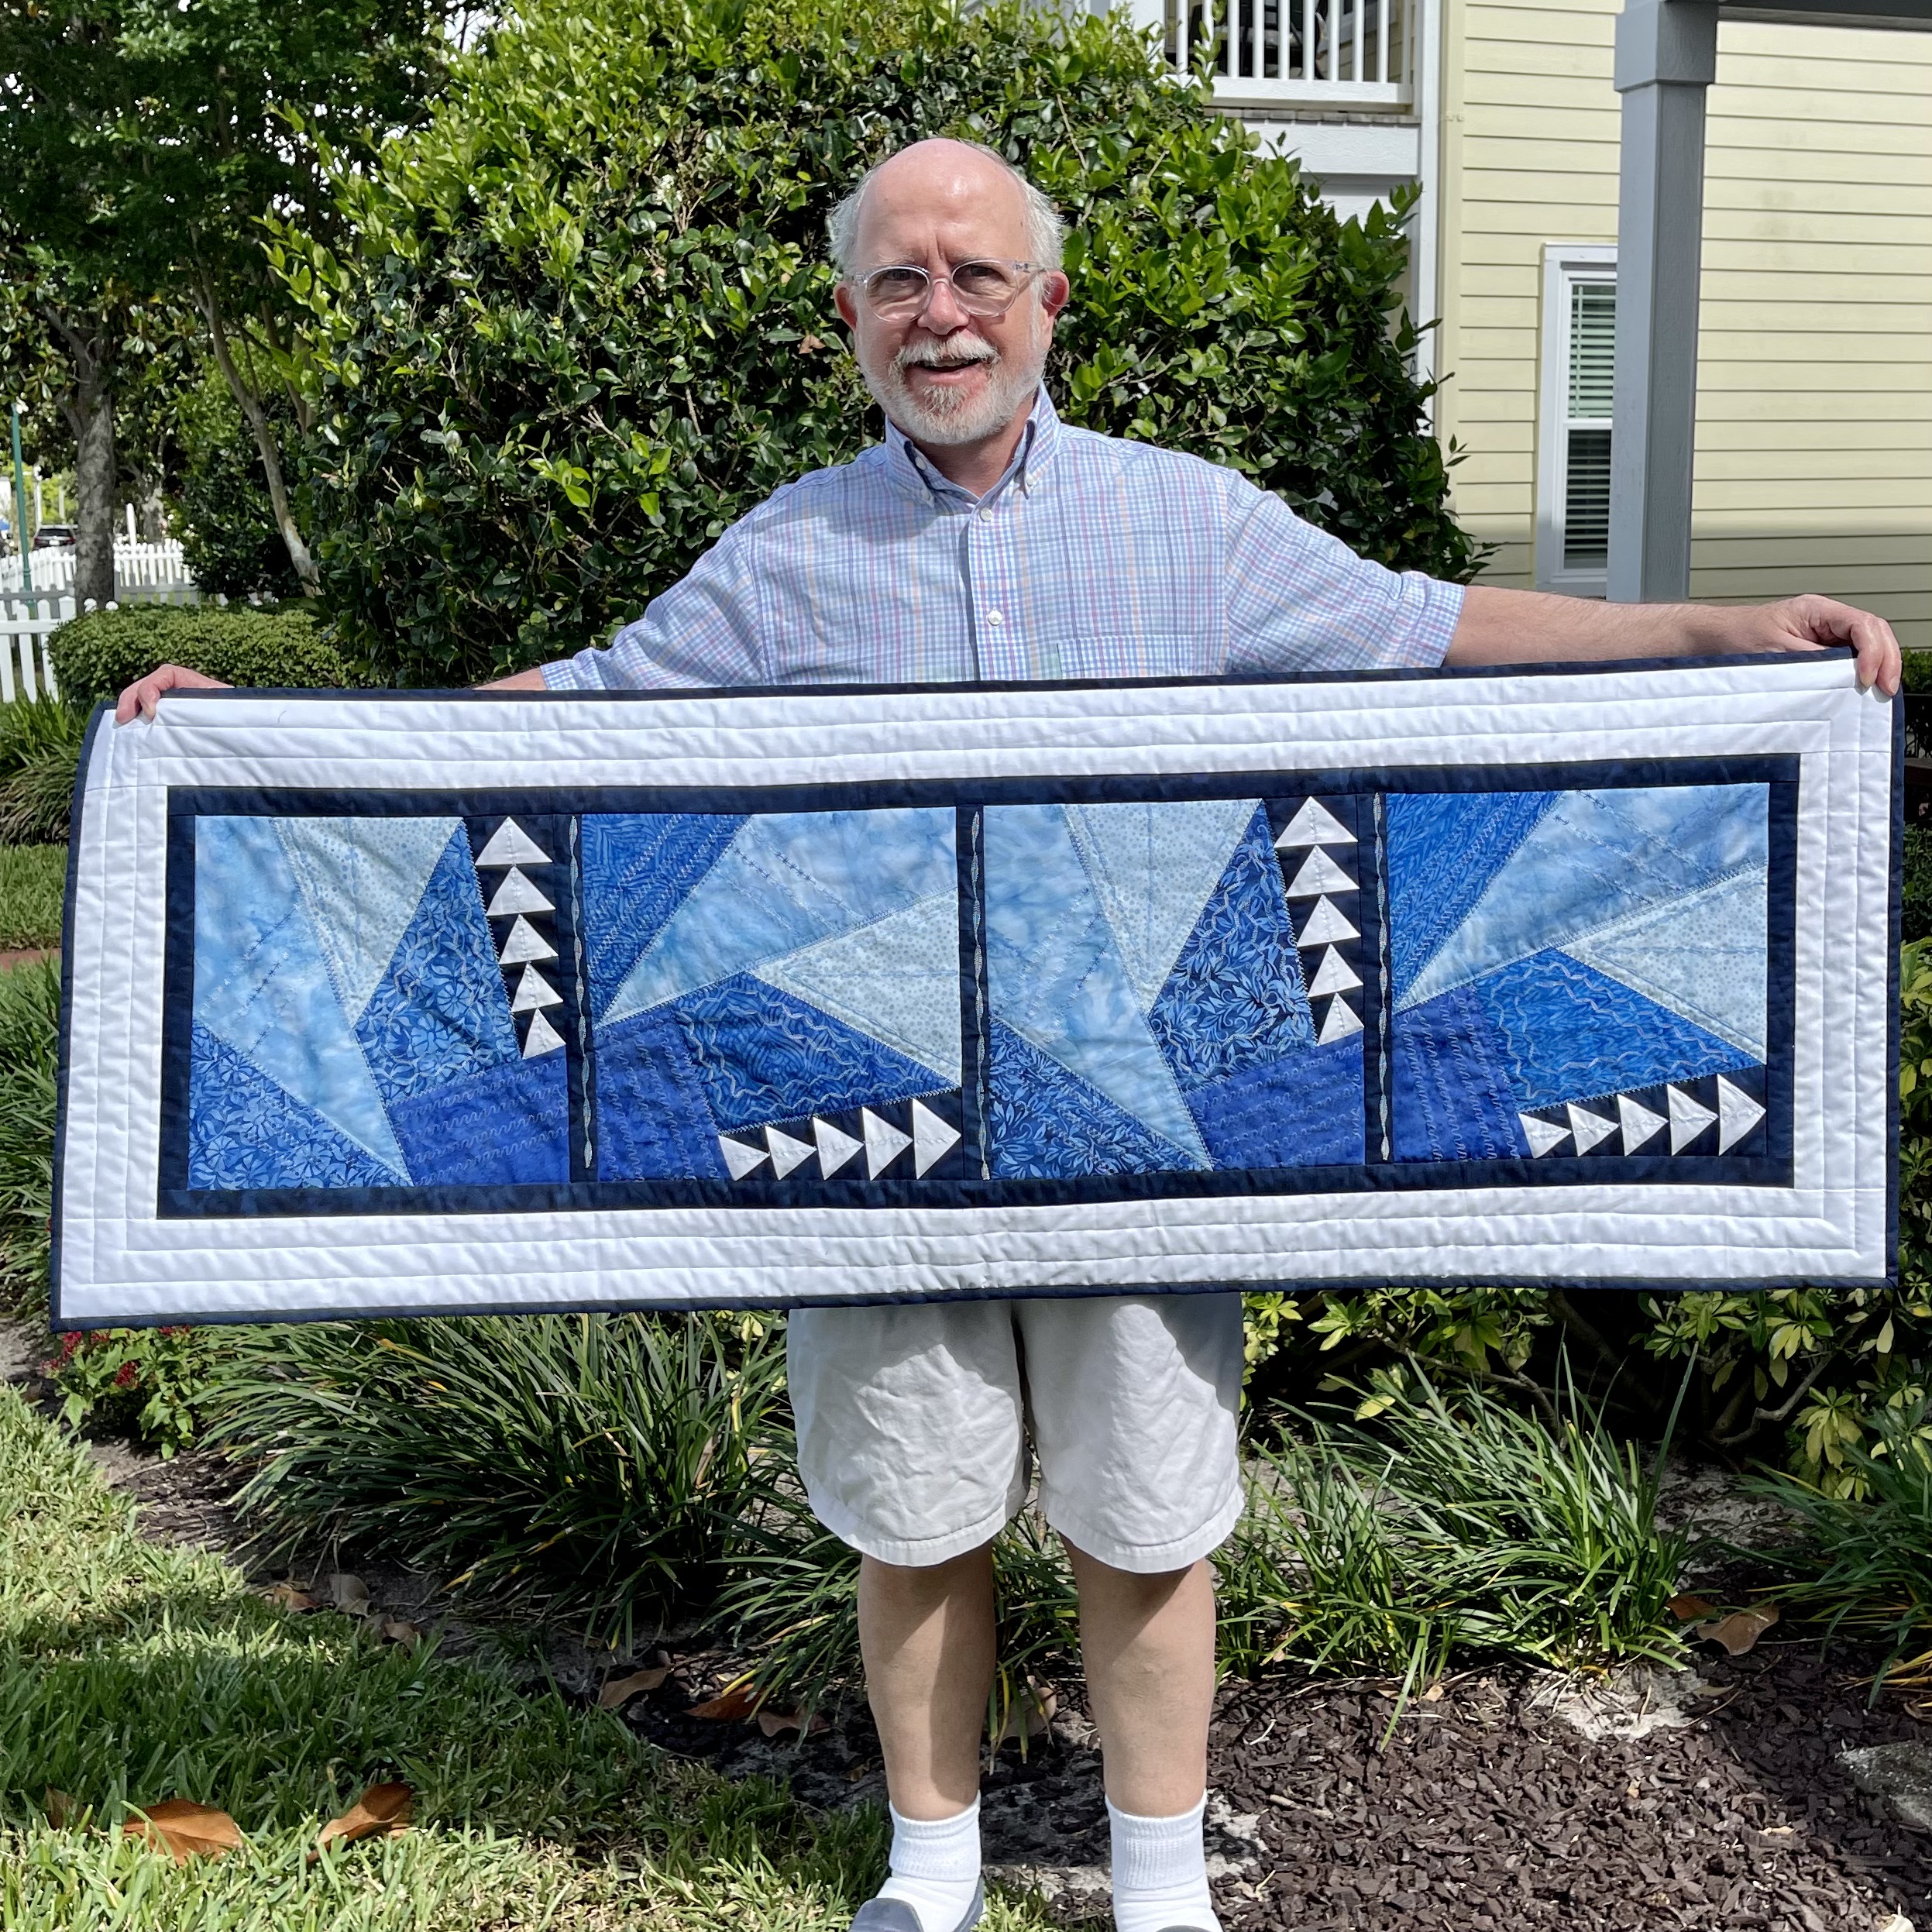
Here I am with the finished quilt. I hope you like it. Below is a closeup of the quilt so you can see some of those luscious Island Batik fabrics.

quilt closeup
quilt closeup

The supplies I used to make this project were provided by:

Island Batik Porcelain Blue fabric collection.

Aurifil 50 wt Thread- variegated light blue

Schmetz 70/10 Quilting needle

Hobbs Batting Hobbs Thermore Batting 


IB-Aurifil-Schmetz

Hobbs-logo

If you are on TikTok, be sure to check out the video I have posted with the quilt. (Look for Blue Bear Quilts)

Also, please follow me on Instagram (Blue Bear Quilts) as that is where I occasionally have giveaways. 

Blue Bear hopes you like this festive, wintery lap quilt. Please let him know how much you love it by writing to him in the comments!

The other amazing Island Batik Ambassadors are also posting their December projects.  Check out their projects by clicking on the links next to their names to be directed to their blog posts.

Emily Leachman, The Darling Dogwood

Sarah Pitcher, Pitcher’s Boutique

Claudia Porter, Create with Claudia

Brenda Alburl, Songbird Designs

Elita Sharpe, Busy Needle Quilting

Reed Johnson, Blue Bear Quilts   Thanks for stopping by!

Suzy Webster, Websterquilt

Preeti Harris, Sew Preeti Quilts

Renee Atkinson, Pink Tulip Quilting

Denise Looney, For the Love of Geese

Gail Sheppard, Quilting Gail

Anorina Morris, Samelia’s Mum

Sandra Starley, Textile Time Travels

Susan Deshensky, Lady Blue Quilts

Randi Jones, Randi’s Roost

Brittany Fisher, Bobbin with Brittany

Lisa Pickering, Lisa’s Quilting Passion

Victoria Johnson, Forever Quilting for You

Mania Hatziioannidi, Mania for Quilts

Lana Russel, Lana Quilts

Pamela Boatright, Pamela Quilts

Jennifer Thomas, Curlicue Creations

Maryellen McAuliffe, Mary Mack Made Mine

Leah Malasky, Quilted Delights

Connie Kauffman, Kauffman Designs

#islandbatikambassador #islandbatik #iloveislandbatik #hobbsbatting #aurifil #aurifilthread #schmetzneedles #doyoueq #Janome #electricquilt #eq8 #HancocksofPaducah #fabricsmart 


Posted on 4 Comments

Island Batik Ambassador- November 2023 Project- Switchback Bag- Part of the It’s In the Bag Blog Hop

Blue Bear with Switchback bag

This month’s blog hop is called It’s In the Bag as the Island Batik Ambassadors will all be making a project using different upcoming fabric collections from Island Batik and a pattern and supplies from byAnnie.com. I am looking forward to seeing all the wonderful projects that will be created during this month’s Island Batik blog hop as Patterns byAnnie are so easy to follow that they can turn anyone into a bag maker. Since this month is a blog hop, you can check out the Island Batik blog and enter each week to win a fat quarter bundle of some of the fabrics the Ambassadors are using in their projects. I will show the other fabric collections later in this blog along with a link to the giveaway from Island Batik and links to other ambassador’s blogs.

It's In the Bag Blog Hop
It’s In the Bag Blog Hop


Check out the fabric I was given to use to make the Switchback bag: Porcelain Blue by Kathy Engle from Island Batik. Just look at this gorgeous blue and white collection of batik fabrics with a woodsy theme.  The Porcelain Blue collection may be found at your local quilt shop that carries Island Batik, such as Boutique4quilters in Melbourne, FL and Fabric Smart in St. Petersburg FL. This collection should be in your local quilt shop Spring of 2024. You may find them online at https://www.boutique4quilters.com/ or call them at (321) 768-2060 or www.fabric-smart.com or call them at (727) 914-8850. Another online option for you to shop for this fabric would be Hancocks of Paducah: Hancocks of Paducah

Porcelain Blue Collection


The bag I made is 11″ x 11″ x 4. The fabric collection has various shades of blue and white. The Porcelain Blue collection has many woodsy elements like leaves and flowers. Making this bag was easy and fun using the pattern byAnnie.com. 

Blue Bear with Switchback bag

Here is Blue Bear who is thrilled with his new Switchback bag.

The first thing to get started on this project is to get your supplies and tools all lined up. You of course will need some beautiful batiks like the Porcelain Blue collection from Island Batik and some Aurifil 50 wt. cotton thread. You will also need pins, a ruler, rotary cutter, cutting mat and some snips. You will need the Switchback pattern from byAnnie. I was provided some needed supplies from byAnnie as well such as the Soft and Stable foam stabilizer, fusible interfacing, fold-over elastic, zippers, strapping and hardware. 

Switchback Bag supplies

The byAnnie pattern is very well organized and so easy to follow. It makes it possible for someone like me who has hardly made a bag before to make one. The pattern has detailed illustrations and boxes for you to check off each section as you have completed it. There is a page with a list of all the various pieces so that you can keep track of them and know which piece the pattern is talking about.

pattern
pattern

There are 5 different fabrics used in making this bag. The pattern refers to the fabrics by name type and thus I labeled the fabrics to keep straight which fabric was called for in the pattern. 

Labeling the fabric
Labeling the fabric

One of the first things you do is quilt the fabric that is for the front and back of the bag, using the Soft and Stable foam stabilizer. I love this foam stabilizer as it is so easy to quilt with on a domestic machine. 


Quilting the front and back pieces

You can quilt the pieces in a chain piece fashion to make the quilting go faster.

Chain piecing the quilting

A lot of the lining pieces are stabilized with a fusible interfacing, which helps to give the bag more structure. 

fusible interfacing
fusible interfacing

The pattern shows you how to make binding cut on the bias, which makes it have more stretch and makes it easier to go around the curved sections of the bag that need binding. 

binding cut on the bias

The strap of the bag is covered with cloth, which really gives the bag that finished look.

Cloth strapping
Cloth strapping

The pattern shows you how to make all the fabric steps and accessories that are needed for the bag. It has you make precise markings on the bag parts, so you know exactly where to put the accessories. 

strap accessories and tabs

The pattern has you put zippers in the bag with several different methods. The zipper at the inside top of the bag is made with zipper strips. One of the best features of the byAnnie.com patterns is that many of them come with a coupon code that allows you watch a video that covers some of the more difficult aspects of making the bag. These videos come in really handy for someone like me that is not used to making bags.

Zipper strips
Zipper strips

This zipper is for an inner pocket that is accessible from the front of the bag. 

Front pocket
Front pocket

This is a more standard zipper placement on an inside pocket. 

inside pocket
inside pocket

Here I am installing the a zipper strip at the inside top of the bag opening. 

different methods of inserting zippers

One of the final tasks is to sew the bias binding around the raw edges that will be in the inside of the bag. This task can be a little daunting as you have to finagle so many layers of fabric under the needle and sew around curves.

sewing on the binding

Finally, your Switchback bag is complete and you have a stylish bag with so much room and so many pockets to take on all of your adventures. 


Blue Bear with Switchback bag
 

Below is the image of my YouTube video of me revealing this bag. Here is a link to the video if you would like to watch it and see more details of the bag: Switchback Bag- reveal of November Island Batik Ambassador project

YouTube video
YouTube video

If you like the video, please be sure to give it a thumbs up, share it with your friends and subscribe so you don’t miss any upcoming videos.


The supplies I used to make this project were provided by:

Island Batik Porcelain Blue collection

Aurifil 50 wt Thread

Schmetz 70/10 Quilting needle

Patterns by Annie Switchback bag pattern and needed supplies


IB-Aurifil-Schmetz

byAnnie logo
byAnnie logo


If you are on TikTok, be sure to check out the video I have posted about the inside of the bag. (Look for Blue Bear Quilts)

Blue Bear hopes you like his new Switchback bag. Please let him know how much you love it by writing to him in the comments!

The other amazing Island Batik Ambassadors are also posting their November Blog It’s In the Bag projects.  Check out their projects by clicking on the links next to their names to be directed to their blog posts.

WEEK 1

November 1

Celtic-Fields
Celtic-Fields


Susan Deshensky, Lady Blue Quilts

Gail Sheppard, Quilting Gail

November 2

Citron Breeze
Citron Breeze


Lana Russel, Lana Quilts

Mania Hatziioannidi, Mania for Quilts

November 3

Blog Hop Week 1 Round Up + giveaway

WEEK 2

November 6

Country Charm
Country Charm


Brenda Alburl, Songbird Designs

Brittany Fisher, Bobbin with Brittany

November 7

Flour Sack
Flour Sack


Sandra Starley, Textile Time Travels

Victoria Johnson, Forever Quilting for You

November 8

Limerick
Limerick


Maryellen McAuliffe, Mary Mack Made Mine

Emily Leachman, The Darling Dogwood

Leah Malasky, Quilted Delights

November 9

Morris Mist
Morris Mist


Sarah Pitcher, Pitcher’s Boutique

Preeti Harris,Sew Preeti Quilts

November 10

Blog Hop Round-Up Week 2 and Giveaway

WEEK 3

November 13

Morris Tiles
Morris Tiles


Elita Sharpe, Busy Needle Quilting

Pamela Boatright, Pamela Quilts

November 14

Porcelain Blue
Porcelain Blue


Reed Johnson, Blue Bear Quilts   Thanks for stopping by!

Jennifer Thomas, Curlicue Creations

November 15

Red White and Blooms


Connie Kauffman, Kauffman Designs

Claudia Porter, Create with Claudia

November 16

Vintage Charm
Vintage Charm


Suzy Webster, Websterquilt

Denise Looney, For the Love of Geese

Randi Jones, Randi’s Roost

November 17

Blog Hop Week 3 Round Up + giveaway

WEEK 4

Winged Things
Winged Things


November 20


Renee Atkinson, Pink Tulip Quilting

Anorina Morris, Samelia’s Mum

Lisa Pickering, Lisa’s Quilting Passion

November 21

End of Blog Hop + Final Round Up

Island Batik Giveaway
Week 3 of the It’s In the Bag Blog Hop giveaways, from Island Batik, started on Sunday, November 12th!
Two lucky winners will each receive a bundle of new collections that will be featured this week – Red, White and Blooms or Vintage Charm. Don’t miss out on your chance to add these beautiful batiks to your stash. Enter now during the It’s In the Bag Blog Hop:

To enter for your chance to win one of the two prizes above, follow the simple Rafflecopter prompts below.

a Rafflecopter giveaway

This giveaway ends on November 17th at 11:59 pm PDT. Two random winners will be notified by email on November 18th and announced on the Island Batik Facebook page on November 21st. If the winners do not respond within the first three days after being notified, two new random winners will be chosen. Please check your spam folders! 

Make sure to follow Island Batik on social media to hop along with the It’s In the Bag Blog Hop. Be sure to check out the Island Batik Blog.

#islandbatikambassador #islandbatik #bagmaking #iloveislandbatik #aurifil #aurifilthread #schmetzneedles #Janome  #HancocksofPaducah #fabricsmart #patternsbyannie. 


Posted on 4 Comments

Island Batik Ambassador- October 2023 Project- Fall Table Runner- Part of the Falling For Accuquilt Challenge

Me with table runner

The Island Batik Ambassadors are using the Accuquilt die called North Carolina Star to make their projects this month. And they are using Island Batik fabric of course. I look forward to seeing how they mix their projects up using this die. Links to the other Ambassador’s blogs may be found at the bottom of this post.

Falling For Accuquilt


For my fabric selection, I dug into my Island Batik stash and selected some bright and fun fall colors. Island Batik fabrics may be found at your local quilt shop that carries Island Batik, such as Fabric Smart in St. Petersburg FL. You may also find them online at www.fabric-smart.com or call them at 727-914-8850. Another online option for you to shop for this fabric would be Hancocks of Paducah: Hancocks of Paducah

Fabric selection
Fabric selection

Orange, yellow and black are definitely a fall palate, but sometimes there are dark purples. I threw in the white and teal for some accent colors. This is a very bright and cheery palette, but still says fall is in the air.


Completed Table Runner 2


The table runner I made, is a large table runner- 20″ x 56.” The orange and yellow borders really highlight the beautiful fall batik colors. The quilting of this table runner was done by Kim Jenkins-Pein of Sunshine Quilts from Tampa, Florida. Didn’t she do a nice job?

EQ 8 Rendering of pattern


NC Star block
NC Star block

I designed the table runner pattern in Electric Quilt 8. This is a rendering of the pattern in EQ8. You can see that the block has a large number of pieces.

North Carolina Star die

The Accuquilt North Carolina Star die makes it super easy to cut out all the shapes that are needed to make one block

What die looks like
What die looks like

This photo shows what the die looks like. You can see that it has the shapes clearly labeled. You may cut 6 layers of fabric at one time. If you carefully lay out your fabrics, you can get all the pieces needed for one block in one pass of the cutting machine.

Cut pieces all laid out

Here are all of the pieces cut and laid out to make one black. You can see that the corners have been clipped on some of the pieces and this means that there will be no dog ears to trim after the pieces have been sewn together. 

Sort pieces into sections

In order to sew this block together, I organize the pieces into quadrants and then sew those sections together first.

Sewn sections of block laid out

Quilted Hexagons


Then I laid those sewn sections out in a traditional block layout and then sew those sections together. If you would like to see me using the Accuquilt cutter and a die, I  have a video on my You/Tube Channel at “Blue Bear Quilts.” Here is a link to the YouTube video where you can watch: https://youtu.be/EuNLrvuZn7s If you like the video, please be sure to like it, share it with your friends and subscribe so you don’t miss any upcoming videos.

Completed block
Completed block

Here is the block all sewn together. Because there are so many pieces, you have to sew them carefully and press flat so that the center does not buckle.

Me with table runner

Here I am with the finished runner. I hope you like it.


The supplies I used to make this project were provided by:

Island Batik Miscellaneous batik fabrics.

Aurifil 50 wt Thread- Black

Schmetz 70/10 Quilting needle

Hobbs Batting Hobbs Premium Cotton/Poly Batting

Accuquilt North Carolina Star 


IB-Aurifil-Schmetz

Hobbs-logo

accuquilt
accuquilt

If you are on TikTok, be sure to check out the video I have posted about the table runner. (Look for Blue Bear Quilts)

Also, please follow me on Instagram (Blue Bear Quilts) as that is where I occasionally have giveaways. 

Blue Bear hopes you like this fall table runner. Please let him know how much you love it by writing to him in the comments!

The other amazing Island Batik Ambassadors are also posting their October projects.  Check out their projects by clicking on the links next to their names to be directed to their blog posts.

Emily Leachman, The Darling Dogwood

Sarah Pitcher, Pitcher’s Boutique

Claudia Porter, Create with Claudia

Brenda Alburl, Songbird Designs

Elita Sharpe, Busy Needle Quilting

Reed Johnson, Blue Bear Quilts   Thanks for stopping by!

Suzy Webster, Websterquilt

Preeti Harris, Sew Preeti Quilts

Renee Atkinson, Pink Tulip Quilting

Denise Looney, For the Love of Geese

Gail Sheppard, Quilting Gail

Anorina Morris, Samelia’s Mum

Sandra Starley, Textile Time Travels

Susan Deshensky, Lady Blue Quilts

Randi Jones, Randi’s Roost

Brittany Fisher, Bobbin with Brittany

Lisa Pickering, Lisa’s Quilting Passion

Victoria Johnson, Forever Quilting for You

Mania Hatziioannidi, Mania for Quilts

Lana Russel, Lana Quilts

Pamela Boatright, Pamela Quilts

Jennifer Thomas, Curlicue Creations

Maryellen McAuliffe, Mary Mack Made Mine

Leah Malasky, Quilted Delights

Connie Kauffman, Kauffman Designs

#islandbatikambassador #islandbatik #iloveislandbatik #hobbsbatting #aurifil #aurifilthread #schmetzneedles #doyoueq #Janome #electricquilt #eq8 #HancocksofPaducah #fabricsmart #Accuquilt #AccuquiltGo


Posted on 2 Comments

Island Batik Ambassador- September 2023 Project- Out of This World Quilt- Part of the Pieced To Perfection Blog Hop

Me with the quilt

This month’s blog hop is called Pieced To Perfection as the Island Batik Ambassadors will all be making a quilt project using different upcoming fabric collections from Island Batik and paper piecing. I am looking forward to seeing all the wonderful projects that will be created during this month’s Island Batik blog hop, as paper piecing allows such perfect points in your piecing. If you dread paper piecing because of all the paper you have to rip out, be sure to read this month’s post and watch my accompanying YouTube video to see how to do a method that uses freezer paper and then there is no paper that needs to be removed later. This is game changing! Since this month is a blog hop, you can check out the Island Batik blog and enter each week to win a fat quarter bundle of some of the fabrics the Ambassadors are using in their projects. I will show the other fabric collections later in this blog along with a link to the giveaway from Island Batik and links to other ambassador’s blogs.

Pieced To Perfection Blog Hop


Check out the fabric I was given to use: Pin Dot Floral by Kathy Engle from Island Batik. Just look at this gorgeous pastel collection of batik fabrics with a floral theme.  The Pin Dot Floral collection may be found at your local quilt shop that carries Island Batik, such as Boutique4quilters in Melbourne, FL and Fabric Smart in St. Petersburg FL. This collection should be in your local quilt shop this Fall. You may find them online at https://www.boutique4quilters.com/ or call them at (321) 768-2060 or www.fabric-smart.com or call them at (727) 914-8850. Another online option for you to shop for this fabric would be Hancocks of Paducah: Hancocks of Paducah

Pin Dot Floral 2
Pin Dot Floral 2

The quilt I made is 57″ x 57.” It has various shades of pink, blue and green, along with  black and white. The Pin Dot Floral collection has many floral elements like leaves, ferns, berries, flowers and butterflies. I named this project “Out of This World”, as it has a retro spaceship feel to it and there is an optical illusion that gives the quilt a rounded or global image. Making this quilt was easy and fun using the freezer paper piece method. I will have a pattern for the Out of This World quilt available on my website later this fall.

Out of This World Quilt

Here is a closeup of the Pin Dot Floral batik bundle I was provided. Aren’t these fabrics just glorious?

Pin Dot Floral Fabric
Pin Dot Floral Fabric 

I used Electric Quilt 8 software to design this quilt, which is shown in the 1st photo below. The second set of 4 photos, below, are alternative versions of the quilt which I thought of making and they all use the same block. This block is so easy to work with and you can see that it created a stunning array of quilts. The 6th photo, below, is a recolored version of a Quilt of Valor I designed for Love of Quilting magazine a few years ago, which can also be made with the freezer paper piecing method.  

EQ8 Out of This World Quilt
Alt 1
Alt 1


Alt 2
Alt 2


Alt 3
Alt 3
Alt 5
Alt 5


Alt 4
Alt 4

The first thing to get started on this project is to get your supplies and tools all lined up. You of course will need some beautiful batiks like the Pin Dot Floral collection from Island Batik. Some Aurifil 50 wt. cotton thread will do a good job of piecing and quilting later on. You will also need pins, a ruler, rotary cutter, cutting mat and some snips. You will need Reynolds Freezer Paper, the plastic coated kind, and an ink jet printer. A nice firm postcard will allow you to fold the template on the line with a nice sharp crease and will provide an edge for the Add-A-Quarter ruler to butt up against. Finally, two optional tools are the Add-a-Quarter ruler and a light box so you can see the lines through the paper for the placement of your fabric. If you want to see, in detail, a demonstration of me using these supplies to make the Out of This World quilt, I will provide a link below to a YouTube video where I show how I made this quilt. 

supplies needed
supplies needed

Below is a photo of a completed block. Notice the sharp, skinny, black points you are able to achieve with this method of paper piecing.

completed block
completed block

It is important that you cut pieces that are large enough to cover the shapes in the block. I measured how big the shape was for covering the first batik piece and then cut strips that size. The upcoming pattern will have the measurements for these strips that need to be cut from the colored batiks and the black and white fabrics.

Cutting green strip
Cutting green strip

Next, you press the block pattern, which has been printed onto the paper side of the freezer paper, with the plastic coated side onto the wrong side of the batik. This is what holds the fabric in place while you are sewing. The plastic on the back of the freezer paper template is easily removed later and does not leave a residue on the fabric.   


Pressing green to freezer paper

It helps to pre-crease the lines on your block pattern template. You fold the freezer paper template on the first line, on the paper side, with your postcard edge on the line, and then trim the fabric that is sticking out with either an Add-A-Quarter ruler or the 1/4″ line on a regular ruler. This creates a straight edge for you to line up the next piece. The beauty of the Add-A-Quarter ruler is that it butts up nicely against the folded edge of the freezer paper and postcard.

Trimming the green
Trimming the green

Line up the straight edge of the next black piece with the straight edge of the green piece you just trimmed. I pin it in place so that it does not shift when sewing. The green piece is adhered to the freezer paper, but the black piece is just floating on top of it.

lining up the black with previous piece

Flip the block upside down so the fabric is now on the bottom and the freezer paper is on top. Fold the freezer paper back so that the trimmed edge of the green is showing. You this stitch along that folded line, right next to the freezer paper template, but not sewing through the freezer paper. The closer you can get your needle to the folded edge of the freezer paper, without the needle piercing the template, the more accurate your finished block will be. Also the more accurate you are in folding the freezer paper template, on the various lines, the more accurate your finished block will be.

sewing the black
sewing the black

Now you press the black onto the plastic side of the template, which will temporarily adhere the black piece to the template.

pressing the black
pressing the black

Next you fold back the template from the paper side, over the edge of the postcard, on the next line in the pattern, which will allow you to trim the black piece so you can add the next green piece.

trimming the black
trimming the black

Repeat across the block until all the pieces are in place. This is what the block looks like before it is trimmed up.

front of block before trimmed

It’s time to square up the block with your straight edge ruler.

squaring up the block

Once the block is trimmed up, you can easily peel the template off of the back of the block and reuse the template as many times as it will stick to fabric.

freezer paper peels off

Here’s the block all trimmed up. Now we just need to make 41 more blocks. You can speed up the process by printing multiple templates and then chain piece each of the various steps. These blocks will be done in no time flat.

completed block
completed block

Once all of your blocks are complete, you will want to lay them out on a bed, or the floor, in a fashion that is pleasing to you. From the alternate quilts I showed above, you can see that this is a versatile block and it can make a variety of interesting quilts.

Blocks laid out
Blocks laid out

The absolute best way to paper piece is to actually sew on the lines of the paper, which will give you those perfectly sewn blocks assuming you can sew straight on the lines and don’t mind picking out small bits of paper. This freezer paper method comes pretty close, but these is the possibility of a small margin of error as your 1/4″ may be off or the fabric may slip, etc. Since these blocks have points that need to match up, I wanted to put sashing in the quilt as that would make any slight imperfections not be as noticeable. There is black sashing between the blocks and a row of sashing with cornerstones in between the rows. 


sashing and cornerstones

The blocks are sewn together in rows with black sashing in between them. Then the strip of sashing with the cornerstones is sewn to the top of the rows.

sewn together in rows

Then the rows are sewn together in pairs.

sew the rows together

Finally the row pairs are sewn together and borders are added and your quilt top is done. Now it is time to quilt it. I wanted to use my walking foot on my Janome 6500. I also wanted to start and stop as little as possible, so I decided to quilt following the design of the black spike triangles with black Aurifil thread. 


Top is ready for quilting

Next I layered the quilt top, with some Hobbs Tuscany Cotton Wool Blend batting. I love this batting as it lays so nicely and is easy to quilt on a domestic machine, especially when using a brand new Schmetz quilting needle.  The Hobbs batting also gives the quilt a nice drape and doesn’t retain any fold creases.

Hobbs Tuscany Wool Cotton Blend

Here are a few more images of the completed Out of This World Quilt.


Out of This World quilt on a chair


Me with the quilt
Me with the quilt


Below is the image of my YouTube video for making this quilt. Here is a link to the video if you would like to watch it and see more detail of how I made the quilt: Out of This World- Paper Piecing With Freezer Paper           

Out of This World Quilt

If you like the video, please be sure to give it a thumbs up, share it with your friends and subscribe so you don’t miss any upcoming videos.


The supplies I used to make this project were provided by:

Island Batik Pin Dot Floral collection

Aurifil 50 wt Thread

Schmetz 70/10 Quilting needle

Hobbs Batting Tuscany Collection Cotton Wool Blend Batting


IB-Aurifil-Schmetz

Hobbs Batting
Hobbs Batting

If you are on TikTok, be sure to check out the video I have posted about the quilt. (Look for Blue Bear Quilts)

Blue Bear hopes you like this quilt. Please let him know how much you love the this quilt by writing to him in the comments!

The other amazing Island Batik Ambassadors are also posting their September Blog Pieced To Perfection projects.  Check out their projects by clicking on the links next to their names to be directed to their blog posts.

WEEK 1

September 5

Blushing Garden
Blushing Garden


Elita Sharpe, Busy Needle Quilting

Denise Looney, For the Love of Geese

September 6

Buds and blooms
Buds and blooms


Sarah Pitcher, Pitcher’s Boutique

Sandra Starley, Textile Time Travels

September 7

Chromatic
Chromatic


Brenda Alburl, Songbird Designs

Preeti Harris,Sew Preeti Quilts

Connie Kauffman, Kauffman Designs

September 8

Blog Hop Round-Up Week 1 and Giveaway

WEEK 2

September 11

Copper Patina
Copper Patina


Brittany Fisher, Bobbin with Brittany

Gail Sheppard, Quilting Gail

September 12

Earthly Greens
Earthly Greens


Maryellen McAuliffe, Mary Mack Made Mine

Susan Deshensky, Lady Blue Quilts

September 13

English Lavender
English Lavender


Emily Leachman, The Darling Dogwood

Jennifer Thomas, Curlicue Creations

Anorina Morris, Samelia’s Mum

September 14

Magenta Dusk
Magenta Dusk


Claudia Porter, Create with Claudia

Victoria Johnson, Forever Quilting for You

September 15

Blog Hop Round-Up Week 2 and Giveaway

WEEK 3

September 18

Natural Healing
Natural Healing


Lana Russel, Lana Quilts

Lisa Pickering, Lisa’s Quilting Passion

September 19

Ornate Gems
Ornate Gems


Randi Jones, Randi’s Roost

Suzy Webster, Websterquilt

September 20

Park Avenue
Park Avenue


Pamela Boatright, Pamela Quilts

Leah Malasky, Quilted Delights

Mania Hatziioannidi, Mania for Quilts

September 21

Pin Dot Floral
Pin Dot Floral


Reed Johnson, Blue Bear Quilts   Thanks for stopping by!

Renee Atkinson, Pink Tulip Quilting

September 22

End of Blog Hop + Final Round Up

Fabric Giveaway
Fabric Giveaway
The final of the Pieced to Perfection Blog Hop giveaways, from Island Batik, started on Sunday, September 17th!
Two lucky winners will each receive a bundle of new collections that will be featured this week – Pin Dot Floral or Park Avenue. Don’t miss out on your chance to add these beautiful batiks to your stash. Enter now during the  Pieced to Perfection Blog Hop:

To enter for your chance to win one of the two prizes above, follow the simple Rafflecopter prompts below.

a Rafflecopter giveaway

This giveaway ends on September, 22nd at 11:59 pm PDT. Two random winners will be notified by email on September, 23rd and announced on the Island Batik Facebook page on September, 26th. If the winners do not respond within the first three days after being notified, two new random winners will be chosen. Please check your spam folders! If the winners do not respond within the first two days after being notified, two new random winners will be chosen and notified.

Make sure to follow Island Batik on social media to hop along with the Pieced to Perfection Blog Hop. Be sure to check out the Island Batik Blog.

#islandbatikambassador #islandbatik #paperpiecing #iloveislandbatik #hobbsbatting #aurifil #aurifilthread #schmetzneedles #doyoueq #Janome #tool crazebloghop #electricquilt #eq8 #HancocksofPaducah #fabricsmart #freezerpapermethod. 


Posted on 10 Comments

Island Batik Ambassador- August 2023 Project- Quilt as You Go Hexie Bed Runner- Part of the It’s All Up to You Challenge

Quilt as You Go Hexie Bed Runner

The Island Batik Ambassadors get to make whatever they want this month, using Island Batik fabric of course. I am sure you will see many creative projects this month. Links to the other Ambassador’s blogs may be found at the bottom of this post.

It's All Up to You
It’s All Up to You


Since I could use any Island Batik fabric I wanted, I selected a collection of 5″ strip stash busters. Island Batik fabrics may be found at your local quilt shop that carries Island Batik, such as Fabric Smart in St. Petersburg FL. You may also find them online at www.fabric-smart.com or call them at 727-914-8850. Another online option for you to shop for this fabric would be Hancocks of Paducah: Hancocks of Paducah

stash busters
stash busters

I love a fall palate. These stash buster rolls, from Island Batik, have an array of brown, orange, yellow, purple, blue and green. These colors are just so bright and vibrant and will really shine when paired with black.


Stash Buster Rolls
Stash Buster Rolls
fall color stash busters


The quilt I made, Quilt as You Go Hexie Bed Runner, is a large table or bed  runner- 21″ x 72.” The black border really sets off the beautiful fall batik colors. This process of it being quilt as you go is such an added bonus as it makes this beautiful runner go together fairly quickly.

Quilt as You Go Hexie Bed Runner

The Hex N More ruler makes it a breeze to cut out the 4-1/2″ and 6-1/2″ hexagons that are needed to make this runner. This ruler also cuts out half hexagons, diamonds and triangles, which are not needed for this project. In this project, I needed to cut out 77, each, of three shapes:

  1. 4-1/2″ hexies from Island Batik Scrap Buster rolls that are strips of 5″ batik fabric. These strips are first trimmed to 4-1/2″ strips. The top and bottom of the hexagon shape on the ruler line up with the top and bottom of the fabric strip. You trim on both sides to create the hexagons.
  2. 4-1/2″ hexies from Hobbs premium cotton/poly batting. They are cut the same way as the small hexies in #1.
  3. 6-1/2″ hexies from Island batik black fabric. These are cut from 6-1/2″ strips.
Hex N More Ruler
Hex N More Ruler


Cutting the Hobbs batting

Next it is necessary to center the batting in the middle of the large black hexagon, which has been placed right side down. I do this by making sure that the edge of the batting is an inch away from the edge of the black hexie.

Centering the batting

Then I make a hexie sandwich by laying the small hexie right side up on top of the batting. I pin all of the lays together so they don’t shift when pressing and sewing. 

making the hexie sandwich


Pin all three layers together.

To quilt the hexes as you go, it is necessary to fold the 1″ black border on one edge of the small hexagon in half and press, then fold this pressed edge over the small hexagon. Clip with the Clover Wonder Clip and then repeat around the small hexagon in a counter clockwise fashion. It is a good idea to prep a bunch of these and then bring them to the sewing machine. To quilt these hexes, I put a blind hem stitch foot on my machine and did a top stitch on the black fabric, with black Aurifil thread, on the edge next to the small hexagon. These units are now quilted and ready to be stitched together to make the runner. If you want to, you could also do a quilting design within the small hexie, but I did not find that this was necessary.

Folded and clipped
Folded and clipped

Quilted Hexagons

Then it is necessary to lay out all of the hexagons in a way that pleases you. To stitch the hexagons together, I changed the presser foot on my sewing machine to an open toe foot and set the stitch to the standard zig zag stitch. I still used black thread as it would not show where the hexagons were stitched together. I have a great tutorial on my free You/Tube Channel at “Blue Bear Quilts.” Here is a link to the YouTube video where you can watch and see more details of how I made the table runner: https://youtu.be/EuNLrvuZn7s If you like the video, please be sure to like it, share it with your friends and subscribe so you don’t miss any upcoming videos.

Quilted hexies
Quilted hexies
YouTube tutorial
YouTube tutorial

Here is the finished Quilt as You Go Hexie Bed/Table Runner, along with some closeups of the hexies.

Finished Bed Runner
Finished Bed Runner
Close up bed runner
Close up bed runner


hex closeup
hex closeup

The supplies I used to make this project were provided by:

Island Batik Stash Buster Rolls batik fabrics.

Aurifil 50 wt Thread- Black

Schmetz 70/10 Quilting needle

Hobbs Batting Hobbs Premium Cotton/Poly Batting


IB-Aurifil-Schmetz

Hobbs-logo


If you are on TikTok, be sure to check out the video I have posted about the quilt. (Look for Blue Bear Quilts)

Also, please follow me on Instagram (Blue Bear Quilts) as that is where I occasionally have giveaways. 

Blue Bear hopes you like this Quilt as You Go bed/table runner. Please let him know how much you love it by writing to him in the comments!

The other amazing Island Batik Ambassadors are also posting their August projects.  Check out their projects by clicking on the links next to their names to be directed to their blog posts.

Emily Leachman, The Darling Dogwood

Sarah Pitcher, Pitcher’s Boutique

Claudia Porter, Create with Claudia

Brenda Alburl, Songbird Designs

Elita Sharpe, Busy Needle Quilting

Reed Johnson, Blue Bear Quilts   Thanks for stopping by!

Suzy Webster, Websterquilt

Preeti Harris, Sew Preeti Quilts

Renee Atkinson, Pink Tulip Quilting

Denise Looney, For the Love of Geese

Gail Sheppard, Quilting Gail

Anorina Morris, Samelia’s Mum

Sandra Starley, Textile Time Travels

Susan Deshensky, Lady Blue Quilts

Randi Jones, Randi’s Roost

Brittany Fisher, Bobbin with Brittany

Lisa Pickering, Lisa’s Quilting Passion

Victoria Johnson, Forever Quilting for You

Mania Hatziioannidi, Mania for Quilts

Lana Russel, Lana Quilts

Pamela Boatright, Pamela Quilts

Jennifer Thomas, Curlicue Creations

Maryellen McAuliffe, Mary Mack Made Mine

Leah Malasky, Quilted Delights

Connie Kauffman, Kauffman Designs

#islandbatikambassador #islandbatik #iloveislandbatik #hobbsbatting #aurifil #aurifilthread #schmetzneedles #doyoueq #Janome #electricquilt #eq8 #HancocksofPaducah #fabricsmart


Posted on 4 Comments

Island Batik Ambassador- June 2023 Project- Twisted Tango Table Runner- Part of the Fly Away Challenge

Twisted Tango Runner

The Island Batik Ambassadors are going up, up and away. This month’s challenge is called Fly Away and the Island Batik Ambassadors are making whatever project they want using flying geese with Island Batik fabric.  Flying geese are a very popular quilt block unit and I am sure you will see many creative ways to use this unit in your quilts. Links to the other Ambassador’s blogs may be found at the bottom of this post.

Fly Away Challenge
Fly Away Challenge


Since I could use any Island Batik fabric I wanted, I selected their Baroque collection of 10″ squares. Island Batik fabrics may be found at your local quilt shop that carries Island Batik, such as Fabric Smart in St. Petersburg FL. You may also find them online at www.fabric-smart.com or call them at 727-914-8850. Another online option for you to shop for this fabric would be Hancocks of Paducah: Hancocks of Paducah

Baroque Batik
Baroque Batik

The Baroque collection, from Island Batik, I was given, has many beautiful jewel tones and the collection was paired with a light and dark blue batik. These colors are just so bright and vibrant.


The quilt I made, Twisted Tango Table Runner, is a large table runner- 22″ x 54.” The dark blue sky pieces created twisted shapes, or dancers, that appear to be doing the tango. They are framed with the colorful jewel tones and the light blue.  The light blue inner border and dark blue outer border bring it all together in perfect harmony.

the finished runner
the finished runner

I used my Electric Quilt 8 software to design this quilt.

EQ design
EQ design

The photos, below,  are alternative versions I thought of doing. In the first one, the jewel tones would have created a solid ribbon across the runner, but I did not have enough fabric to choose that option. In the second alternative, the dark blue fabric would have become the geese and the jewel tones would have been the sky, creating more of a 3d pyramid look. I like Alternative 2, but I felt that the one I chose was a bit more modern.

EQ design alternative 1
EQ design alternative 2

The easy part about making this runner is that the tool I used to make the flying geese units allows you to make 4 perfect units at a time and since this required quite a few units, I was very happy about that. The tool I used to accomplish this is the Quilt in a Day Mini Flying Geese Ruler. A rotating mat is also very helpful for turning the units when you are trimming them. 

QIAD Mini Flying Geese Ruler

To start out, you need a large square, which is the sky and a small square which is the goose, or center triangle.

Large and small squares

Then you pin the two fabrics together and cut them diagonally as shown in the picture below.

Cut 2 squares diagonally

Next, you sew the edges that you just cut with a quarter inch seam. This method is slightly different than the Quilt in a Day method in that it eliminates the step of having to draw a line down the middle first.

Quarter inch seam


The two pieces are pressed to the dark


Press to the dark
Press to the dark

Those squares are then placed right sides together and the seams are not nesting, but are offset. You are lining up the outside lines of the squares and not the seam lines. The light and dark pieces are touching each other when they are placed together. The pieces are then pinned together like before and then cut down the middle diagonally. Finally, you sew with a quarter inch seam along the edges you just cut.

Place squares together
Another quarter inch seam

Press to either side. To get this unit to lay flat, it is necessary to clip to the seam line where there was an overlap between the two seams. 

Press open
Press open


Cut seam in back
Cut seam in back

Finally, you take the Mini Flying Geese Ruler and place the green lines for the goose on the goose seam lines of the unit and cut the unit in half. Then you trim the other three sides of the unit by rotating the mat. The ruler stays in the same spot the whole time with the green goose seam lines on top of the goose seam lines in the unit. When you have trimmed up both of the squares, you end up with four perfectly trimmed up flying geese units.

Trim up the unit
Trim up the unit
4 units at once
4 units at once.

Once all of your geese are trimmed up, they are sewn together in rows and every other row is offset by half of a block. Those are called half drop blocks. When sewing the units together, it helps to nest the seams and then clip to the seam line so the units lay flat. 

Line up the rows
Line up the rows

Because the alternate rows were half drop blocks, it is necessary to trim up the sides of the runner so they are even.

Trim the ends
Trim the ends

Finally, It is necessary to measure your quilt top’s  width and height in three places and make your borders the average of those three numbers so that your quilt, or table runner, top will be nice and square. One of the final things I did was to layer the top with a batik backing and a layer of Hobbs Premium 80/20 Batting and then pin basted the table runner together. I quilted it by outlining the dark blue dancers and the independent dark blue triangles. Finally the dark blue binding was machine sewn on.

Measure for borders
Measure for borders


Pin basting
Pin basting

Here is the finished Twisted Tango Table Runner.

the finished runner
the finished runner

For further details, I have a YouTube video about this quilt. Here is a link to the YouTube video where you can watch and see more details of how I made the table runner:    Making a Making the Twisted Tango Table Runner

YouTube Video
YouTube Video

If you like the video, please be sure to like it, share it with your friends and subscribe so you don’t miss any upcoming videos.


The supplies I used to make this project were provided by:

Island Batik Baroque collection batik fabrics.

Aurifil 50 wt Thread- Passionflower Color Builders Set

Schmetz 70/10 Quilting needle

Hobbs Batting Hobbs Thermore Batting


IB-Aurifil-Schmetz

Hobbs-logo


If you are on TikTok, be sure to check out the video I have posted about the quilt. (Look for Blue Bear Quilts)

Also, please follow me on Instagram (Blue Bear Quilts) as that is where I occasionally have giveaways. 

Blue Bear hopes you like this Twisted Tango table runner. Please let him know how much you love it by writing to him in the comments!

The other amazing Island Batik Ambassadors are also posting their June flying geese projects.  Check out their projects by clicking on the links next to their names to be directed to their blog posts.

Emily Leachman, The Darling Dogwood

Sarah Pitcher, Pitcher’s Boutique

Claudia Porter, Create with Claudia

Brenda Alburl, Songbird Designs

Elita Sharpe, Busy Needle Quilting

Reed Johnson, Blue Bear Quilts   Thanks for stopping by!

Suzy Webster, Websterquilt

Preeti Harris, Sew Preeti Quilts

Renee Atkinson, Pink Tulip Quilting

Denise Looney, For the Love of Geese

Gail Sheppard, Quilting Gail

Anorina Morris, Samelia’s Mum

Sandra Starley, Textile Time Travels

Susan Deshensky, Lady Blue Quilts

Randi Jones, Randi’s Roost

Brittany Fisher, Bobbin with Brittany

Lisa Pickering, Lisa’s Quilting Passion

Victoria Johnson, Forever Quilting for You

Mania Hatziioannidi, Mania for Quilts

Lana Russel, Lana Quilts

Pamela Boatright, Pamela Quilts

Jennifer Thomas, Curlicue Creations

Maryellen McAuliffe, Mary Mack Made Mine

Leah Malasky, Quilted Delights

Connie Kauffman, Kauffman Designs

#islandbatikambassador #islandbatik #iloveislandbatik #hobbsbatting #aurifil #aurifilthread #schmetzneedles #doyoueq #Janome #electricquilt #eq8 #HancocksofPaducah #fabricsmart #flyinggeese #flyawaychallenge


Posted on 9 Comments

Island Batik Ambassador- May 2023 Project- Island Pop Quilt- Part of the Tool Craze Blog Hop

Island Pop Table Runner

This month’s blog hop is called Tool Craze as the Island Batik Ambassadors will all be making any size project using different upcoming fabric collections from Island Batik and a provided Studio 180 Design tool. I am looking forward to seeing all the wonderful projects that will be created during this month’s Island Batik blog hop. Since this month is a blog hop, you can check out the Island Batik blog and enter each week to win a fat quarter bundle of some of the fabrics the Ambassadors are using in their projects. I will show the other fabric collections later in this blog along with a link to the giveaway from Island Batik and links to other ambassador’s blogs.

Tool Craze
Tool Craze


I love the fabric I was given to use: Maple Island by Kathy Engle. Just look at this gorgeous collection of blue and green batik fabrics with a woodland theme.  The Maple Island collection may be found at your local quilt shop that carries Island Batik, such as Boutique4quilters in Melbourne, FL and Fabric Smart in St. Petersburg FL. This collection should be in your local quilt shop this summer. You may find them online at https://www.boutique4quilters.com/ or call them at (321) 768-2060 or www.fabric-smart.com or call them at (727) 914-8850. Another online option for you to shop for this fabric would be Hancocks of Paducah: Hancocks of Paducah

Maple Island
Maple Island


The table runner I made is 22″ x 46.” It has various shades of blue and green, along with  white. The Maple Island collection has many natural elements like leaves, ferns, berries, pinecones and tree bark. I originally was going call this project “Into the Woods”, but ultimately decided to call it “Island Pop” to incorporate the Corner Pop tool into the name. Making this table runner was easy and fun thanks to the Studio 180 Design tools.

Island Pop Table Runner

Here are several closeups of the Maple Island batik bundle I was provided. The first photo shows the bundle with the Corner Pop tool and the second photo is from one of my Tik Tok videos I made about this quilt. My username on TikTok is BlueBearQuilts.

Maple Island fabric and Corner Pop tool
Maple Island selection

I used my Electric Quilt 8 software to design this table runner. The first photo is a quilt I thought of doing which uses the Studio 180 Design Split Rects and Corner Pop tools. I decided to go with the table runner in the second photo, which was made with the V Block tool and the Corner Pop tool, as it had less pieces and I think it showcases the Maple Island Collection nicely. I also like the 3d effect that the Corner Pop tool created in the dark green background. Also, another aspect of this project was to make the blocks in various sizes using the Studio 180 Design tools. I really liked how the smaller version of the blocks looked in the border.

Alternative Quilt
Alternative Quilt


Island Pop Table Runner

The first step in making this table runner is to make the V Blocks aka triangle in a square blocks. Below are the completed V blocks. Don’t they look lovely in the Maple Island Collection? If you want to see in detail a demonstration of me using the Studio 180 Design tools, I will provide a link below to a You Tube video where I show how I made this runner.

V Blocks
V Blocks

The Studio 180 Design V block tool makes it so easy to make these blocks in multiple sizes. The instructions tell you what size strip to cut for the various finished sized blocks. The triangles are cut out extremely accurately using the V block tool. Look how nice this cut out triangle looks.

Cutting triangles with V Block tool


cut triangle piece
cut triangle piece

Next, you cut out the side triangle pieces. they are cut from strips that are the same size as the triangle. When you have the folded strip right sides together you will get the required mirrored image pieces that you need to make the V block.  

Cutting triangle sides with V Block tool

It is important to lay out the block before sewing so that you have the left and right side triangle pieces in the correct location. This is not as necessary with batiks, but it is something to be mindful of. A little known fact is that there really is a right side to batik fabrics. You can keep track out the right side of a batik fabric by being mindful of the fold as it comes off of the bolt. The fabric is always folded with the right side on the outside of the folded fabric. 

V Block laid out
V Block laid out

The pieces are easily sewn together by matching the tips on both ends and then sewing 1/4″ along the edge. I pressed mine toward the dark green fabric. 

The V blocks are oversized and are easily trimmed up with the tool. Below are pictures of the large and small V blocks all trimmed up. You wouldn’t believe how easy it was to make these blocks in several sizes using the Studio 180 Design V Block tool. 

large V Block
large V Block
small V Block
small V Block

Now it is time to use the Corner Pop tool, from Studio 180 Design, to give the V Blocks some pop in the corners.


The Corner Pop tool has two sections to it. The first section is where you trim off a corner of a previously made block. In my case, the V blocks. This is similar to a stitch and flip method, but with less waste of the fabric. If you know what size square you need to do a stitch and flip, the instructions tell you which line to use to cut off the corners of the block. The instructions also tell you what size squares to cut out and then cut in half diagonally to make the oversized half square triangle corners. You cut the corners off with the ruler and then sew the oversized triangles onto the corners. It is easy to sew these corner triangles on as they are centered over the edge that you trimmed off the block. 

After you have sewn the corners on, it is necessary to trim up the block as the corner triangles are oversized. This trimming up allows you to have a perfect sized block when putting the quilt together.

trimming the block
trimming the block

Here is what the block looks like after is is all trimmed up.

finished Island Pop block

Once the blocks are trimmed up, they are ready to be sewn together to make the quilt top.

Corner Pop and blocks

Next I layered the quilt top, with some Hobbs Premium wool batting. I love this batting as it gives the quilt some puffy definition and is so easy to quilt with. It also gives the quilt a nice drape and doesn’t retain any fold creases.

Hobbs Heirloom Premium Wool


Here are a few more images of the completed Island Pop Table Runner.

Island Pop Table Runner


Completed Runner
Completed Runner
left closeup
left closeup
middle closeup
middle closeup
right closeup
right closeup

Below is the image of my You Tube video for making this quilt. Here is a link to the video if you would like to watch it and see more detail of how I made the quilt:              https://youtu.be/x2aNL1xX5Uo           

You Tube Video
You Tube Video

If you like the video, please be sure to like it, share it with your friends and subscribe so you don’t miss any upcoming videos.


The supplies I used to make this project were provided by:

Island Batik Maple Island collection

Studio 180 Design Corner Pop tool

Aurifil 50 wt Thread

Schmetz 70/10 Quilting needle

Hobbs Batting Heirloom Wool Batting


IB-Aurifil-Schmetz

Studio 180 Design
Studio 180 Design
Hobbs Batting
Hobbs Batting

If you are on TikTok, be sure to check out the video I have posted of the table runner. (Look for Blue Bear Quilts)

Blue Bear hopes you like this table runner. Please let him know how much you love the this table runner by writing to him in the comments!

The other amazing Island Batik Ambassadors are also posting their May Blog Hop Tool Craze projects.  Check out their projects by clicking on the links next to their names to be directed to their blog posts.

WEEK 1

May 1

Celebrate
Celebrate


Susan Deshensky, Lady Blue Quilts

Randi Jones, Randi’s Roost

May 2

holiday-at-home
holiday-at-home


Elita Sharpe, Busy Needle Quilting

Mania Hatziioannidi, Mania for Quilts

May 3

Let it Snow
Let it Snow


Brittany Fisher, Bobbin with Brittany

Pamela Boatright, Pamela Quilts

May 4

Make a Wish
Make a Wish


Denise Looney, For the Love of Geese

Connie Kauffman, Kauffman Designs

May 5

Blog Hop Round-Up Week 1 and Giveaway

WEEK 2

May 8

maple island
maple island


Reed Johnson, Blue Bear Quilts   Thanks for stopping by!

Sandra Starley, Textile Time Travels

May 9

Sandalwood
Sandalwood


Gail Sheppard, Quilting Gail

Lana Russel, Lana Quilts

May 10

Sea Cookies
Sea Cookies


Emily Leachman, The Darling Dogwood

Claudia Porter, Create with Claudia

Anorina Morris, Samelia’s Mum

May 11

Sorbet
Sorbet


Brenda Alburl, Songbird Designs

Jennifer Thomas, Curlicue Creations

May 12

Blog Hop Round-Up Week 2 and Giveaway

WEEK 3

May 15

Summer Twilight
Summer Twilight


Victoria Johnson, Forever Quilting for You

Maryellen McAuliffe, Mary Mack Made Mine

Leah Malasky, Quilted DelightsLisa Pickering, Lisa’s Quilting Passion

May 16

Sunny Meadow
Sunny Meadow


Sarah Pitcher, Pitcher’s Boutique

Renee Atkinson, Pink Tulip Quilting

May 17

Wild Blooms
Wild Blooms


Preeti Harris, Sew Preeti Quilts

Suzy Webster, Websterquilt

Lisa Pickering, Lisa’s Quilting Passion

May 18

End of Blog Hop + Final Round Up

week-2-prize
week-2-prize
The first of the Tool Craze Up Blog Hop giveaways, from Island Batik, started on Sunday, April 30th!
Two lucky winners will each receive a bundle of new collections that will be featured this week – Sorbet by Claudia Pfeil of Claudia Pfeil Design or Sea Cookies, designed Kate Colleran by Kate Colleran Designs, LLC. Don’t miss out on your chance to add these beautiful batiks to your stash. Enter now and every week during the  Tool Craze Blog Hop:

To enter for your chance to win one of the two prizes above, follow the simple Rafflecopter prompts below.

a Rafflecopter giveaway

This giveaway ends on May, 12th at 11:59 pm PDT. Two random winners will be notified by email on May, 13rd and announced on the Island Batik Facebook page on May, 16th. If the winners do not respond within the first three days after being notified, two new random winners will be chosen. Please check your spam folders! If the winners do not respond within the first two days after being notified, two new random winners will be chosen and notified.

Make sure to follow Island Batik on social media to hop along with the Tool Craze Blog Hop. Be sure to check out the Island Batik Blog.

#islandbatikambassador #islandbatik #studio180design #iloveislandbatik #hobbsbatting #aurifil #aurifilthread #schmetzneedles #doyoueq #Janome #tool crazebloghop #electricquilt #eq8 #HancocksofPaducah #fabricsmart


Posted on 3 Comments

Island Batik Ambassador- April 2023 Project- Crazy Quilt Table Runner- Part of the Crazy Quilts Challenge

April Crazy Quilt

The Island Batik Ambassadors are going crazy this month. This month’s challenge is called Crazy Quilts and the Island Batik Ambassadors are making their version of a crazy quilt with Island Batik fabric and different Aurifil Color Builders thread sets.  I am koo koo for Krazy Quilts and I know you are going to see some fun projects this month. Links to the other Ambassador’s blogs may be found at the bottom of this post.

Crazy Quilts Challenge

Since I could use any Island Batik fabric I wanted, I selected a shaded variety of blue batiks I had in my stash. As you will see, I was given a beautiful set of blue Aurifil threads to use and I thought they would go well with these blue batiks. Island Batik fabrics may be found at your local quilt shop that carries Island Batik, such as Fabric Smart in St. Petersburg FL. You may also find them online at www.fabric-smart.com or call them at 727-914-8850. Another online option for you to shop for this fabric would be Hancocks of Paducah: Hancocks of Paducah

blue batiks
blue batiks

The idea behind this challenge was to make a crazy quilt using one of the Aurifil Color Builder sets each of the ambassadors were given. I was given the Passionflower Color Builder set. It contains a light blue spool, a light blue variegated spool and a dark blue variegated spool. This 50 weight cotton Aurifil thread works beautifully with my Janome 6600 and creates fantastic stitches with little lint or thread breakage. Aurifil thread is my go-to thread of choice. These lovely blues will ignite the passion for stitching in anyone.

Aurifil Passionflower Color Builders set

The quilt I made, Crazy Quilt Table Runner, is a large table runner- 20″ x 60.” This beautiful runner has shades of blue and is highlighted with navy and white.  I wanted to put a modern spin on the crazy quilt, so I paper pieced it and incorporated some flying geese to give it a more modern feel. 

I used my Electric Quilt 8 software to design this quilt.

IB April Crazy Quilt TR

The photo, below, is an alternative version I thought of doing, which would have spun the blocks in a 2 x 2 grid and made a small table topper. The actual finished quilt looks slightly different that the computer image. This is due to the fact that I did not input the actual batiks I was using into the software. I could have, but didn’t feel the need to do so as I knew I had batiks in the same shades as the colors I was using in the EQ software.

IB April quilt alternative layout

Once I had the pattern designed, the fabric and thread picked out, it was time to get started. This is what the block pattern looks like when it is printed out. It is a large block, so I had to combine 4 pages together to make the paper foundation. You will notice that the pattern is reversed and that is because you put the fabric pieces on the other side and sew on the side with the lines. This was paper pieced and you cover one section of the pattern at a time, add another piece to the back and then sew on the lines. Then you trim with an Add a Quarter ruler and add the next piece. You keep doing this until the paper is covered. This is similar to regular crazy quilting, only regular crazy quilting is usually sewn onto a fabric foundation, like muslin, and the pieces are randomly sewn on. In paper piecing, the angles are random, but they are predetermined in the pattern and normal crazy quilting doesn’t usually have something as organized as the flying geese in this pattern. Later in this blog entry, you will find a link to my YouTube video showing  how I made this quilt. It is a very detailed video on paper piecing and how I added the decorative stitches.

Foundation paper piece pattern

Once I had the blocks all pieced, it was time to get out that beautiful Aurifil Color Builder set called Passionflower. In order for your decorative stitches to stand out, it is necessary to audition the threads on top of the fabric to see if they have enough contrast to stand out. You will see in the next picture that the light blue variegated thread has good contrast with the darker blue fabric.

testing out the thread on the fabric

Once the decorative stitching was applied to the top of the block, using the paper foundation as a stabilizer, it was time to remove the paper from the back of the block. Next, I added the sashing and the borders. Finally, I made a quilt sandwich with the quilt top, Hobbs Thermore batting, and a light blue batik backing fabric. Hobbs Thermore batting is an excellent choice for a table runner as it is a thin batting that lays nice and flat and is easy to quilt on. Here are a couple more closeup pictures of the decorative stitching. The Schmetz Needles I used in this project did a great job of piecing the block and stitching the decorative stitches. It is important to change your needles fairly frequently, especially after you have made a large project or are stitching through paper like I did in this project. You can see in the first photo below that I did some decorative stitching, to the quilt top only, in the middle of the block sections. In photos of the finished project below, you can see that I also applied some decorative stitches to quilt the table runner, along with some stitching in the ditch.

quilt top
quilt top
stitching closeup
stitching closeup
more decorative stitches

Here is the finished crazy quilt table runner. I did simple quilting in the border as I wanted the decorative stitching to be the focal point. 

April Crazy Quilt
April Crazy Quilt

The next photo is showing what the decorative stitching looks like on the blue backing fabric. I wasn’t sure it was going to work by using decorative stitching to quilt some of the quilt, but it worked out fine.

Here are a couple more pictures of the finished table runner.

finished table runner

crazy quilt table runner

table runner close up

For further details, I have a YouTube video about this quilt. 

Here is a link to the YouTube video where you can watch and see more details of how I made the quilt:    Making a Crazy Quilt Table Runner

YouTube video
YouTube video

If you like the video, please be sure to like it, share it with your friends and subscribe so you don’t miss any upcoming videos.

The supplies I used to make this project were provided by:

Island Batik Blue batik fabrics.

Aurifil 50 wt Thread- Passionflower Color Builders Set

Schmetz 70/10 Quilting needle

Hobbs Batting Hobbs Thermore Batting


IB-Aurifil-Schmetz

Hobbs-logo

If you are on TikTok, be sure to check out the video I have posted about the quilt. (Look for Blue Bear Quilts)

Also, please follow me on Instagram (Blue Bear Quilts) as that is where I occasionally have giveaways. 

Blue Bear hopes you like this crazy quilted table runner. Please let him know how much you love it by writing to him in the comments!

The other amazing Island Batik Ambassadors are also posting their April crazy quilt projects.  Check out their projects by clicking on the links next to their names to be directed to their blog posts.

Emily Leachman, The Darling Dogwood

Sarah Pitcher, Pitcher’s Boutique

Claudia Porter, Create with Claudia

Brenda Alburl, Songbird Designs

Elita Sharpe, Busy Needle Quilting

Reed Johnson, Blue Bear Quilts   Thanks for stopping by!

Suzy Webster, Websterquilt

Preeti Harris, Sew Preeti Quilts

Renee Atkinson, Pink Tulip Quilting

Denise Looney, For the Love of Geese

Gail Sheppard, Quilting Gail

Anorina Morris, Samelia’s Mum

Sandra Starley, Textile Time Travels

Susan Deshensky, Lady Blue Quilts

Randi Jones, Randi’s Roost

Brittany Fisher, Bobbin with Brittany

Lisa Pickering, Lisa’s Quilting Passion

Victoria Johnson, Forever Quilting for You

Mania Hatziioannidi, Mania for Quilts

Lana Russel, Lana Quilts

Pamela Boatright, Pamela Quilts

Jennifer Thomas, Curlicue Creations

Maryellen McAuliffe, Mary Mack Made Mine

Leah Malasky, Quilted Delights

Connie Kauffman, Kauffman Designs

#islandbatikambassador #islandbatik #iloveislandbatik #hobbsbatting #aurifil #aurifilthread #schmetzneedles #doyoueq #Janome #electricquilt #eq8 #HancocksofPaducah #fabricsmart


Posted on 10 Comments

Island Batik Ambassador- March 2023 Project- Teal Appeal Quilt- Part of the It’s All Up To You Challenge

Finished Teal Appeal Quilt

The Island Batik Ambassadors are getting creative this month. This month’s challenge is called It’s All Up to You and the Island Batik Ambassadors are free to make whatever project they want using fabrics from Island Batik.  I can’t wait to see what the other ambassadors come up with and I know you are going to see some awesome projects this month. Links to the other Ambassador’s blogs may be found at the bottom of this post.

03 - It's All Up To You
03 – It’s All Up To You


Since I could come up with any project I wanted for March, I decided to design a 2-1/2″ strip quilt pattern using a strip pack from Island Batik. I love teals and the fabric I chose to use is Tantalizing Teal. Just look at this gorgeous collection of blue and green teal batik fabrics. The Tantalizing Teal collection may be found at your local quilt shop that carries Island Batik, such as Fabric Smart in St. Petersburg FL. You may find them online at www.fabric-smart.com or call them at 727-914-8850. Another online option for you to shop for this fabric would be Hancocks of Paducah: Hancocks of Paducah

Tantalizing Teal-SP
Tantalizing Teal-SP


Tantalizing Teal Spread
Teal Appeal Quilt
Teal Appeal Quilt

Here is a closeup of the Tantalizing Teal collection. 


The quilt I made, Teal Appeal, is a large lap sized quilt- 52″ x 52.” This gorgeous quilt has shades of teal blues and greens and is highlighted with black.  This quilt was easy and fun to make. This quilt will be offered as a pattern later this year, after my pattern testers have finished testing it. If you think you would like to be a Blue Bear Quilts pattern tester, please send me an email asking me for information about the group.

I used my Electric Quilt 8 software to design this quilt. The first photo is a version I thought of doing, which is in the genre of a Row By Row Quilt and it really showed all of the different looks you could create from this block. The block is in the second photo.  The block looks complicated, but it really is not. It’s just teal and black 2-1/2″ strips cut into segments.  Then you would use either the Creative Grids Folded Corner Clipper Tool, or the stitch and flip method, to create the half square triangles at the end of teal rectangles. The next six photos are alternate versions of the quilt. They can be made using the same blocks by rotating their orientation. They all had a good shot at being the quilt I would make, but I chose the one I did as I liked the secondary patterns that were created in the quilt.  It had a more modern look. Quilt alternate #6 had a very good shot as a more traditional looking quilt. You would be able to make this one by rotating the blocks differently than they are in the pattern.  Quilt alternate #4 has some white substituted for black. Quilt Alternate #1 has sashing and corner stones to separate the blocks. You may notice that the actual finished quilt looks slightly different that the computer image. This is because you may layout the quilt blocks in any order that is pleasing to you.

Row By Row
Row By Row


block
block
alt 6
alt 6
alt 5
alt 5
alt 4
alt 4
alt 3
alt 3
alt 2
alt 2
alt 1
alt 1

Here is the finished Teal Appeal quilt. The next photo is the teal quilting on the black backing fabric. The black backing fabric really shows off the quilting. The quilting was done by Diane from Quilting in the Harbor. If you would like to send your quilt to her to be quilted, you will find details about her long-arm business on Facebook. 


Finished Teal Appeal Quilt
Finished Teal Appeal Quilt back

This blog post is more about the design process of creating the quilt than it is about the actual making of the quilt. The pattern that is coming out later this year will give specific instructions for how to make the quilt. I also made a YouTube video where I show how I made this quilt. 

Here is a link to the YouTube video if you would like to watch it and see more details of how I made the quilt:    Making the Teal Appeal Quilt

Making the Teal Appeal Quilt


If you like the video, please be sure to like it, share it with your friends and subscribe so you don’t miss any upcoming videos.


The supplies I used to make this project were provided by:

Island Batik Tantalizing Teal collection.

Aurifil 50 wt Thread

Schmetz 70/10 Quilting needle

Hobbs Batting Hobbs Heirloom® Premium 80/20 Black Cotton Blend Batting


IB-Aurifil-Schmetz

Hobbs-logo


If you are on TikTok, be sure to check out the video I have posted of me with the quilt. (Look for Blue Bear Quilts)

Also, please follow me on Instagram (Blue Bear Quilts) as that is where I occasionally have giveaways. 

Blue Bear hopes you like this quilt. Please let him know how much you love the this quilt by writing to him in the comments!

The other amazing Island Batik Ambassadors are also posting their March projects.  Check out their projects by clicking on the links next to their names to be directed to their blog posts.

Emily Leachman, The Darling Dogwood

Sarah Pitcher, Pitcher’s Boutique

Claudia Porter, Create with Claudia

Brenda Alburl, Songbird Designs

Elita Sharpe, Busy Needle Quilting

Reed Johnson, Blue Bear Quilts   Thanks for stopping by!

Suzy Webster, Websterquilt

Preeti Harris, Sew Preeti Quilts

Renee Atkinson, Pink Tulip Quilting

Denise Looney, For the Love of Geese

Gail Sheppard, Quilting Gail

Anorina Morris, Samelia’s Mum

Sandra Starley, Textile Time Travels

Susan Deshensky, Lady Blue Quilts

Randi Jones, Randi’s Roost

Brittany Fisher, Bobbin with Brittany

Lisa Pickering, Lisa’s Quilting Passion

Victoria Johnson, Forever Quilting for You

Mania Hatziioannidi, Mania for Quilts

Lana Russel, Lana Quilts

Pamela Boatright, Pamela Quilts

Jennifer Thomas, Curlicue Creations

Maryellen McAuliffe, Mary Mack Made Mine

Leah Malasky, Quilted Delights

Connie Kauffman, Kauffman Designs

#islandbatikambassador #islandbatik #iloveislandbatik #hobbsbatting #aurifil #aurifilthread #schmetzneedles #doyoueq #Janome #electricquilt #eq8 #creativegrids #HancocksofPaducah #fabricsmart


Posted on 4 Comments

Quilt Block Mania-Happy Sunflowers Block- Complimentary Block Pattern for March 2023

Happy Sunflowers

Hello there! March is a month where we begin to think about spring. We love the springtime when the flowers are in bloom. There are some great blocks with the theme of floral for March 2023. I think sunflowers are one of the happiest flowers and they bring so much joy. Our complimentary block of the month for Quilt Block Mania, during the month of March 2023, Happy Sunflowers Block, is great for making a table runner or small quilt. If you like receiving the complimentary blocks from Quilt Block Mania, please share this with your quilting friends on social media (please ask them to sign up for their own copy) so the designers can continue to do this every month. The designers thank you for your support, through your purchases of other patterns, which allow us to offer these complimentary block patterns each month.

SF Cover
GS Cover

During March 2023, we are offering 20% off two of our spring digital download patterns. They are the Spring Friends Table Runner and The Good Shepherd quilt pattern. The link to these patterns is here: downloadable-patterns/

This is the Happy Sunflowers Block. This block features yellow sunflowers with happy faces on a dark green background with a red heart. I placed the flowers on a dark background to make them pop. You certainly may use a lighter background if you prefer. Also, If you don’t like the faces on the flowers, you may leave them off.

Quilt Block Mania has 27 talented quilt designers creating blocks for this month’s theme- Floral.

Happy Sunflowers
Happy Sunflowers

The Happy Sunflowers Block makes a great 33″ square quilt with a 1″ finished light brown inner border, and sashing, and a 3″ finished green outer border.

HSF Quilt
HSF Quilt

The Happy Sunflowers block also makes a cheery 20″ x 46″ table runner with a 1″ finished light brown inner border, and sashing, and a 3″ finished green outer border. .

HSF TR
HSF TR

How to get the block

If you are new to our website and are interested in downloading a complimentary PDF pattern of our Happy Sunflowers Block for March 2023, all you have to do is look for the box on our blog, on the right hand side, that says “Like this content? Sign up for free updates” and sign up to receive our newsletter. When you have done that, you will receive a welcoming email from us that will contain a coupon code and a link back to the complimentary pattern. You will act as though you are purchasing the pattern and in the cart, you will apply the coupon code, which will make the pattern free. You will need to fill out contact information, but no payment method will be necessary. Don’t worry, we do not send out newsletters very often and we never sell email addresses or contact information. Here is what the pattern looks like. It is in a format very similar to most Blue Bear Quilt patterns, so if you see what you like in this complimentary pattern, you will like our other patterns as well.

Please note: This pattern will only be complimentary during the month of March 2023.

HSF Cover
HSF Cover

Current newsletter subscribers, don’t despair! You will be able to download the complimentary pattern as well. You have already been sent a newsletter on March 7th which gave you the coupon code.

Be sure to follow us on our Instagram page, @bluebearquilts, as that is where we occasionally have giveaways.

As you may be aware, I am an Island Batik Ambassador again for 2023. My February project is a puff quilt and if you have not made one of those yet, they are a lot of fun. My last blog post details how I made it and I also have a YouTube video, on my channel, talking about how I made it. Check out my last blog post to see how I made it.

2023-I'm-An-Island-Batik-Ambassador
2023-I’m-An-Island-Batik-Ambassador
Finished Puff Quilt
Finished Puff Quilt

If you like my February Project, stay tuned for more projects in 2023. I think you are going to like the March project, which is a strip quilt.

Please follow me on social media so you don’t miss a thing.

Also, please check out our Tik Tok and YouTube Channels (Blue Bear Quilts) for more quilting fun and inspiration. Please be sure to follow and subscribe so you don’t miss a thing. And thanks for watching!

We are so happy that you stopped by to visit us in the Quilt Block Mania hop and we hope that you like our block. Please stop by to see all of the other designer’s wonderful blocks.

March-Floral-Quilt-Blocks

You can click on the links to the other blocks here.

Chubby Daisy Quilt block by Carolina Moore
Violet by Inquiring Quilter
Dahlia by Inflorescence Designs
Poppy by Boberry Design Co
Summer Poppies
Coronation Bloomd
Rose of Sharon by QuiltFabrication
Irises by Paleofish Designs
Lavender by Palm Creations
Crocuses at Patti’s Patchwork
Tulip by Penny Spool Quilts
Improv Pansy at Lovingly, Lissa
Daisy by Appliques Quilts and More
Cone Flower
Summer Flower by Crafty Staci
Mother Nature’s Memos
Kaye Collins- Big Blossom
Flower Shop
Star Flower Quilt Block
FPP Flower at The (not so) Dramatic Life
Spring Tulip by Around the Bobbin
Pretty Pot
Happy Sunflowers by Blue Bear Quilts
Poppy by Sallys’ Sewing Circle
Reversible Flower Block | Happy Hippie Studio
Primrose Pinwheels by A Piece of Quiet Quilts
Flower power