Spring is coming! The sun will be shining and those gentle April rains will bring the beautiful May flowers. Our complimentary block of the month for Quilt Block Mania, Spring Posies, will definitely get you in the mood for spring.
During the month of March, we are offering 20% off of our digital download Faith Hope and Love quilt and Spring Friends Table Runner patterns. The link to these patterns is here: downloadable-patterns/
FHL Cover
cover
Quilt Block Mania has more than 25 talented quilt designers creating blocks for this month’s theme of flowers. Here is a picture of the theme colors.
March colors
These colors got my designer mojo going and I was really in the mood for making something fun and springy!
This is the Spring Posies block.
Spring Posies
It features 3 posies, in pink, plum and tomato red on a light grey background. This block is part of our Spring Friends Table Runner pattern and you are able to get a complimentary PDF of the Spring Posies block this month. If you would like to make the Spring Friends Table Runner, you are able to purchase that downloadable pattern at 20% off, or for $9.60 this month. This adorable block, or table runner, is sure to brighten up your home and get you excited for spring.
Here is a photo of the Spring Posies block that has been sewn with fabrics from my stash.
Spring Posies block
spring posies on dark background
This block also looks fantastic set again a dark background. You could turn this block into a pillow. Here it is shown with a tan and green border. Our Wonky Hearts pillow pattern shows you how to turn a 12″ finished block into a pillow cover.
Posie Pillow
Spring Friendsspring bunny on dark background
The Spring Posies Block is part of our Spring Friends Table Runner pattern. Spring Bunny and Spring Chick love that the posies are blooming so, they have adorned themselves with posie wreaths to celebrate. The blocks look awesome set against the dark plum background. Here is a picture of the table runner made with fabrics from my stash. The Spring Friends Table Runner pattern also has templates so that the plum flower can be right facing as well, which allows you to make the table runner longer as in these two examples. It also looks great as a vertical wall hanging.
Spring Friends stash TRSpring Friends Table Runner with pink borderLong Table Runner
Extra long TRSpring Friends Vertical Wall Hanging
If you are new to our website and are interested in downloading a complimentary PDF pattern of our Spring Posies block for March, all you have to do is look for the box on our blog, on the right hand side, that says “Like this content? Sign up for free updates” and sign up to receive our newsletter. When you have done that, you will receive a welcoming email from us that will contain a coupon code and a link back to the complimentary pattern. You will act as though you are purchasing the pattern and in the cart, you will apply the coupon code, which will make the pattern free. You will need to fill out contact information, but no payment method will be necessary. Don’t worry, we do not send out newsletters very often and we never sell email addresses or contact information. Here is what the pattern looks like. It is in a format very similar to most Blue Bear Quilt patterns, so if you see what you like in this free pattern, you will like our other patterns as well.
Please note: This pattern will only be complimentary during the month of March 2021.
SP Cover
Current newsletter subscribers, don’t despair! You will be able to download the complimentary pattern as well as you have already been sent a newsletter on March 2nd which gave you the coupon code.
On our Instagram page, @bluebearquilts, we had our fat quarter bundle giveaway with QT Fabrics and the lucky winner was mamma_sews. Sign up to follow us on Instagram and watch for future giveaways.
We are so happy that you stopped by to visit us in the Quilt Block Mania hop and we hope that you like our block. Please stop by to see all of the other designer’s wonderful blocks.
March Flower Blocks
You can click on the links to the other blocks here.
Over the years, we have created a number of patterns for Accuquilt. I thought it would be fun to share them all in a post. They are all available on their website as a free download. The patterns on their website may be found here: https://www.accuquilt.com/patterns.html
The first pattern that we created for Accuquilt was Hexagon Illusions and it was made by cutting larger hexagons from an ombre fabric and then cutting smaller hexagons from the same section of the fabric and rotating them 180 degrees and appliquéing them onto the larger hexagons.
Hexagon Illusions
Elephant Cuddles was the next pattern and it was made from Minky.
Elephant Cuddles
Holiday Northwoods Medley Placemats are created with a reverse appliqué technique.
Holiday Northwoods Medley Placemats
Lilac Table Topper uses the die that cuts perfect 1″ finished squares.
Lilac Table Topper
Fall Frolic Table Runner was made with beautiful Jinny Beyers Denim fabric from RJR Fabrics.
Fall Frolic Table Runner
Cleapatra’s Garden Gate featured the Cleapatra’s Fan die.
Cleopatra’s Garden Gate
Have you ever heard of crumb quilting? That was the technique used in Spring Medley Mug Rugs. You sew small scraps of fabric together and then apply fusible webbing before cutting out the appliqué shapes on the die. Accuquilt also supplies the embroidery files as a free download on their website.
Spring Medley Mug Rugs
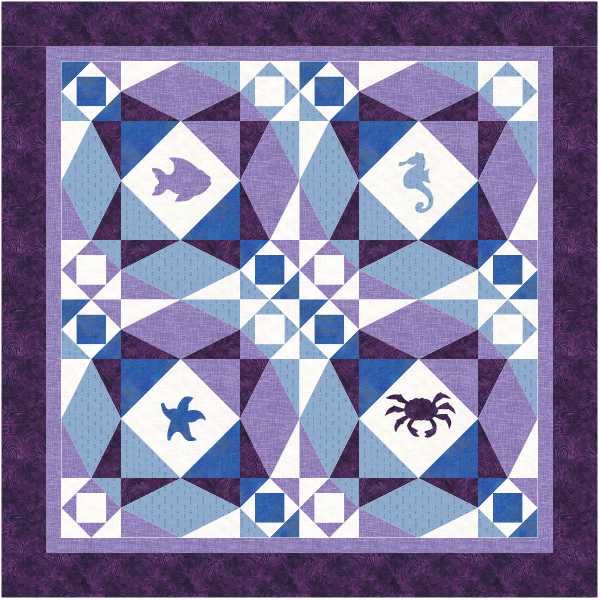
Fun at Sea Life Medley is a great quilt pattern for showcasing your appliqué shapes.
Fun at Sea Life Medley Quilt
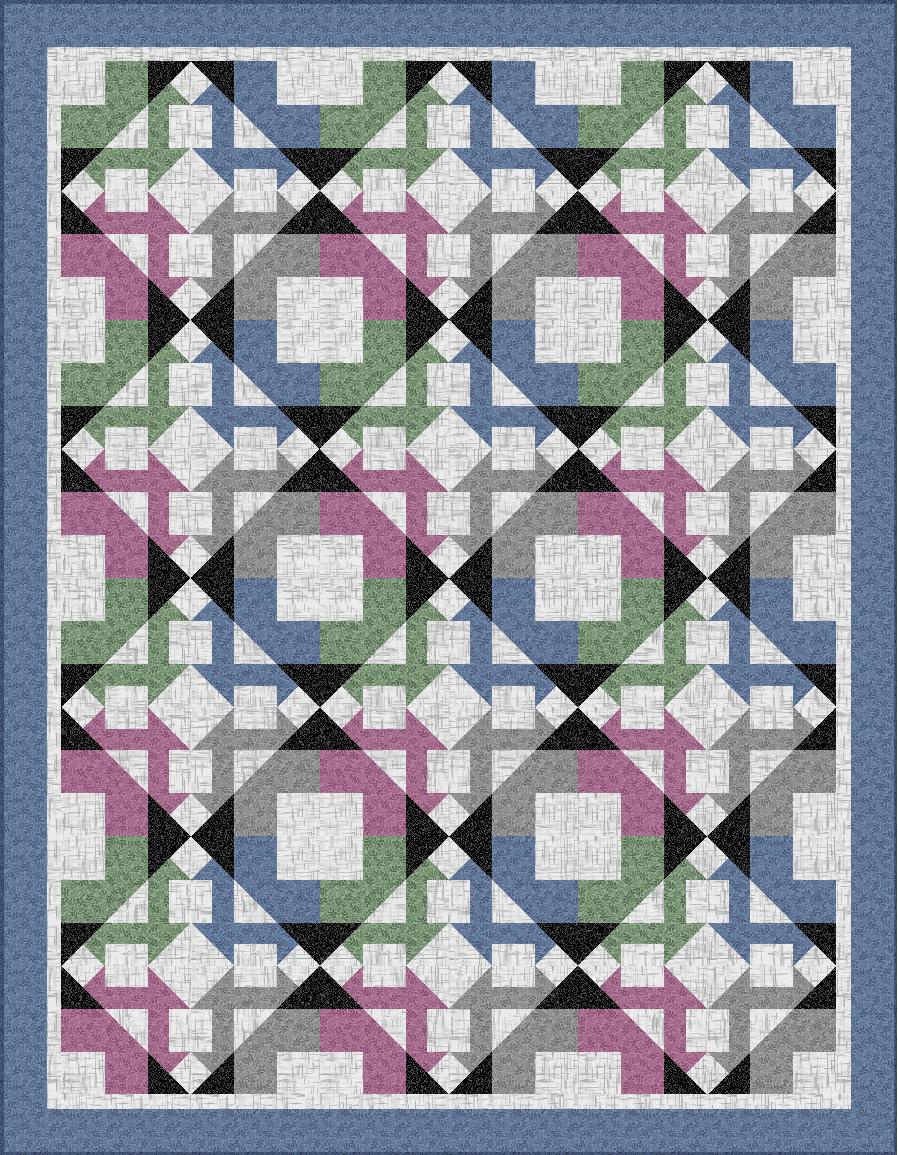
With that same die, we also created Storm at Sea Life Medley.
Storm at Sea Life Medley Quilt
Antique Americana was made using the very versatile Hattie’s Choice die. This patriotic quilt is perfect for the 4th of July, Veteran’s Day or a Quilt of Valor.
Antique Americana
A perfect quilt for a hot summer day would be Orange Cream Soda. It features the Studio Setting Triangles dies.
Orange Cream Soda
A modern take on the Glorified Nine Patch block resulted in Sherbet Dreams.
Sherbet Dreams
Fall is Coming is a great quilt for fall which uses Kimberly Einmo’s Solidish Fabrics from Timeless Treasures Fabrics.
Fall is Coming
Love Letters also used Kimberly Einmo’s Solidish Fabrics from Timeless Treasures Fabrics. This would be a great Valentines quilt.
Love Letters
In the mood to create something scary? Then you might want to make the Boo! Halloween Medley Table Runner.
Boo! Halloween Table Runner
Ahoy Mate and Let’s Go Sailing were created using the GO! Nautical Medley die and is the perfect pattern and die for all of you water lovers.
Ahoy Mate Table Runner
Let’s Go Sailing
The Retro Twist Wall Hanging was made with the Starry Path die. This is the perfect wall hanging for your mid century modern home.
Retro Twist Wall Hanging
The Go! Yuletide Gnome Wall Hanging is a great decoration to make for the holidays. Who doesn’t love a little gnome?
GnomeYuletide Gnome Wall Hanging
Your kids will love the Deco Dino Table Runner.
Deco Dino Table Runner
Stay tuned for more fun and inspiring designs we create for Accuquilt.
It has been a very busy summer, designing new quilt patterns, teaching classes, attending a Niece’s wedding, designing quilt patterns for magazine submissions and entering a contest.
We entered the Accuquilt Block Design contest again this year. They should be announcing the winners very soon. Here are a few of the blocks that I entered this year. Thank you to everyone that voted for my blocks. I appreciate it very much!
X Marks the SpotSnow ConesSea GlassBlue DiamondBig Star Grid.
Before attending a wedding, we went to a family farm, in Northern Minnesota, and I was able to walk across the Mississippi River, in Itasca State Park. This is where the great river originates and it is very narrow and shallow, enabling you to walk across. I would not try that in New Orleans where it is deep and wide. I also saw amazing sunflower fields and llamas.
Reed at start of MississippiCrossing MississippiLlamasSunflower Field
My Niece got married this August in Stillwater, Minnesota. It was beautiful wedding at a flower farm and the rehearsal dinner was on a riverboat. I also went to the Como Park Conservatory, which has amazing floral displays.
Niece and husbandStillwater RiverboatLights at WeddingWedding BouquetHot Air BalloonComo Park ConservatoryVery large hibiscus
Butterfly at flower farm
I taught a Quilt-in-a-Day class on Kylee’s Kite at Bear Patch Quilting Company in White Bear Lake Minnesota. Everyone had a great time. Several students brought in their completed tops from this year and last year.
Kylee’s KiteKylee’s Kite classStudent’s Kylee’s KiteStudent’s Bear in My Watermelon Patch
I can’t reveal the quilt designs for the magazines yet, or several new patterns I developed with QT Fabrics. However, I can show you the Northwoods Holiday Medley Placemats that were designed for Accuquilt and the pattern is available as a free download on their website https://www.accuquilt.com/go-northwoods-medley-holiday-placemats.html
Northwoods Holiday Medley Placemats
I can also show you our latest pattern, Kaleidoscope, that was designed with QT Fabrics. This pattern is available on our website, Craftsy, and coming to a quilt shop near you soon.
Kaleidoscope Quilt
It is going to be a busy fall writing patterns and making a sample quilt for QT Fabrics that will be displayed at quilt market this November, utilizing a new line of fabrics for them.
Also, Blue Bear will be teaching on a cruise in 2020. We are very excited about this and hope to be able to provide you with details soon. When it is this far out, it will give you lots of time to plan and save for a quilting cruise. We are so excited to have the opportunity to quilt and cruise with you! Stay tuned.
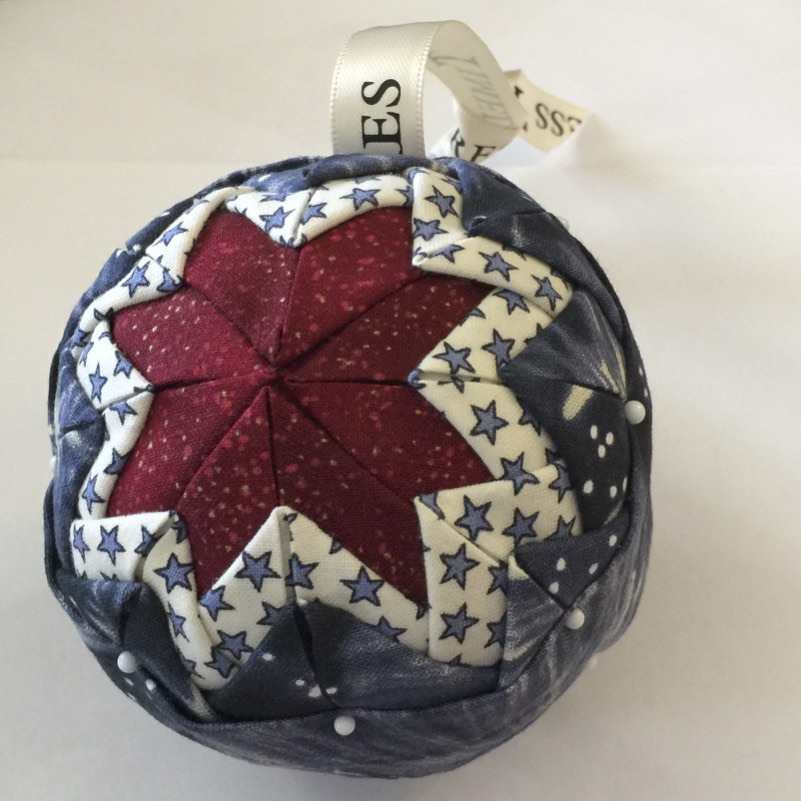
You could make one of these every year year. Keep them for yourself, or give them as a gift. Once you learn the technique, you can put photos on fabric in the middle or use something small that you have cross-stitched or embroidered. Have fun making these as they do not need to be perfect to look fantastic!
Quilted Star Ornament – Supply List
(1) 3” Styrofoam ball
(1) 1/8th yard dark fabric
(1) 1/8th yard light fabric
(1) 1/4th yard 2d dark fabric
(1) box dressmakers pins 1 1/16th inch, at least 300 count
(1) box extra-fine glasshead pins in color of your choice
(1) 1/4th yard decorative silky ribbon to create hanger
Quilted Star Ornament – Preparing Fabric
You need 2.5″ squares of coordinating and contrasting fabric. You will need 3 coordinating fabrics and one of them should be a light color and the other two can be a darker color. Press your fabrics, and then using a cutting mat and rotary cutter, cut 2.5″ strips and then sub-cut the strips into 2.5″ squares. For a 3” Styrofoam ball, you will need 10 squares of the first dark color and 16 squares, each, of the light colored fabric and the 2nd dark colored fabric.
2.5″ squares
Now, it’s time for the pressing of the prairie points. But first, set aside 2 squares from the first dark color, of which you started with 10, that you will not be pressing.
a. Fold the all the rest of the 2.5″ squares in half to make rectangles that are 1.25” x 2.5.” Press with your iron on steam setting. Do not iron, just press.
Half Rectangles
b. Then fold the just made rectangles again to make squares that are 1.25” x 1.25”.
1.25″ folded squares
c. Once you have the small, twice folded, squares, you open them back up to the rectangle and then fold the upper, left and right, corners in to meet the center crease line in the middle of the rectangle. Be precise when lining up the edges to the center; the closer (without overlapping the edges) the better. This makes a neat equilateral triangle (a prairie point) with the folded edges meeting in the center of the front of the triangle. When you have formed the prairie point, you carefully press. Be careful not to burn your fingers. You will end up with 40 small prairie points and 2 squares that have not been pressed.
Prairie PointsPrairie Points close upPrairie Points and squares
Quilted Star Ornament – Pinning the Pieces
To create the quilted look, you pin the prairie points to the foam ball in concentric layers.
Start by placing the two unfolded squares, evenly spaced apart, one at the top and one at the bottom, on the foam. Pin each corner of the squares to the foam and have the corners from each square almost meet each other, evenly spaced apart.
Squares on opposite sides
Round 1 of Prairie Points (1st Dark color that has 8 remaining squares)
Place your first prairie point directly on the 2.5″ square just placed at the top of the foam. Match the wide edge of the prairie point triangle with the corners of the square. Pin the bottom wide corners of the prairie point to the foam, first, and then the upper point. Then pin, to the foam, the upper point of the prairie point in between the two folds, a little below the top edge of the prairie point. You want to place the pin right in the creased edge of the fold so that the fold will cover it. Pull the folded flaps over this pin to hide it. When finished with a prairie point, the two pins at the bottom of the triangle will be showing and the pin at the upper point will be covered by the folded edges.
First Prairie Point
Using the same method, complete the second prairie point directly across from the first one. The upper points of these two prairie points will meet in the middle of the unfolded square on the foam ball.
Second Prairie Point
Using the same method, place the 3rd prairie point in the empty space beside the two just placed prairie points.
Pin the 4th prairie point in the remaining open space on the unfolded square to finish this round. You will have 4 prairie points in the center of the foam ball and all points should match up and not be overlapping each other at the center. They may overlap each other a little at the bottom of the prairie points. You will repeat this process on the opposite side of the ball and can do so now or after you have finished all 3 rounds on the top first.
Completed Round 1 on one side
Round 2 of Prairie Points (Light color that has 16 squares)
In this next round, you can decide how large you want your center star to be by deciding how much of the first round you want to leave showing. A good approximation is to start the 2nd round about ½” below the top of the first round. You should be able to fit 3 rounds without using more than half of the foam ball’s space.
To start round two, this time, place the prairie point’s upper point pin in first, right in the middle of the fold line of the first prairie point, from the previous round, about ½” from the top of the round 1 prairie point and then pin down the outer corners of the prairie point. It helps to put a pin anywhere on the prairie point, while pinning this center point first, and then remove this temporary pin. Use the same technique from round 1 of placing the upper point pin between the two folds a little below the top edge of the prairie point and pull the folded flaps over the upper point pin to hide it. Then pin the outside corners of the prairie point. These outside corners will overlap each other.
Round 2, 1st Prairie Point
Place the second prairie point, of round 2, completely opposite of the one placed in # 2 above. Just like last time, pin the center, hide the pin, and then pin the corners of the prairie point.
Using the same method, place the third prairie point, of round 2, 90 degrees from prairie points 1 and 2 just created.
Using the same method, place the 4th prairie point, of round 2, directly opposite of the piece created in # 4 above.
Now there are 4 long sections of the first round (dark color) that are exposed and are creating an “x.”
Round 2 “X”
You will now be placing a prairie point in each of the legs of that “x.” Place a 5th light color prairie point in one of the areas not covered by the previous 4 pieces from round 2. Place this prairie point in the line formed where the edges of the round 1 prairie points meet and just slightly below the level where the previous 4 round 2 prairie points were placed.
Round 2, 5th Prairie Point
You are adding another layer to round 2, of the same color, and are now going to start forming your star. Just like before, pin the center point, hide the pin, and then pin the corners of the prairie point.
Place the 6th prairie point completely opposite of the one placed in # 6 above.
Place the 7th prairie point 90 degrees from pieces 6 and 7 above.
Place the 8th prairie point directly opposite piece # 8. You will now see your first star formed from the dark color of round 1.
Completed Round 2 on one side
Round 3 of Prairie Points (2d Dark color that has 16 squares)
Now you will place a third round of prairie points on top of round 2. Start with the first prairie point that you placed in round two and going about ½” from the upper point of the round 2 prairie point, place the point pin of the round 3 prairie point first, in the folds of the round 2 prairie point, just like you did for the last round, and then pin down the outer corners of the round 3 prairie point.
Round 3, 1st Prairie Point
Place the second prairie point completely opposite the one in # 1 above.
Place the third prairie point 90 degrees from the prairie points created in # 1 and 2 above.
Place the fourth prairie point directly opposite of prairie point # 3 above.
Now there are 4 prairie points of the second round (light color) that are not covered by round 3. You will next place a prairie point in each of those 4 prairie points. Place a 5th dark color prairie point in one of the areas not covered by the previous 4 pieces from round 3. Place this prairie point in the center line of the round 2 prairie point and just slightly below the level where the previous 4 round 3 prairie points were placed. You are adding another layer to round 3, of the same color, and are now going to start forming your second star. Just like before, pin the upper center point, hide the pin, and then pin the corners of the prairie point.
Round 3, 5th Prairie Point
Place the 6th prairie point completely opposite of the one created in # 5 above.
Place the 7th prairie point 90 degrees from prairie points # 5 and 6 from above.
Place the 8th prairie point directly opposite of the one created in # 7. You will now see your second star.
Completed Round 3 on one side
Optionally, If you have room for another layer without going over the half way point of the foam ball, switch colors and repeat steps from round 3. You would need to cut 16 additional 2.5” squares of the new color.
When finished with one side of the foam ball, flip over the ornament and repeat all steps. If you repeated each round on the opposite side as you went, this step is already completed.
Quilted Star Ornament – Finishing Steps
Where the top and bottom edges meet is where you will place a fabric strip or ribbon. Usually the edges don’t match up perfectly. You can make the fabric strip the width needed to make sure you cover it all. Notice my edges and how at one spot the prairie points overlap each other and in another spot there is a gap.
Ornament Unfinished Edge
Finishing the Ornament
If you used a different sized ball, wrap a measuring tape around the ornament to determine the size of ribbon or fabric needed to cover the edge. For the 3” foam ball, I used a 12″ x 2.5” strip of fabric. You can use whatever color of fabric you want, but if you used the same fabric as in the round three prairie points, it will create a more harmonious look.
Coordinating Fabric Strip
Fold the strip in half, wrong sides together and press. Open the strip and fold both long edges of the strip toward the center line so that they meet in the center and then press. Fold each end of the strip in about a ½ “ and press. You end up with a 1.25″ finished strip to wrap around the ornament.
Determine the top of your ornament, if you have a preference. Wrap the fabric strip around the edge of your ornament and secure with the glass head pins at the intersections of the prairie points. When you come to the top, lay your hanger ribbon under the fabric strip and secure the ribbon and fabric strip to the ornament with four glass head pins. Tie your hanger ribbon in a knot at the top.
Attaching Strip and Ribbon
Optionally, you can attach the fabric strip and the hanger ribbon with a glue gun, if you prefer.
Keep in mind this is a handmade item and is not going to be perfect. The imperfections are what make it unique and special. There are no rules for the colors that are used or the spacing used between the rounds. Make it yours! You can make these into hanging ornaments, or decorative balls to place in a bowl or basket. The first round does not need to be prairie points. You can substitute a photo on fabric for the center square, or use a small piece of cross-stitch or embroidery as the center. To do this, you would skip the placement of the round one prairie points and start with round two after you have placed your photo or needlework.
Your ornament is ready to hang on your tree or give as a gift.
Folded Fabric Star Ornament
Please let me know if you have any questions and please share any ornaments that you make with the hashtag #bluebearquilts.
Happy 4th of July America. This is a patriotic home in Whitefish Bay Wisconsin.
Patriotic House
Blue Bear is taking some time off to celebrate with his family. He has been working on several new patterns to be released soon. A couple are patriotic and use fabrics designed for Quilts of Valor. Another is a bed runner that he is designing.
Happy Memorial Day from Blue Bear Quilt Kits. Blue Bear salutes all those who have served our country. Thank you for your service. He hopes everyone is having a great weekend with their families.
A great Valentine’s quilt kit and pattern coming soon to Blue Bear Quilt Kits & More. It is called A Box of Chocolate Covered Cherries. It looks delicious.