Posted on Leave a comment

Week 9- Block of the Week- Nebraska Windmill Block

Nebraska Windmill Block

We have another fun block of the week. This time we discovered the Nebraska Windmill Block.

Nebraska Windmill Block

We discovered this block on the National Park Service’s board regarding a Quilt Discovery Experience. You can see this block and others here: https://www.nps.gov/home/planyourvisit/quilt-discovery-experience.htm

Here is what the National Park Service had to say about this block, which they called Nebraska Pinwheel: “Wheels represent movement. The pioneers depended on wheels to carry them across the plains.

For the homesteaders, wheels were vital to their lives. They were the basis of their transportation. Wheels were used in sawmills and in gristmills where grain was ground into flour or meal.

In the early 1900’s, windmills pumped water for livestock and made life on the homestead easier. Because of its importance to the homesteaders in their everyday lives, the wheel was often a favorite quilt pattern.

When the United States entered World War I in 1917, quilt making took on new significance. The government took all the wool produced for commercial use, and actively urged citizens to make quilts using the slogan, “Make Quilts-Save the Blankets for our Boys Over There.” As a result, many utilitarian quilts for home use were made. These quilts soon earned the nickname of, “Liberty Quilts.”


The block originated in 1977 with the Lincoln Quilters Guild. Here is what they have said about it: “In 1977, The Lincoln Quilters Guild (LQG) sponsored a contest to select a quilt block to honor the State of Nebraska. The contest was in conjunction with Quilt Symposium ’77: Fine Art, Folk Art, planned & hosted by LQG. The 85th Nebraska State Legislature passed Legislative Resolution Number One in January 1977 to designate the winning block as the Official Nebraska Block. The winning block, Nebraska Windmill, was designed by E.S. “Bud” Dunklau of Lincoln, NE. Bud & Carol Dunklau gave the original block pattern & rights to the pattern to LQG. LQG gave the original cloth block to the Nebraska State Historical Society.”

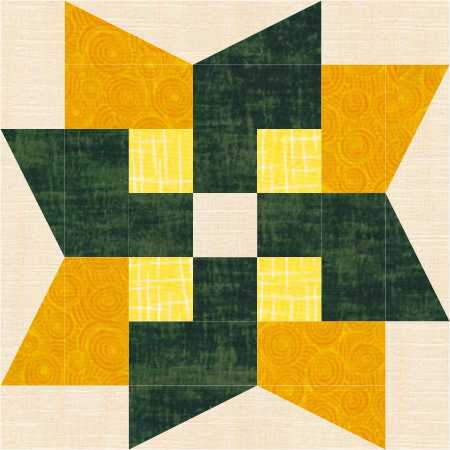
You can clearly see why the block became the official state block, as the green windmill blades, in my example, look like the shape of the state of Nebraska. Here is a slightly different coloring of the block.

Alternate Nebraska Windmill Block


You can create a striking quilt by just laying the blocks out in a horizontal layout.

Horizontal Quilt
Horizontal Quilt

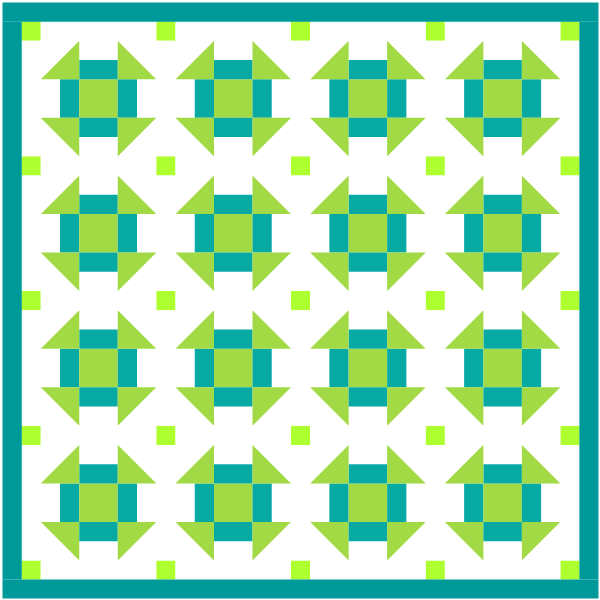
The quilt takes on a different look when you add sashing and use the alternative coloring of the block.

Quilt with sashing
Quilt with sashing

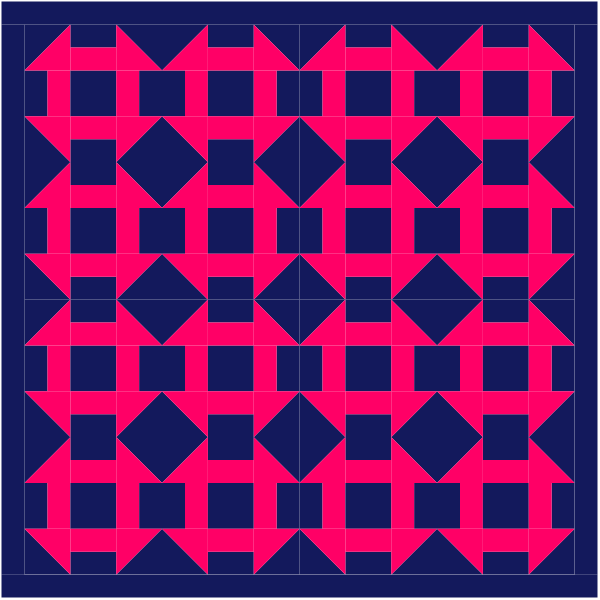
Here are a few more quilt layouts for this block.

Quilt with alternate coloring
Quilt with half square triangle
Quilt with half square triangles
Quilt with four patch


Quilt with alternate bear paw block


Quilt on point
Quilt on point


This block is fairly easy to cut out and sew together. You will have to see what creation you can come up using the Nebraska Windmill block. Post a picture on Instagram, or Facebook, and tag it with #BlueBearQuilts so we can see your creations.

Posted on Leave a comment

Week 8- January 15, 2018- Block of the Week- Churn Dash

Block of the week is back and this week’s block is a favorite among quilters. It is the churn dash.

Churn Dash Block
Churn Dash Block


It originated in the early 1800’s. It is called churn dash as the outside rounded corners look like the outside of a butter churn

and the center square looks like the wooden dash that went into the center of the churn to make the butter by pounding the dash

up and down in the churn. It is a favorite among quilters as it is fairly easy, using only a square, rectangles and triangles.

It makes a beautiful quilt.

Churn Dash Quilt
Churn Dash Quilt

Accuquilt makes it super easy to make this block with their 9″ Churn Dash die.

Accuquilt Churn Dash


The churn dash pattern has many, many different names and variations of construction, such as the Shoo Fly and Double Monkey Wrench.

Let’s take a look at how some quilters have put a modern spin on a churn dash quilt.

It could be a red and white quilt as was done by Amy Smart.

Red White Churn Dash Quilt

Or a blue and white as created by Material Girl Quilts

Blue White Churn Dash Quilt


This quilt is absolutely gorgeous turned on point.

On Point Churn Dash
On Point Churn Dash by Pat Speth.

How about something big and bold like this coloring of the quilt?

Bold Churn Dash
Bold Churn Dash

You can also piece some of the shapes in the block for a modern effect, like this colorful 4-patch center and pieced rectangles in Nut by The Happy Zombie.


or add flying geese to the rectangles as was done by Blue Ridge Girl in this modern interpretation of the churn dash block.

Flying Geese Churn Dash

Finally, you could alternate the churn dash with another block

such as the 9-patch for a very striking and modern quilt created by Mary Manson or


make the block wonky like this one made by Jennifer Dick of 42 Quilts.

Wonky Churn
Wonky Churn


I hope this has inspired you to try some new things for putting a modern spin on the old time favorite churn dash block.

Posted on Leave a comment

Week 7- September 26, 2016- Block of the Week- Log Cabin- Part 2

As we discussed in Part 1 last week, this is a excellent block for beginning quilters to learn how to quilt. It is the pattern that I used when I was first learning to quilt. The most recommended book to make this pattern is “Make a Quilt in a Day- Log Cabin Pattern” by Eleanor Burns. So many people, including me, have used this book to make their first quilt. Thus, Quilt in a Day and Eleanor Burns are endeared to many quilter’s. Eleanor was a school teacher and her patterns are clearly written and easy to follow. The book is pictured in the photo below.


Quilt in a Day Log Cabin Pattern
Log Cabin Pattern

One helpful tool that the book contains is a paste-up sheet, where you lay out all of your fabric samples to see if you have a good mixture of lights and darks. An additional trick that I learned was to photocopy this sheet with the fabrics on it as it will highlight the contrasting tonal values for you. Here is a photo of the paste-up sheet that I  did for my first quilt and a photo of it photocopied. To obtain the desired pattern effects, you want a strong contrast between the lights and darks. Remember this was my first quilt and I now see that I could have done a better job of making a stronger contrast between the lights and darks. Today, I  would have made the pink center square darker and the two outer light colors lighter. This palette with the floral fabrics created a very country look and today I would most likely shy away from that as well. This quilt pattern is also good for a beginner as you can quilt it yourself by quilting straight stitches in the ditch.

Color Paste-up sheet
Copier Paste-up sheet


This pattern is very versatile and can result is many different looks, depending on how you rotate the blocks. Let’s take a look at the traditional quilt from last week laid out 8 different ways. Depending on the fabrics you use and the layout, this traditional pattern can take on a modern look. I think that Whirligig and Navajo have a more modern spin to them.

Barn Raising Layout
Barn Raising Layout
Whirligig Layout
Whirligig Layout
Cross Hatch Layout
Cross Hatch Layout
Positive/Negative Layout
Stained Glass Layout
Fields and Furrows Layout
Navajo Layout
Navajo Layout
Dark with Light Layout

My favorite is “Positive/Negative” as I love how the lights and darks create a a dimensional feel to the pattern. Which one is your favorite?

Positive/Negative Layout

Next week, we will look at the Wild Geese Block which can create some fun modern patterns.

Posted on Leave a comment

Week 6- September 19, 2016- Block of the Week- Log Cabin- Part 1

Today we are going to look at the log cabin block. This is the quintessential beginner quilt block because it is so easy. All you have to do is sew strips together and cut various sized units. Those units keep getting sewn to another strip and then cut again. Here is what the block traditionally looks like.

Log Cabin Block
Log Cabin Block

You will note that there is a red center with light fabrics on the left side and dark fabrics on the right side. The red center is thought to be the fireplace of the cabin, and the light side is the sun shining on the cabin, or goodness, and the dark side is thought to be shadows on the house, or sadness. Sometimes this quilt is called Sunshine and Shadows depending on how the blocks are arranged. The next photo shows how this quilt is traditionally laid out.

Traditional Log Cabin Quilt

Here is an excellent video animation by Judit Hajdu showing how to strip piece this quilt. https://youtu.be/ZayIGmzkMmo

Next week will feature part 2 on the log cabin block and showcase how many different quilts one can create depending on how the blocks are arranged.

Posted on Leave a comment

Week 5-Block of the Week- September 12, 2016- God’s Eye Block

There are many blocks which have names related to things or events in the Bible. Today’s block, God’s Eye, would be one of the them.

God's Eye Block
God’s Eye Block

Others would be Jacob’s Ladder, Crown of Thorns, Joseph’s Coat, Ruins of Jericho, Star of Bethlehem and many others. Quilts with Biblical names can be reassuring to those that are devoted to God and quilts have often been used as burial shrouds and it is comforting to families to have their loved one wrapped in a quilt with a Biblical theme. Many other quilt blocks with a square eye in the middle have been called “God’s Eye.” The yarn “God’s Eye” is a popular kids craft where two sticks make a cross and then different colored yarns are wrapped around the sticks concentrically.


The block is made up of a 4 x 4 grid, with smaller 4 x 4 grids contained therein. The smaller grids are composed with squares and half square triangles. Although there are many pieces in this block (88), it would still be a fairly easy block for a beginning quilter. This block is usually composed with four colors, 2 lights and 2 darks. Below is an example of  a 16 block quilt made up of God’s Eye blocks.

God's Eye Quilt
God’s Eye Quilt


This quilt can be very striking when made from scrappy fabrics, such as the quilt below.

God's Eye Scrappy Quilt
God’s Eye Scrappy Quilt


Stay tuned for next week’s block, which will be the Log Cabin, a great block for a beginner to learn to quilt.

Posted on Leave a comment

Quilt Block of the Week- September 5, 2016

Week 4- September 5, 2016

Jacob’s Ladder


Happy Labor Day. I hope everyone is enjoying their time off with their families.

This week’s block is the Jacob’s Ladder. It has a Biblical reference as it refers to the story of Jacob found in Genesis 28: 10-12. The block also has many other names such as “Road To California, “Double Hour Glass” and “Covered Wagon,” suggesting that they were popular with the early pioneers headed west. Here is an example of what the block historically looked like.

Traditional Jacob's Ladder Quilt Block
Traditional Jacob’s Ladder Quilt Block

Notice that the block is a nine patch construction, which was discussed in a previous post, containing 5 four patch blocks, also discussed in a previous post, and 4 new blocks that are called half square triangles (HST.) See example below. This block is documented as having been made into a quilt at the beginning of the 20th century. It was originally made with two contrasting colors, a light and a dark. The block often has another name, ” Underground Railroad,” associated with it, but it has not been documented that this block existed around the time of pre Civil War, when the Underground Railroad was happening, and may have gotten the name later as a remembrance.

Example of half square triangle

This is an excellent block for a novice quilter as sewing the HSTs together is easy as you just have to sew two triangles together. It can be a little tricky to get those points on the end to match up, so one of my favorite tools to create the Jacob’s Ladder patches is my Accuquilt Fabric Cutter. It precision die cuts the pieces so they are perfectly cut. On the triangles, it cuts off the dog ears (the points that stick out) so that the ends are easy to align. Here is a link to the Accuquilt website, where you will find the fabric cutters and lots of fun dies. http://www.accuquilt.com.

Two “Go! Dies” that could be used to make this block are the 2.5″ square and the 2″ finished half square triangle.  You will notice that the dies are two-tone, making it easy for you to place the fabric on the die. Then you place a plastic mat over the fabric and run the die, with the fabric and mat on it, through the cutter. There are manual and electric fabric cutters. Here is a picture of a “Go! Fabric Cutter” and the square and triangle dies. (Click on the thumbnails to make the pictures larger.) They are frequently on sale.


Continue reading Quilt Block of the Week- September 5, 2016

Posted on Leave a comment

Quilt Block of the Week- August 29, 2016

Week 3- August 29, 2016

Double Nine Patch

Double Nine Patch Block

In order to create a double nine patch, we need to know what a nine patch is first. it is a block that contains a 3 x 3 grid. Normally there is a combination of light and dark fabrics. Here is an example of the basic nine patch block.

Basic Nine Patch Block

Notice how there are nine “patches” that are the same size. There is a combination of light yellow with the dark navy blue. The yellow is forming a cross and the navy is forming an “x” in the middle. All of these patches can be anywise, but typically they are divisible by 3, so the overall block size is usually 6, 9 or 12 inches. This block is popular with beginning quilters as it involves straight sewing and matching of a couple of seams. It is also an easy block to select color fabrics as you only need two, consisting of a light and dark. This block also makes a great scrap quilt as each of the navy squares in the example could be a different piece of fabric. This is also an easy jelly roll quilt as to contract the blocks, you sew 2.5″ strips of dark, light, dark together and strips of light, dark, light together and then cut them at 2.5″ intervals. Then you take two of the dark, light, dark units and piece them together with a light, dark, light unit in the middle. Here is what a quilt would look like using this block, and then using the block alternating with plain navy squares.

basic nine patch quilt
Basic Nine Patch Quilt


Variation Nine Patch Quilt

Continue reading Quilt Block of the Week- August 29, 2016

Posted on Leave a comment

Quilt Block of the Week- August 22, 2016

Week 2 – August 22, 2016

The Double Four Patch

double four patch
Double Four Patch

The name comes from the fact that there are two smaller four patches contained in this block. While four patch is in the name, “four patch” also describes the type of block construction.  

Notice that there are two four patches and two plain squares. When these four units are combined together, they create a larger four patch, containing two smaller four patches, and you notice a lovely chain effect happening. The smaller four patch units could be made from strips or jelly rolls. This is an excellent block to use up scraps as each one of the colored squares could be a different color fabric creating a wonderful scrappy look.


Due to its simplicity, this block is an excellent block for beginning quilters and it can create a gorgeous quilt as you can see in the diagram below. This quilt contains 64 blocks- 8 across and 8 down.

double four patch quilt
Double Four Patch Quilt

Next Week’s Block of the Week will be the Double Nine Patch.

Posted on Leave a comment

Quilt Block of the Week- August 15, 2016


Quilt Block of the Week.

We will feature a quilt block of the week. You will be able to find them all grouped together in the page tab on the right side of the blog. We will have an example of the block and how it looks in a quilt and tell you a little about the history of the block, if known.


Week 1- August 15, 2016


Most Basic Block- Mother of all Quilt Blocks- The Basic Four Patch

This has to be the easiest of all quilt blocks. This is an excellent block for a beginning quilter to start with due to its straight sewing and simplicity. Here is what the block looks like.

4 patch block
Four Patch Block

To enhance the pattern, light and dark patches are alternated. It is called the four patch as it is composed of four patches. I believe that it was first identified by Carrie Hall in 1935. This block is a good one for thrifty quilters as it allows small scraps of fabric to be sewn together. The squares in the example above are 2″ by 2.”

Four patch is also the style, or basic grid-work, of a block when four similar units are combined together to form a larger four patch block, similar to the example below.

4 patch grid block example

Here is how the 4-patch block looks in a quilt. It creates a checkerboard pattern when it is not combined with any other blocks. For this reason, this block is sometimes called checkerboard as well. This quilt is good for placing appliqué and/or quilting designs in the square blocks and borders.

4-Patch Block Quilt
4-Patch Block Quilt


Next week, we will talk about the Double Four Patch Quilt Block.